


Group
Admin Groups
Purpose:
This master plays a key role in defining and managing all authorizations within the Semsto system. Using this module, the admin can create multiple access groups and assign specific permissions to each group based on their responsibilities in the organization.
Every company has different departments such as HR, Admin, Accounts, Sales, Operations and Support. Each department requires access only to the modules and features relevant to their work. This master ensures that every employee receives the correct level of access, improving data security, preventing unauthorized actions and enabling smooth workflow management.
- The Accounts team may need access to Finance modules like Expense Entry, Budgets, Vendor Payments and Invoices, but they should not access employee performance or onboarding details.
- The HR team needs access to Employee Records, Attendance, Leave Management, Appraisal and Onboarding modules, but should not access financial settings or company-wide payment data.
- The Admin team may need access to all masters, configuration settings and system-level controls.
- The Sales or CRM team may require access only to Leads, Clients, Follow-ups and Revenue-related modules.
- Create groups based on departments or job roles
- Assign fine-grained permissions such as View, Add, Edit and Delete
- Enable or restrict access to each module, submenu and feature
- Maintain complete control over who can see, edit or manage specific data
- Ensure that every user works within the boundaries defined for their role
This master provides a centralized and secure way to manage user permissions across the entire Semsto solution, ensuring compliance, accountability and operational efficiency.
Who Can Use This
Only users with high-level administrative privileges such as Super Admin, System Admin, or IT Administrator can access this master. These users are responsible for creating access groups, assigning permissions and controlling what each department or employee is allowed to view or perform within the Semsto system.
How To Access:
Top Right Corner Setting Icon → Administration Section → Groups
Detailed Explanation of Terms Used in the Admin Group Master
-
Group Name
The Group Name is the title you give to a permission group. When you create multiple groups, each one should have a meaningful name that clearly shows what type of access it provides.
Why it is important
A proper group name helps admins quickly understand:
- What the group is meant for
- Which department or role will use it
- What kind of permissions it includes
Example
If you are creating a permission group for the Finance Department and giving access only to finance-related modules, suitable names could be:
- Finance Manager
- Account Manager
- Senior Accountant
- Budget Team
This helps everyone immediately understand the purpose of the group.
-
Group Short Name
The Group Short Name is a shorter version of the main group name. It appears in the top-left switch panel where users can switch between Admin View and Employee View.
Why it is useful
Some users have dual roles.
Example
- A person may be an Admin, but they also work as an Employee.
- They need access to both roles.
By using the short name, they can quickly identify and switch between:
- EMP (Employee view)
- ADM (Admin view)
- FIN (Finance view), etc.
Example
If the Group Name is Finance Manager, then the Short Name could be:
- FIN-MGR
- FIN
- ACC-M
It keeps the view clean and makes switching faster.

See above screenshot, its reflected in the top red marked area to mention name and switch view among admin and employee and this is display only to user who worked as both employee and admin.
-
Group User Type
This setting tells whether the group is created for:
- Admin users, or
- Employee users.
Why this matters
Based on this selection, the system shows only those modules that are allowed for that type of user.
Types
-
Admin User
Choose this if the group is meant for users who manage system settings or master configurations.
- Admin-only modules (example: Configuration) will be visible.
- Regular employee modules may or may not be shown.
-
Employee User
Choose this if the group is meant for normal staff members.
- Admin modules will NOT be shown.
- Only operational modules (Attendance, CRM, Projects, etc.) will appear.
Example
If you select Employee User, the Configuration module (which is only for admins) will not show in the permission list.
This prevents accidental access to sensitive system settings.
-
Permission Type
Permission Types define what actions users inside that group are allowed to perform within each module.
Each module may have different options, but the most common ones are:
- Add Allows the user to create new entries in that module.
Example:
If “Add” is enabled for the Purchase Module, the user can create a new Purchase Order.
- Edit Allows the user to modify existing records.
Example:
If “Edit” is enabled, the user can update details of a previously added Purchase.
- Delete Allows the user to remove existing entries.
Example:
If “Delete” is enabled in the Purchase module, the user can delete a purchase entry.
- Other Permissions Depending on the module, additional
permissions may appear, such as:
- Allow Change Sale Price
- Payment Permission
- Approved Permission
- Etc..
These provide more control and allow very specific access levels.
- Add Allows the user to create new entries in that module.
In Simple Words
You can think of the Admin Group Master as a tool to define who can do what inside Semsto.
- Group Name → What is this group called?
- Group Short Name → How will it appear for quick switching?
- Group User Type → Is it for Admins or Employees?
- Permission Type → What actions are allowed inside each module?
This ensures every person only sees and uses the parts of Semsto relevant to their job, keeping data secure and the system well-organized.
Group List
Below is a group list screen.
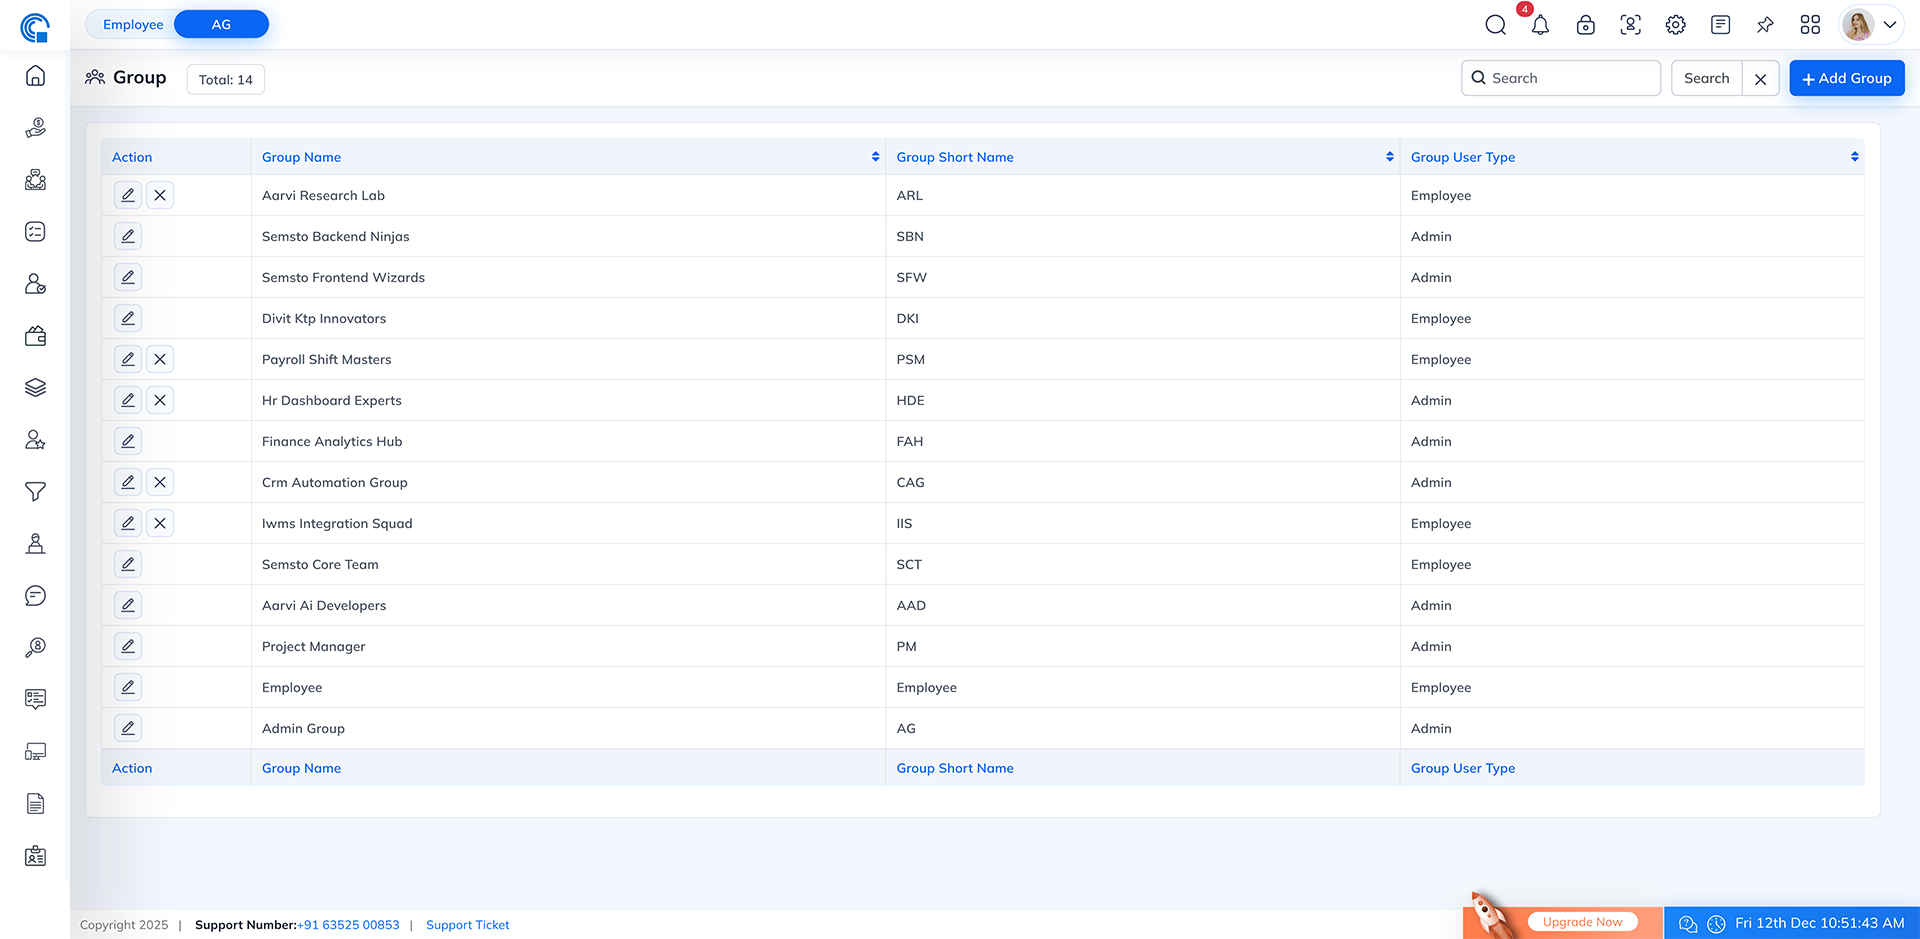
- Total Groups Count Shows how many groups are created in the system, giving a quick overview of your permission structure.
- Smart Search Use the search bar to instantly locate groups by typing either their full name or short name.
- Add New Group Click the “Add Group” button to create a new permission group. You can set group details and assign permissions from this section.
- Group Details Table The table lists all groups with
three important columns:
- Group Name
- Group Short Name
- Group User Type
The Action column allows you to edit group settings or remove a group if required.
Add New Group
The Add Group screen allows administrators to create permission groups and define what each group can access inside Semsto. This setup helps ensure that employees only view and use modules relevant to their role.
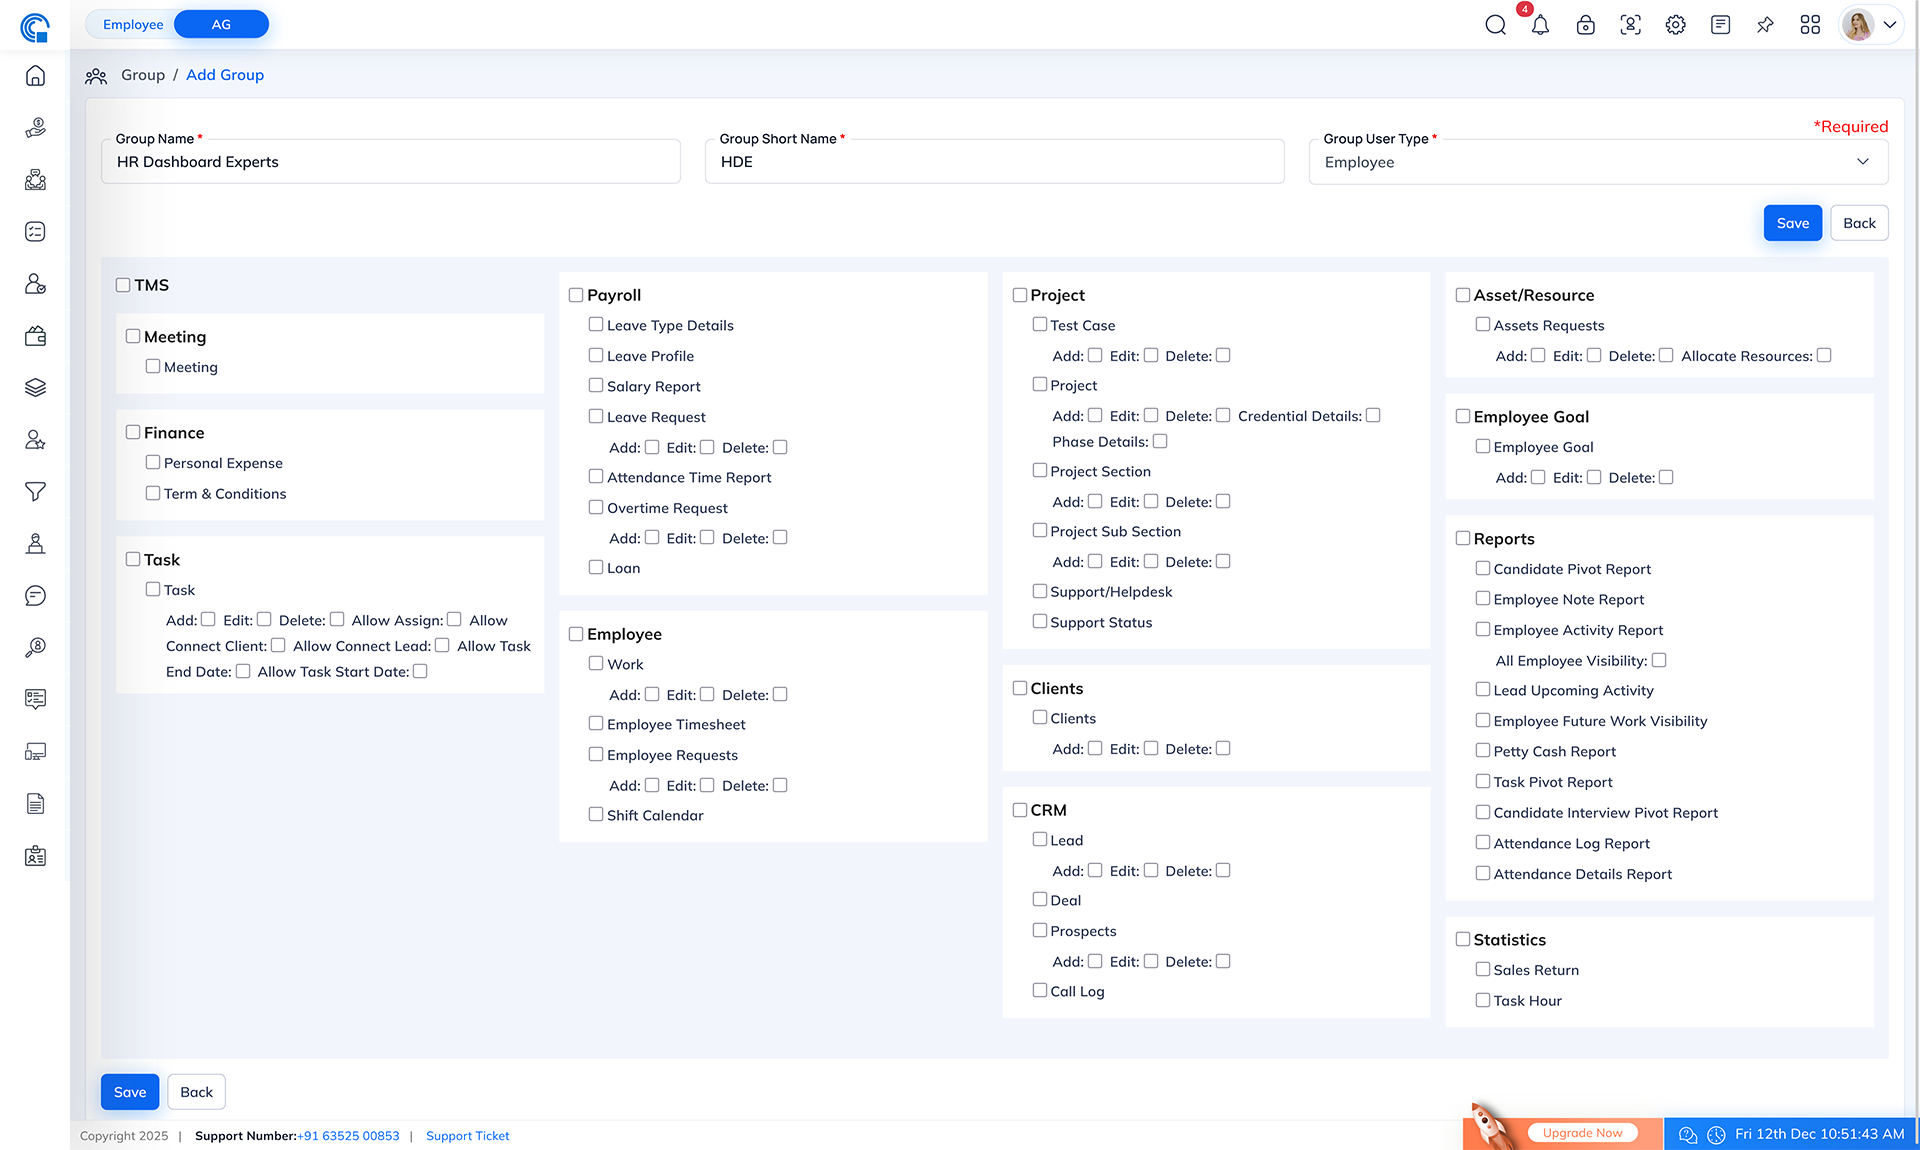
Page Overview
When you open the Add Group page, you will see two main sections:
- Group Information Section: (Top area) Used for entering Group Name, Group Short Name and Group User Type.
- Permission Assignment Section: (Bottom area)
Displays all modules and features available for the selected user type. Here you can assign
View/Add/Edit/Delete and other module-specific permissions.
Once you select the Group User Type, the system automatically loads modules available for that type.
The screen displays:
- Module Name (e.g., CRM, Finance, HR, Projects)
- Sub-modules (e.g., Leads, Attendance, Invoices, Tasks)
- Permission Types (checkboxes)
Common Permission Types
- View - Allows user to see the module
- Add - Allows creating new records
- Edit - Allows modifying existing records
- Delete - Allows removing records
- Module-specific permissions
-
Finance
-
Payment Permission
Applied To
- Sales
- Purchase
- Sales Return
- Purchase Return
What this permission does When to Enable When to Disable System Behavior When Disabled This controls whether the user is allowed to receive payment for a sales/purchase transaction.
- When enabled, the user can:
- Approve petty cash requests
- Issue cash to employees
- Record the given amount in the system
- Track pending settlements
- View history of issued petty cash
- When to Enable, the user can:
- Collect payment against an Invoice
- Record cash, online, cheque, or bank payments
- Mark invoices as partially or fully paid
- View payment history
Enable for:
- Cashiers
- Account Executive
- Store In-charge
- Sales Manager (if allowed to collect payment)
Disable this permission if:
- The user should only create sales invoices but not collect payments
- You want segregation of duties between Sales and Accounts
- You want only finance team members to handle money
If this permission is turned OFF, the user will:
- Not see the “Receive Payment” option
- Not be able to mark any invoice as paid
- Only be able to view the sales invoice but cannot record payment
Purpose:
Provides strong financial control and prevents unauthorized payment handling.
-
Payment Permission for Petty Cash
What this permission does When to Enable When to Disable System Behavior When Disabled The Petty Cash module has an additional permission that controls whether a user can issue petty cash payments to other team members for small expenses. This permission helps maintain transparency and accountability for day-to-day cash handling.
- When enabled, the user can:
- Approve petty cash requests
- Issue cash to employees
- Record the given amount in the system
- Track pending settlements
- View history of issued petty cash
Enable this permission for:
- Accountant
- Admin or Office In-charge
- Team Leader responsible for issuing small routine expenses
- Store/Operations Manager
- Finance staff who handle cash disbursement
- HR
These users regularly handle physical cash distribution and need system access to record such transactions.
Disable this permission if:
- The user should NOT handle or give petty cash
- You want strong financial controls
- Only specific people should distribute cash
- You want to prevent misuse or unauthorized cash flow
This is especially important for junior staff or roles that do not need to handle cash.
If this permission is OFF, the user will:
- Not see the “Payment to Employee” section during petty cash entry
- Not be able to record any cash disbursement
Purpose:
This prevents unauthorized users from distributing cash and ensures financial discipline.
Summary
Payment Permission for Petty Cash = Permission to give cash to employees for small, routine expenses.
If enabled → User can issue petty cash.
If disabled → User cannot give petty cash, only view or request.
-
Approved Permission (Income and Expense)
The Income and Expense modules include a special permission called Approved, which helps ensure that all financial entries are verified by authorized users before becoming part of official company records. If any user having approved permission and if they made any income/expense then it will auto mark as approved.
What this permission does Why It Is Needed When to Enable When to Disable System Behavior When Disabled The Approved permission controls whether a user is allowed to review and approve Income or Expense entries created by other team members.
If this permission is enabled, the user can:
- Check and verify income entries
- Review expense claims submitted by employees
- Approve or reject entries
- Finalize transactions so they reflect in financial reports
This ensures that no Income or Expense record is considered valid until a responsible authority approves it.
Income and Expense data affects:
- Financial accuracy
- Budget tracking
- Profit and loss visibility
- Auditing
- Tax and accounting records
To avoid mistakes or misuse, only authorized users should have the right to approve financial entries.
The purpose is to ensure:
- Data integrity
- Financial transparency
- Proper authorization workflow
- Controlled access based on role
Enable this permission for:
- Finance Manager
- Accountant
- Admin/Management
- Senior staff responsible for budget and financial supervision
- Any user who should officially verify and authorize other team members' entries
Disable this permission for:
- Junior staff
- Interns
- Team members who only submit expenses but cannot approve
- Non-finance roles
- Users without approval authority should only be allowed to create or request, not approve
If the Approved permission is OFF, the user will:
- Not see the approval button
- Not be able to approve or reject entries
- Only be able to add or view their own entries (based on other permissions)
- Their entries will remain in Pending Approval until reviewed by an authorized user
Summary
Approved Permission = Authority to verify and finalize Income & Expense entries created by others.
This ensures:
- Only trusted users approve financial data
- All entries are checked before becoming official
- Company finances remain accurate and properly controlled
-
Approved Permission (Budget Increase Requests)
The Budget module includes a special permission called Approved, which is used to control who can review, authorize and finalize budget increase requests submitted by team members. This ensures all changes in allocated budgets are validated by the appropriate authority.
What this permission does Why this permission is important When to Enable When to Disable System Behavior When Disabled The Approved permission determines whether a user is allowed to:
- Review budget increase requests submitted by department employees
- Verify whether the requested amount is valid and necessary
- Approve or reject the request
- Update the revised budget amount in the system once approved
This permission ensures that no budget adjustments happen without authorization.
Budget adjustments directly impact:
- Department spending limits
- Cash outflow
- Financial planning
- Monthly and yearly budget utilization
- Company-wide financial control
Allowing only trusted users to approve budget increases maintains proper governance and prevents overspending.
The main purpose is to ensure:
- Every increase request is properly justified
- Only authorized decision-makers modify the budget
- Financial discipline is maintained across departments
- No unauthorized user can increase their own departmental budget
Enable this permission for roles such as:
- Finance Manager
- Senior Accountant
- Admin or Management
- Department Head (if approval rights are part of their role)
- Any user responsible for budget allocation and monitoring
These users have authority to evaluate whether a budget increase is justified.
Disable this permission for:
- Regular staff
- Team members who only raise budget requests
- Employees who should not modify or approve financial limits
- Junior accounts staff
These users should only submit requests, not approve them.
If the Approved permission is OFF, the user will:
- Not see the approval option
- Only be able to raise or view budget increase requests
- Not be able to authorize any budget change
- Their requests will remain Pending Approval until reviewed by an authorized user
This preserves financial control and avoids misuse.
Summary
Approved Permission for Budget Increase = Authority to approve or reject budget increase requests made by other team members.
This helps ensure:
- Accountability in budget adjustments
- Full control and transparency
- Only authorized users can change financial allocations
- Proper validation before increasing departmental spending
-
-
Task
-
Allow Assign
What this permission does
The Allow Assign permission gives a user the authority to assign tasks to other team members across the entire Task Management system.
When this permission is enabled, the user can:
- Assign a newly created task to any employee
- Reassign an existing task to another user
- Change the owner of a task anytime work needs to be shifted
- Allocate tasks directly from different screens (not just from the task form)
This permission ensures the user can manage team workloads efficiently.
Where This Permission Applies Why This Permission is Important When to Enable When to Disable System Behavior When Disabled This permission is applied system-wide in multiple areas where task assignment is possible.
- Add Task
- Edit Task
- Task Listing Page
- Task Add
- Mobile App
Assigning tasks is a management responsibility. This permission ensures:
- Proper control over who can delegate work
- Prevention of misuse (junior staff giving tasks to others)
- Clear ownership for each task
- Smooth workflow and accountability
It maintains structure within the team.
Enable this permission for roles like:
- Project Manager
- Team Leader
- Admin User
- Department Head
- Supervisor
They need authority to distribute work across the team.
Disable this permission for:
- Regular employees
- Interns
- Users who should only execute tasks, not assign them
- Roles with no task delegation responsibility
This prevents unauthorized assignment and confusion.
If Allow Assign is OFF:
- “Assign To” option is disabled
- User can only assign tasks to themselves
- Assign option disappears from:
- Task listing
- Task details
- Quick actions
- Mobile app
- User cannot change a task owner once assigned by someone else
Summary
Allow Assign = Permission to assign tasks to other employees from ANY screen where task assignment is possible.
If enabled → User can assign tasks from task form, task listing, dashboards, project view, mobile app, etc.
If disabled → User can only create and manage tasks for themselves.
-
Allow Connect Client
What this permission does Why This Permission is Important When to Enable When to Disable System Behavior When Disabled The Allow Connect Client permission controls whether a user is allowed to link a task, support ticket, or bug to any existing client that has been added in the Client Module.
When this permission is enabled, the user can:
- Select a client from the client list while creating a new task, support ticket or bug.
- Connect an existing task/support ticket/bug to any client
- Change or update the mapped client for a task/support ticket/bug.
Not all users should have the ability to link task, support ticket, or bug with clients. Client data is sensitive and often managed by specific departments.
This permission ensures:
- Only authorized users can connect task/support ticket/bug to clients
- task/support ticket/bug -client relationships remain clean and consistent
- Teams avoid accidentally linking task/support ticket/bug to incorrect clients
- Confidential client data is not misused or accessed wrongly
It provides an additional layer of control for client-related work assignment.
Enable Allow Connect Client for roles such as:
- CRM Team
- Sales Team
- Client Manager
- Project Manager
- Department Head
- Users who work directly with clients or handle client-related tasks
These roles typically need to map task/support ticket/bug to specific clients to track progress and communication.
Disable this permission for:
- Internal staff who do not interact with clients
- HR, Finance, Admin, or roles unrelated to client work
- Team members who should not access client lists
- Junior employees or interns
This prevents accidental or unauthorized task/support ticket/bug-to-client mappings.
If this permission is OFF, the user will:
- Not see the “Connect Client” option
- Not see the client dropdown in Add or Edit task, support ticket, or bug
- Not be able to view the list of clients inside task, support ticket, or bug screens
- Only create task, support ticket, or bug without client association
- Not be able to change or update client connection on any task/support ticket/bug
This protects the client data and avoids misuse.
Summary
Allow Connect Client = Permission to link task/support ticket/bug with existing clients.
If enabled → User can assign task/support ticket/bug to clients from any task screen.
If disabled → User cannot connect task/support ticket/bug with clients anywhere in the system.
-
Allow Connect Lead
What this permission does Why This Permission is Important When to Enable When to Disable System Behavior When Disabled The Allow Connect Lead permission controls whether a user is allowed to link a task to any existing lead stored in the Lead (CRM) module.
When this permission is enabled, the user can:
- Connect a new task to a specific lead
- Edit an existing task and attach it to a lead
- Change or update the linked lead for better tracking
- Select any lead from the CRM Lead list
- Map internal or follow-up tasks directly with lead records
This helps ensure tasks are organized and tied to the right potential customer.
Linking tasks with leads is normally handled by CRM/Sales teams. It ensures proper tracking of lead progress, communication and follow-up activities.
This permission helps maintain:
- Proper control over CRM-related tasks
- Clean mapping between leads and tasks
- Prevention of accidental or incorrect linking
- Secure access, since lead data is sensitive
Only authorized users should have access to connect tasks to leads.
Enable Allow Connect Lead for:
- Sales Executives
- CRM Team
- Business Development Executives
- Lead Managers
- Team leaders who manage lead follow-ups
- Anyone responsible for lead handling and lead progress
These users need to perform follow-up activities and maintain organized CRM tracking.
Disable this permission for:
- Non-CRM roles (HR, Finance, Admin, Back Office)
- Interns or junior staff without client/lead-facing roles
- Employees who should not access lead data
- Users who should only work on internal tasks
This protects CRM data and reduces risk of misuse.
If Allow Connect Lead is OFF, the user will:
- Not see the “Connect Lead” dropdown
- Not be able to attach any task to a lead
- Not be able to update or remove lead linkage in existing tasks
- Only create general tasks not associated with any lead
- Be restricted from all lead-selection areas in task screens
This ensures lead-related tasks are only managed by authorized CRM staff.
Summary
Allow Connect Lead = Permission to link tasks to any lead inside the CRM module.
If enabled → Users can attach tasks to leads from any task screen.
If disabled → Users cannot access or link any tasks with leads.
-
Allow Task Start Date & Allow Task End Date
What this permission does Why this permission is important When to Enable When to Disable System Behavior When Disabled These two permissions controls whether a user is allowed to set or modify the Start Date and End Date of a task. Both permissions work together to define the task' s timeline and schedule.
When these permissions are enabled, the user can:
- Add a start date when creating a task
- Modify the start date of an existing task
- Add an end date or due date
- Update or extend the end date based on task progress
- Manage schedules, timelines and deadlines directly in the task
These permissions give the user authority to manage when a task begins and when it is expected to be completed.
Start and end dates affect:
- Project planning
- Workload distribution
- Deadlines and delivery timelines
- Reminder notifications
- Reporting and task progress tracking
Not every employee should be allowed to change the timeline of a task.
For example:
- Changing the Start Date affects scheduling
- Updating the End Date affects deadlines and commitments
- Incorrect dates can cause confusion or delays in project timelines
These permissions ensure that only responsible roles can handle scheduling.
Enable these permissions for:
- Project Managers
- Team Leaders
- Department Heads
- Senior Staff responsible for planning and deadlines
- Any role that manages task schedules
These users need control over planning and timelines.
Disable these permissions for:
- Regular employees
- Interns
- Staff who should only execute tasks, not schedule them
- Roles where timeline planning is not part of their responsibility
This prevents users from altering deadlines without authority.
If Allow Task Start Date is OFF:
- User cannot set or change the task start date
- Field may appear disabled or hidden
If Allow Task End Date is OFF:
- User cannot set or update the task's end date or due date
- Only users with permission can manage deadlines
If both permissions are OFF:
- User can only create tasks without scheduling
- No timeline controls will appear for that user anywhere in the system
Summary
Allow Task Start Date & Allow Task End Date = Permissions that allow users to manage task scheduling and deadlines.
If enabled → User can set, edit and control start and end dates from any task screen.
If disabled → User cannot modify timeline fields; tasks remain unscheduled unless set by authorized users.
-
-
Payroll
-
Owner Confirm for Attendance
What this permission does Why this permission is important When to Enable When to Disable System Behavior When Disabled The Owner Confirm permission allows a user (usually HR or an authorized supervisor) to verify and confirm the attendance of employees before it is considered final for payroll processing.
When this permission is enabled, the user can:
- Review daily attendance records for all employees
- Verify if the marked attendance is correct
- Confirm attendance so it becomes eligible for salary calculation
- Approve or finalize attendance discrepancies
- Ensure only accurate data is pushed to payroll
Once attendance is confirmed, it is treated as an official and locked record for the salary cycle.
Attendance directly impacts:
- Salary calculation
- Overtime
- Leave deductions
- Compliance and reporting
- Monthly payroll accuracy
If attendance is not verified properly:
- Incorrect salary may be processed
- Unapproved absences may be paid
- Overtime may be calculated wrongly
- Employees may face salary disputes
Therefore, this permission must be given only to trusted HR personnel or authorized managers.
Enable Owner Confirm for:
- HR Manager
- Senior HR Executive
- Admin-level Attendance Controller
- Payroll Manager
- Department Head (if responsible for attendance approval)
These users are responsible for ensuring attendance accuracy before payroll.
Disable this permission for:
- Junior HR
- Shift in-charges without approval authority
- Anyone not involved in payroll or attendance control
This prevents unauthorized confirmation of sensitive attendance data.
If this permission is OFF, the user will:
- Not see the “Verify Attendance” option
- Not be able to finalize or approve attendance
- Not influence payroll-related attendance data
Attendance will remain Pending Verification until an authorized HR user confirms it.
Where this permission applies This permission is used in Payroll → Attendance.

Summary
Owner Confirm = Permission to verify and finalize employee attendance for payroll usage.
If enabled → User can approve and lock attendance for salary processing.
If disabled → User cannot confirm attendance; only authorized HR can do it.
-
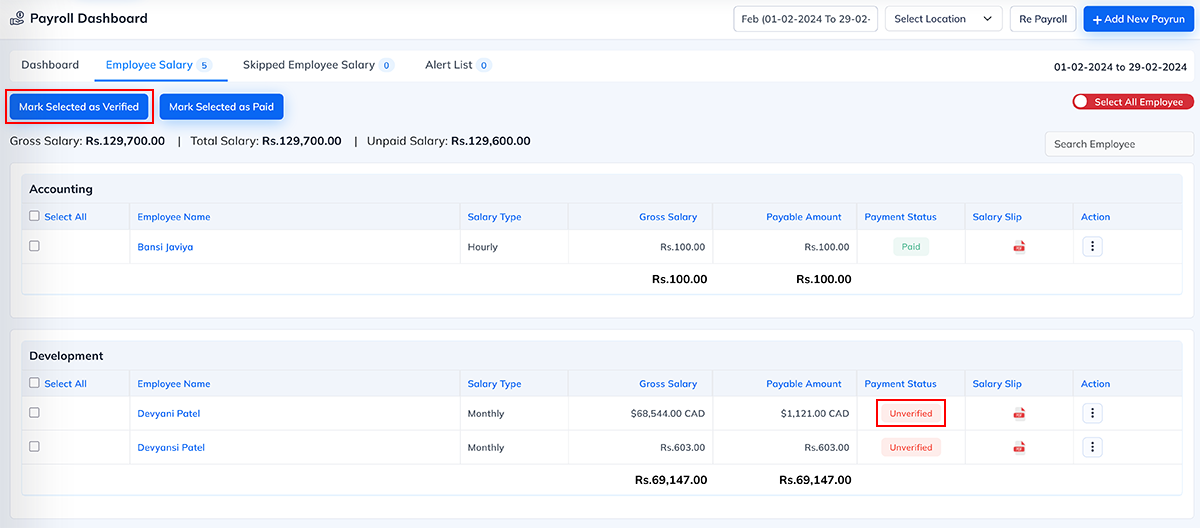
Owner Confirm for Salary
What this permission does Why this permission is important When to Enable When to Disable System Behavior When Disabled The Owner Confirm for Salary permission allows authorized users to verify, review and finalize employee salaries before they are processed or released. It is the final approval step in payroll and ensures that all components of the salary (attendance, leaves, allowances, deductions, overtime, adjustments) are accurate.
When this permission is enabled, the user can:- Review the monthly salary details for every employee
- Verify salary calculations generated by the system
- Approve or confirm salaries for the payroll cycle
- Lock salary data so it becomes ready for payout
- Ensure no further changes can be made unless reopened by admin
Once confirmed, the salary becomes the official record used for generating salary slips and initiating payments.
Salary approval is a critical activity because it directly affects:
- Employee payments
- Company finances
- Compliance and taxation
- Monthly accounting and reporting
- Error-free payroll processing
Incorrect or unauthorized salary approval can lead to:
- Overpayment or underpayment
- Financial discrepancies
- Employee disputes
- Legal and compliance issues
Therefore, this permission must be given only to trusted HR or finance authorities.
Enable this permission for:
- HR Manager
- Payroll Manager
- Finance Manager
- Senior HR Executive
- Admin user responsible for payroll
These roles are responsible for salary verification and approval.
Disable this permission for:
- HR staff without salary authority
- Interns or junior payroll staff
- Anyone not involved in payroll approval
- Employees who should only view salary but not confirm it
This ensures salary approval remains controlled and secure.
If this permission is OFF, the user will:
- Not see the “Mark Selected as Verified” option
- Only be able to view salary details (based on other permissions)
- Not be able to approve or lock salaries
- Not be able to generate final salary output for payment
Salary will remain Pending Confirmation until an authorized person reviews and confirms it.
Where this permission applies This permission is used in Payroll → Employee Salary.
Summary
Owner Confirm for Salary = Permission to verify and finalize employee salaries for the payroll cycle.
If enabled → User can approve, lock and finalize salaries.
If disabled → User can only view salary data; cannot confirm or approve it.
-
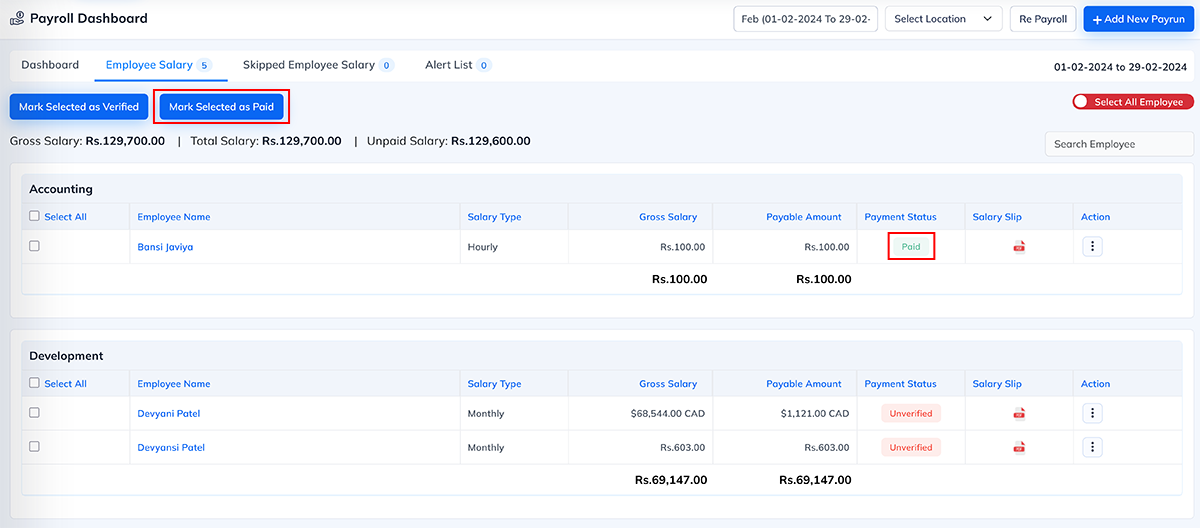
Allow Paid Salary
What this permission does Why this permission is important When to Enable When to Disable System Behavior When Disabled The Allow Paid Salary permission controls whether a user is authorized to mark an employee's salary as Paid in the payroll system.
When this permission is enabled, the user can:
- Mark monthly salaries as “Paid” after disbursement
- Update salary payment status for individual employees
- Mark bulk salaries as paid for a selected month
- Finalize payment status so payroll records reflect accurate disbursement
Ensure salary slips and reports show “Paid” status.
This action indicates that the salary has been successfully released to employees through bank transfer, cash, or any chosen payment method.
Marking salary as “Paid” is an extremely sensitive and critical payroll action.
It directly affects:
- Financial reporting
- Salary slip generation
- Employee payment tracking
- Accounting and compliance
- Monthly expense finalization
If unauthorized users are allowed to mark salaries as paid, it can cause:
- Financial discrepancies
- False reporting
- Conflicts between HR, payroll and accounts
- Confusion during audits
This permission ensures financial accuracy and prevents misuse.
Enable Allow Paid Salary for:
- Payroll Manager
- Finance Manager
- Senior HR Executive involved in salary processing
- Account Department
- Authorized administrators responsible for releasing salaries
These roles are directly responsible for tracking financial disbursement.
System Behavior When Enabled:
If the permission is ON, the user can:
- Mark salaries as Paid individually
- Mark salaries as Paid in bulk
- Finalize salary disbursement records
- Ensure accurate payroll closure
Disable this permission for:
- Regular HR staff
- Users who only verify but do not process payments
- Interns or junior staff
- Anyone not involved in final salary release
This protects salary payment status from unauthorized changes.
If this permission is OFF, the user will:
- Not see the “Mark as Paid” button
- Not be able to update salary payment status
- Only view salary details (based on other permissions)
- Not finalize payroll records
Salaries remain in Pending Payment status until an authorized person updates them.
Where this permission applies This permission is used in Payroll → Employee Salary.
Summary
Allow Paid Salary = Permission to mark employee salaries as Paid in the payroll system.
If enabled → User can finalize payment status and complete salary disbursement.
If disabled → User cannot update payment status; salaries remain pending until approved by authorized payroll staff.
-
-
Employee
-
Salary Permission
What this permission does Why this permission is important When to Enable When to Disable System Behavior When Disabled The Salary Permission inside the Employee module controls complete access to an employee's salary information and salary-related actions.
It not only hides salary details, but also controls whether the user can:
- View the employee's salary structure
- Access previous salary history
- See the Promotion tab (which includes increment details)
- Modify or set the salary structure
- Apply salary increments
- Manage or edit salary components such as allowances, deductions, or CTC breakdown
When this permission is disabled, the user cannot see or edit any salary-related data or actions.
Salary data is extremely sensitive and must be accessed only by authorized HR or payroll personnel.
This permission ensures:
- Confidentiality of employee salary
- Protection of promotion and increment history
- No unauthorized person can modify salary setup
- Clear separation between HR operations and payroll functions
- Compliance with internal and legal privacy requirements
This prevents misuse, salary manipulation and access to financial information by unauthorized staff.
Enable this permission only for roles responsible for payroll and salary decisions, such as:
- HR Manager
- Payroll Manager
- Finance Manager
- Senior HR Executive
- System Administrator responsible for salary setup
These users typically handle salary structure, increments and financial approvals.
System Behavior When Enabled
If the permission is ON:
- Increment tab becomes visible
- Promotion & increment section is visible
- Salary setup during onboarding is allowed
- User can edit, modify and update salary structure
- User can apply and approve increments
- User can review salary history
This gives full control over an employee's salary lifecycle.
Disable this permission for:
- Regular HR staff working on attendance, onboarding, documents, support tickets
- Department heads who need access to employee info but not salary
- Admin users who manage employee records but not payroll
- Any role not directly involved in salary processing
This protects salary details from unnecessary exposure.
If the Salary Permission is OFF, the system will:
Hide All Salary-Related Sections- Increment tab
- Promotion tab
- Salary history
- CTC structure
- Allowance & deduction setup
- User cannot set the initial salary setup during onboarding
- User cannot modify salary structure
- User cannot give or approve salary increments
- User cannot update or correct salary components
User will still be able to manage:
- Profile details
- Department & designation
- Documents
- Attendance
- Leaves
- Task & activity records
But salary-related access remains fully restricted
Summary
Salary Permission = Controls visibility AND editing rights for all salary, increment and promotion functions within the Employee module.
If enabled → User can view and modify salary, setup salary structure, manage increments and access promotion details.
If disabled → User cannot see or change any salary-related information or actions.
-
-
Projects
-
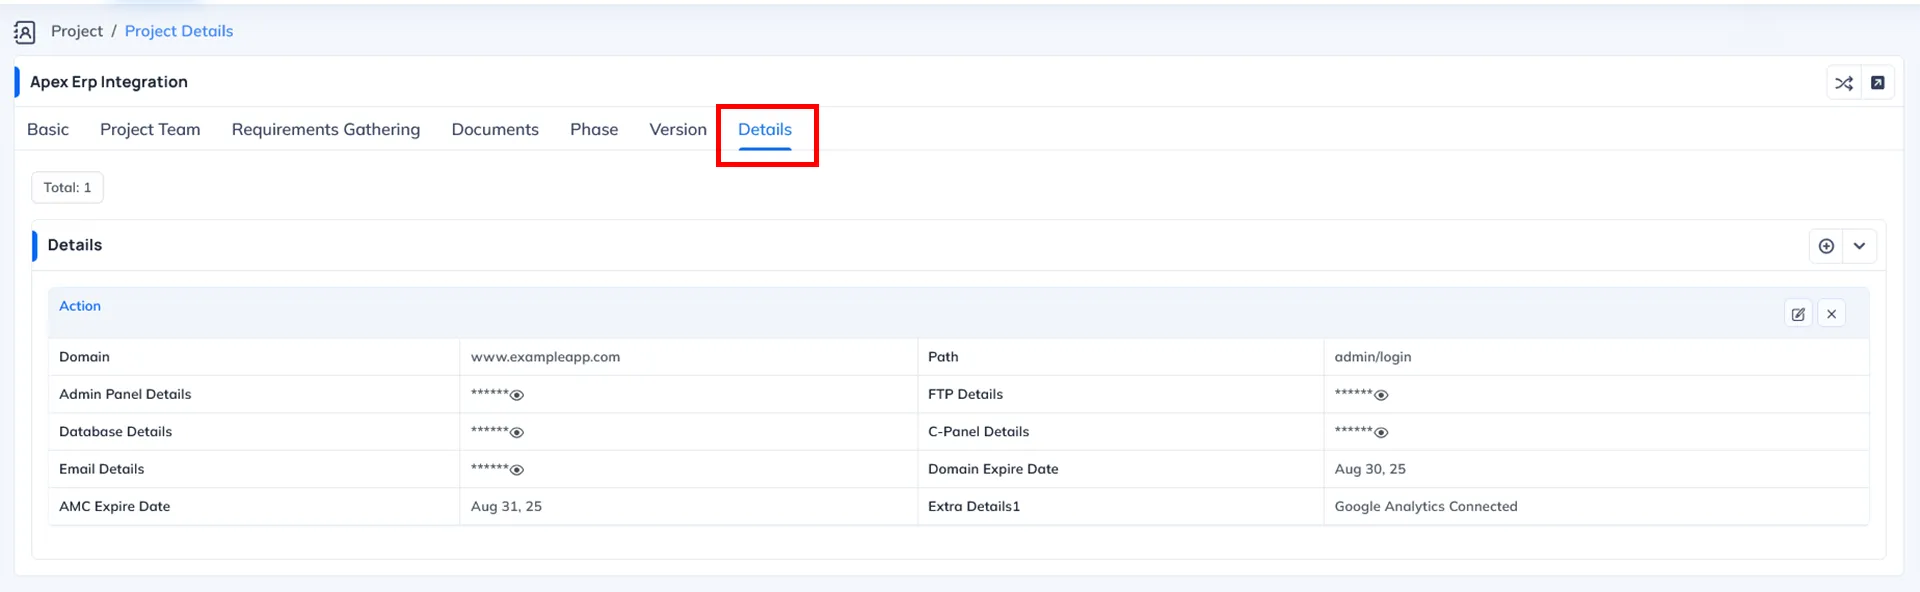
Extra Details
What this permission Why this permission is important When to Enable When to Disable System Behavior When Disabled The Extra Details Permission controls whether a user can access the Details tab inside a project that contains confidential or sensitive project credentials.
This tab may include information such as:
- Server login details
- Database credentials
- FTP/SFTP access
- Hosting panel credentials
- Admin panel logins
- API keys and integration credentials
- Repository access details (Git, Bitbucket, etc.)
- Other sensitive configuration information
- When this permission is disabled, the system hides this tab, ensuring that users who work on the project cannot see or access confidential credentials.
Project credentials are highly sensitive and must be accessible only to authorized roles.
Without proper control, there are major risks:
- Unauthorized access to servers
- Misuse of admin panels
- Security breaches
- Accidental configuration changes
- Leakage of client-sensitive data
This permission ensures strict confidentiality and protects both the client's systems and the company's internal environment.
Enable this permission for roles such as:
- Project Manager
- IT/Admin
- DevOps or Server Administrator
- Senior Developers responsible for deployment
- System Architect
- Super Admin
These users need credential access for deployment, debugging, integration and maintenance.
If this permission is ON:
- The user can view the Details tab
- All project credentials are visible
- User can update or add credentials (based on other edit permissions)
This gives complete access needed for system and deployment management.
Disable this permission for:
- Regular developers
- Interns
- Designers, testers, sales, or support staff
- Any role not requiring access to backend/server credentials
- Freelancers or temporary staff
This prevents exposing sensitive login information.
If this permission is OFF, the user will:
- Not see the Details tab in the project
- Not be able to view any credentials
- Not see the hosting or server-related information
This keeps sensitive areas secure while still allowing normal project operations.
Where this permission applies The permission affects access at details tab of project.
Summary
Extra Details Permission = Controls access to the project's credential tab containing sensitive information.
If enabled → User can view & manage project credentials.
If disabled → User cannot access or view any credential-related information.
-
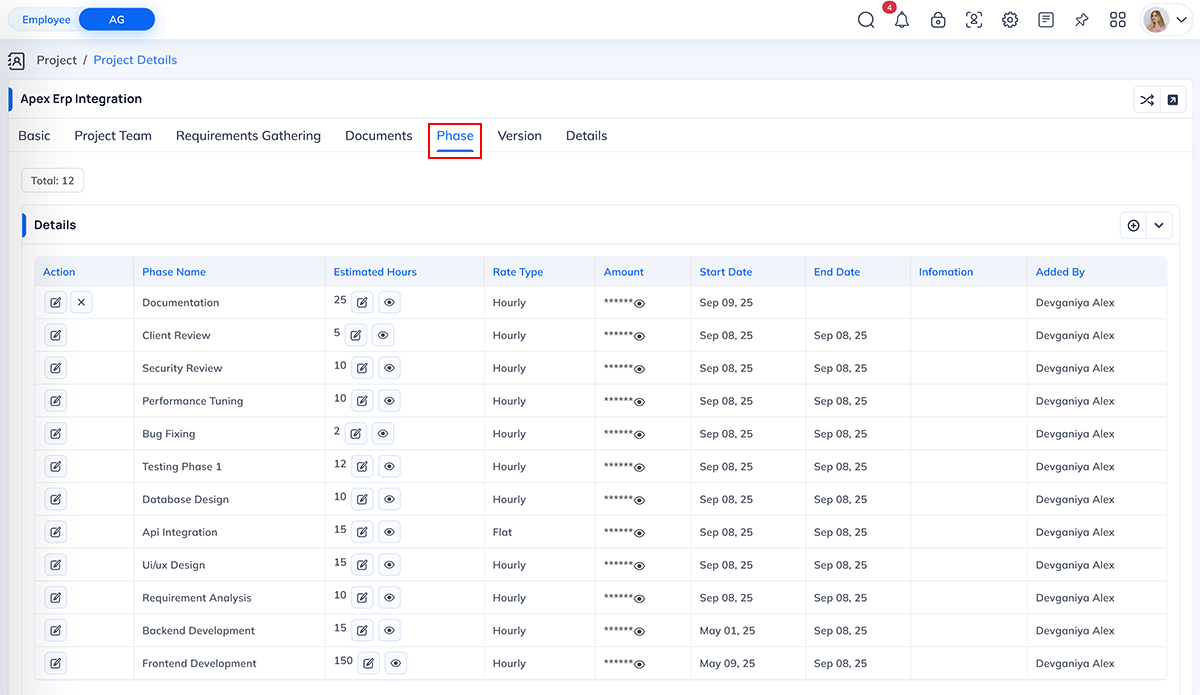
Phase Details
What this permission does Why this permission is important When to Enable When to Disable System Behavior When Disabled The Phase Detail Permission controls whether a user can access the Phase Details section inside a project.
This section contains important phase-wise information such as:
- List of all project phases
- Phase descriptions
- Milestone breakdown
- Payment amount assigned to each phase
- Expected completion timeline
- Phase-wise billing terms (if applicable)
When this permission is enabled, the user can view the complete phase structure and financial details associated with each project phase.
When disabled, the user cannot access this sensitive section.
Phase information is often tied directly to:
- Client billing
- Payment schedules
- Project milestones
- Financial commitments
- Deliverable-based payouts
- Internal project costing
Not every team member should have visibility into payment amounts or billing terms. This permission ensures that only authorized users can view phase-wise payment details.
This permission ensures that only authorized users can view phase-wise payment details.
It helps maintain:
- Financial confidentiality
- Proper access control
- Prevention of unauthorized viewing of project cost structure
- Clear separation between operational tasks and financial details
Enable this permission for roles such as:
- Project Manager
- Senior Manager
- Accounts / Billing Team
- Finance Manager
- Admin-level users
- Client Manager or Business Analyst (if involved in phase planning)
These users often need to understand phase-wise cost and billing before coordinating delivery.
System Behavior When Enabled
If this permission is ON:
- User can view full phase structure
- Can see payment amounts for each phase
- Can review milestone billing terms
- May edit phases (if “Edit Project” permission is also enabled)
Disable this permission for:
- Developers
- Designers
- Testers
- Interns and junior staff
- Roles focused only on task delivery, not financial details
- Any user who should not see payment values or billing structure
This prevents financial information from being exposed unnecessarily.
If the Phase Detail Permission is OFF:
- Phase Detail tab becomes hidden
- User cannot view payment amounts of phases
- User cannot access milestone-wise cost breakdown
- Only general project details remain visible
- Sensitive billing data stays protected
Where this permission applies This permission affects the Phase section in a project.
Summary
Phase Detail Permission = Controls access to the section containing phase list and phase-wise payment details of a project.
If enabled → User can view all phases with their payment amounts.
If disabled → Financial phase details are hidden, ensuring confidentiality.
-
-
Recruitment
-
Communication
What this permission does Why this permission is important When to Enable When to Disable System Behavior When Disabled The Communication Tab Permission controls whether a user can access and use the Communication section inside the Recruitment module. This section is responsible for all forms of direct communication with applicants throughout the hiring process.
When this permission is enabled, the user can:
- Send emails to applicants
- Send WhatsApp messages (custom or template-based)
- View previous communication history
- Follow up with candidates from inside the system
- Use predefined communication templates
- Maintain a complete record of interactions for tracking and auditing
This permission ensures recruiters can efficiently manage applicant communication in one centralized place.
Communication with applicants is sensitive and must be controlled carefully. Improper or unauthorized communication may lead to:
- Sending incorrect or unverified messages
- Exposure of confidential recruitment details
- Confusion among candidates
- Duplicate communication by multiple team members
- Unprofessional or inconsistent follow-ups
Enabling this permission only for authorized recruiters ensures professional, traceable and streamlined communication.
Enable this permission for users responsible for direct communication with applicants, such as:
- Recruiters
- HR Managers
- Talent Acquisition Executives
- Hiring Managers
- Admin or senior HR involved in candidate relations
These roles regularly interact with applicants during screening, scheduling and follow-ups.
If the permission is ON, the user can:
System Behavior When Enabled
- Send WhatsApp and email messages
- Use message templates
- Track historical communication
- Communicate directly from within the applicant profile
- Maintain complete communication logs for each applicant
Disable this permission for roles that should not communicate directly with applicants:
- HR members not involved in communication
- Department heads who only review profiles
- Supervisors or team leaders
- Interns or junior HR staff
- Any employee without authority to contact applicants
This ensures communication is controlled and professional.
If the Communication Tab Permission is OFF, the user will:
- Not see the Communication tab
- Not have access to email or WhatsApp messaging options
- Not be able to view communication history
- Only be able to view applicant details based on general permissions
This ensures that only authorized team members can contact applicants.
Where this permission applies This permission mainly applies to the Communication tab inside the Candidate's profile, where users can send email and WhatsApp messages.

Summary
Communication Tab Permission = Allows users to send email and WhatsApp messages to applicants from the Communication section.
If enabled → User can communicate and view all communication logs.
If disabled → Communication tab remains hidden and messaging is not allowed.
-
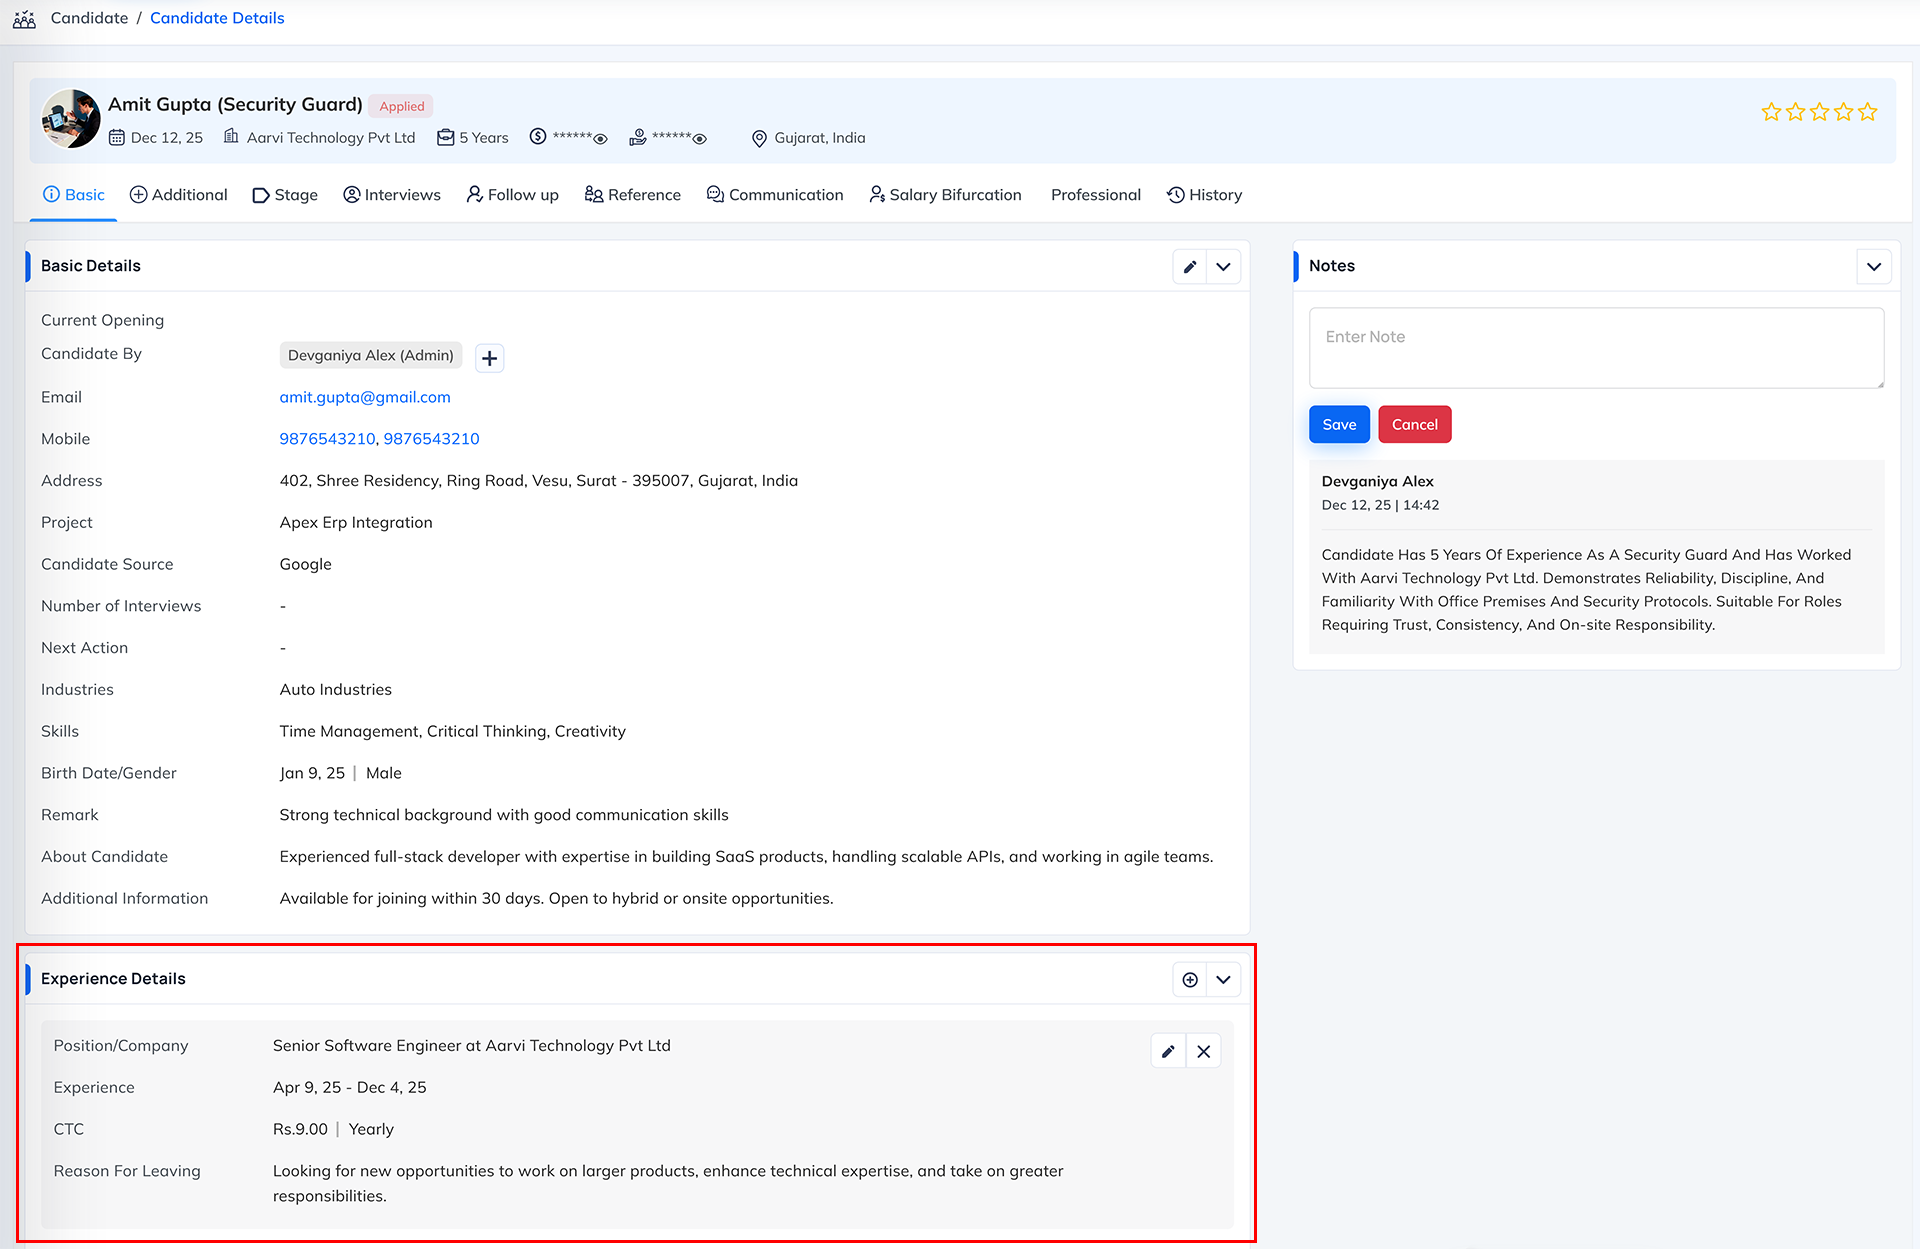
Experience Permission
What this permission does Why this permission is important When to Enable When to Disable System Behavior When Disabled The Experience Permission controls whether a user can view and manage the Experience section inside the Basic Details tab of an applicant's profile.
When this permission is enabled, the user can:
- View the applicant's total experience
- Edit or update experience information
- Enter previous company details
- Update years and months of experience
- Add remarks related to experience (if available)
- Correct or modify experience entries during screening
If this permission is disabled, the Experience section will not be visible to the user.
An applicant's experience directly influences:
- Role suitability
- Salary expectations
- Interview level
- Screening decisions
- Offer preparation
Incorrect handling or unauthorized viewing of experience data may lead to:
- Biased decisions
- Inaccurate applicant evaluation
- Misalignment between HR and hiring managers
- Wrong salary bifurcation if experience affects level
By restricting this permission, only authorized recruitment staff can evaluate or update an applicant's experience details.
Enable Experience Permission for:
- Recruiters
- HR Managers
- Talent Acquisition Executives
- Hiring Managers involved in detailed screening
- Admin users responsible for reviewing applicant data
These roles need access to complete applicant details to make informed hiring decisions.
System Behavior When Enabled
If the permission is ON, the user can:
- Add or update an applicant's experience
- Correct past experience entries
- Enter years, months, company names and related notes
- Review total experience while screening
This helps recruiters validate applicant background thoroughly.
Disable this permission for:
- Department heads who do not manage applicant data
- Interviewers who only assess skill, not background
- Junior HR staff or interns
- Users who only need limited applicant visibility
- Any role not responsible for data accuracy or applicant evaluation
This ensures sensitive applicant background data remains protected.
If the permission is OFF, the user will:
- Not see the Experience fields inside Basic Details
- Not be able to edit or update experience information
- Only view non-experience-related details
- Have limited applicant visibility based on other permissions
The Experience section remains completely hidden.
Where this permission applies This permission mainly applies to the Experience section under the Basic Details tab of the applicant profile.
Summary
Experience Permission = Controls access to view and edit the Experience section inside the Basic Details tab of an applicant profile.
If enabled → User can enter, view and update experience information.
If disabled → Experience fields are hidden and not accessible.
-
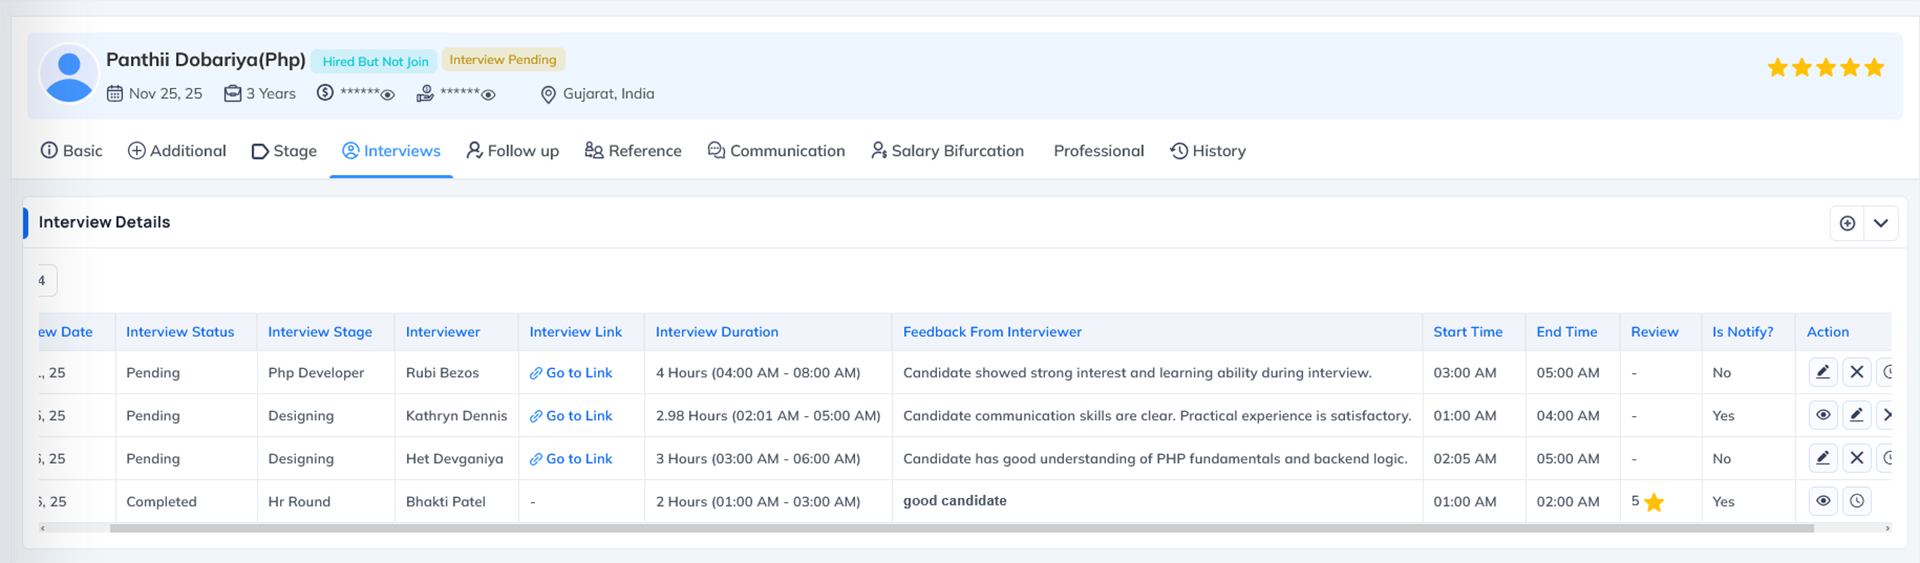
Interviews Permission
What this permission does Why this permission is important When to Enable When to Disable System Behavior When Disabled The Interview Permission controls whether a user can access the Interview section inside the Recruitment module and perform interview-related actions.
When this permission is enabled, the user can:
- Schedule interviews for applicants
- Reschedule interviews if needed
- Select interview date, time and interviewer
- Update interview type (Online, Telephonic, etc.)
- Send interview notifications (based on communication permissions)
- View and manage interview timelines
- Track the history of scheduled and rescheduled interviews
This permission ensures that authorized recruitment staff can plan and manage applicant interviews.
Interview scheduling is a sensitive process involving the candidate, interviewer and HR team.
Improper access can lead to:
- Wrong interview dates being scheduled
- Multiple team members scheduling duplicate interviews
- Communication confusion with applicants
- Mismanaged interviewer availability
- Candidate dissatisfaction due to incorrect or uncoordinated communication
By restricting interview actions to authorized users, the organization ensures a smooth, professional and controlled interview workflow.
Enable Interview Permission for:
- Recruiters
- HR Managers
- Talent Acquisition Executives
- Hiring Managers responsible for interview scheduling
- Admin or senior HR involved in the recruitment process
These users coordinate interviews and need the ability to manage interview timelines.
System Behavior When Enabled
If the permission is ON, the user can:
- Schedule new interviews
- Reschedule existing interviews
- Set or update interview date and time
- Assign or change interviewer
- Track interview logs and history
- Manage full interview workflow from inside the applicant profile
Disable this permission for:
- Department heads or supervisors who only evaluate candidates
- Team leaders who only review resumes
- Interns or junior HR staff without interview coordination responsibility
- Users who should not modify applicant timelines
- Any staff not directly involved in the interview process
This avoids unauthorized modifications to the interview schedule.
If the Interview Permission is OFF, the user will:
- Not see the Interview tab or scheduling section
- Not be able to schedule or reschedule interviews
- Only view applicant information without interview actions
- Refrain from modifying interview dates or interviewer details
This keeps interview scheduling strictly controlled.
Where this permission applies This permission mainly applies to the Interview section inside the Candidate's profile, where users schedule or reschedule applicant interviews.
Summary
Interview Permission = Allows users to schedule and reschedule interviews for applicants from the Interview section.
If enabled → User can plan, update and manage applicant interviews.
If disabled → User cannot schedule or modify any interview details.
-
Salary Permission
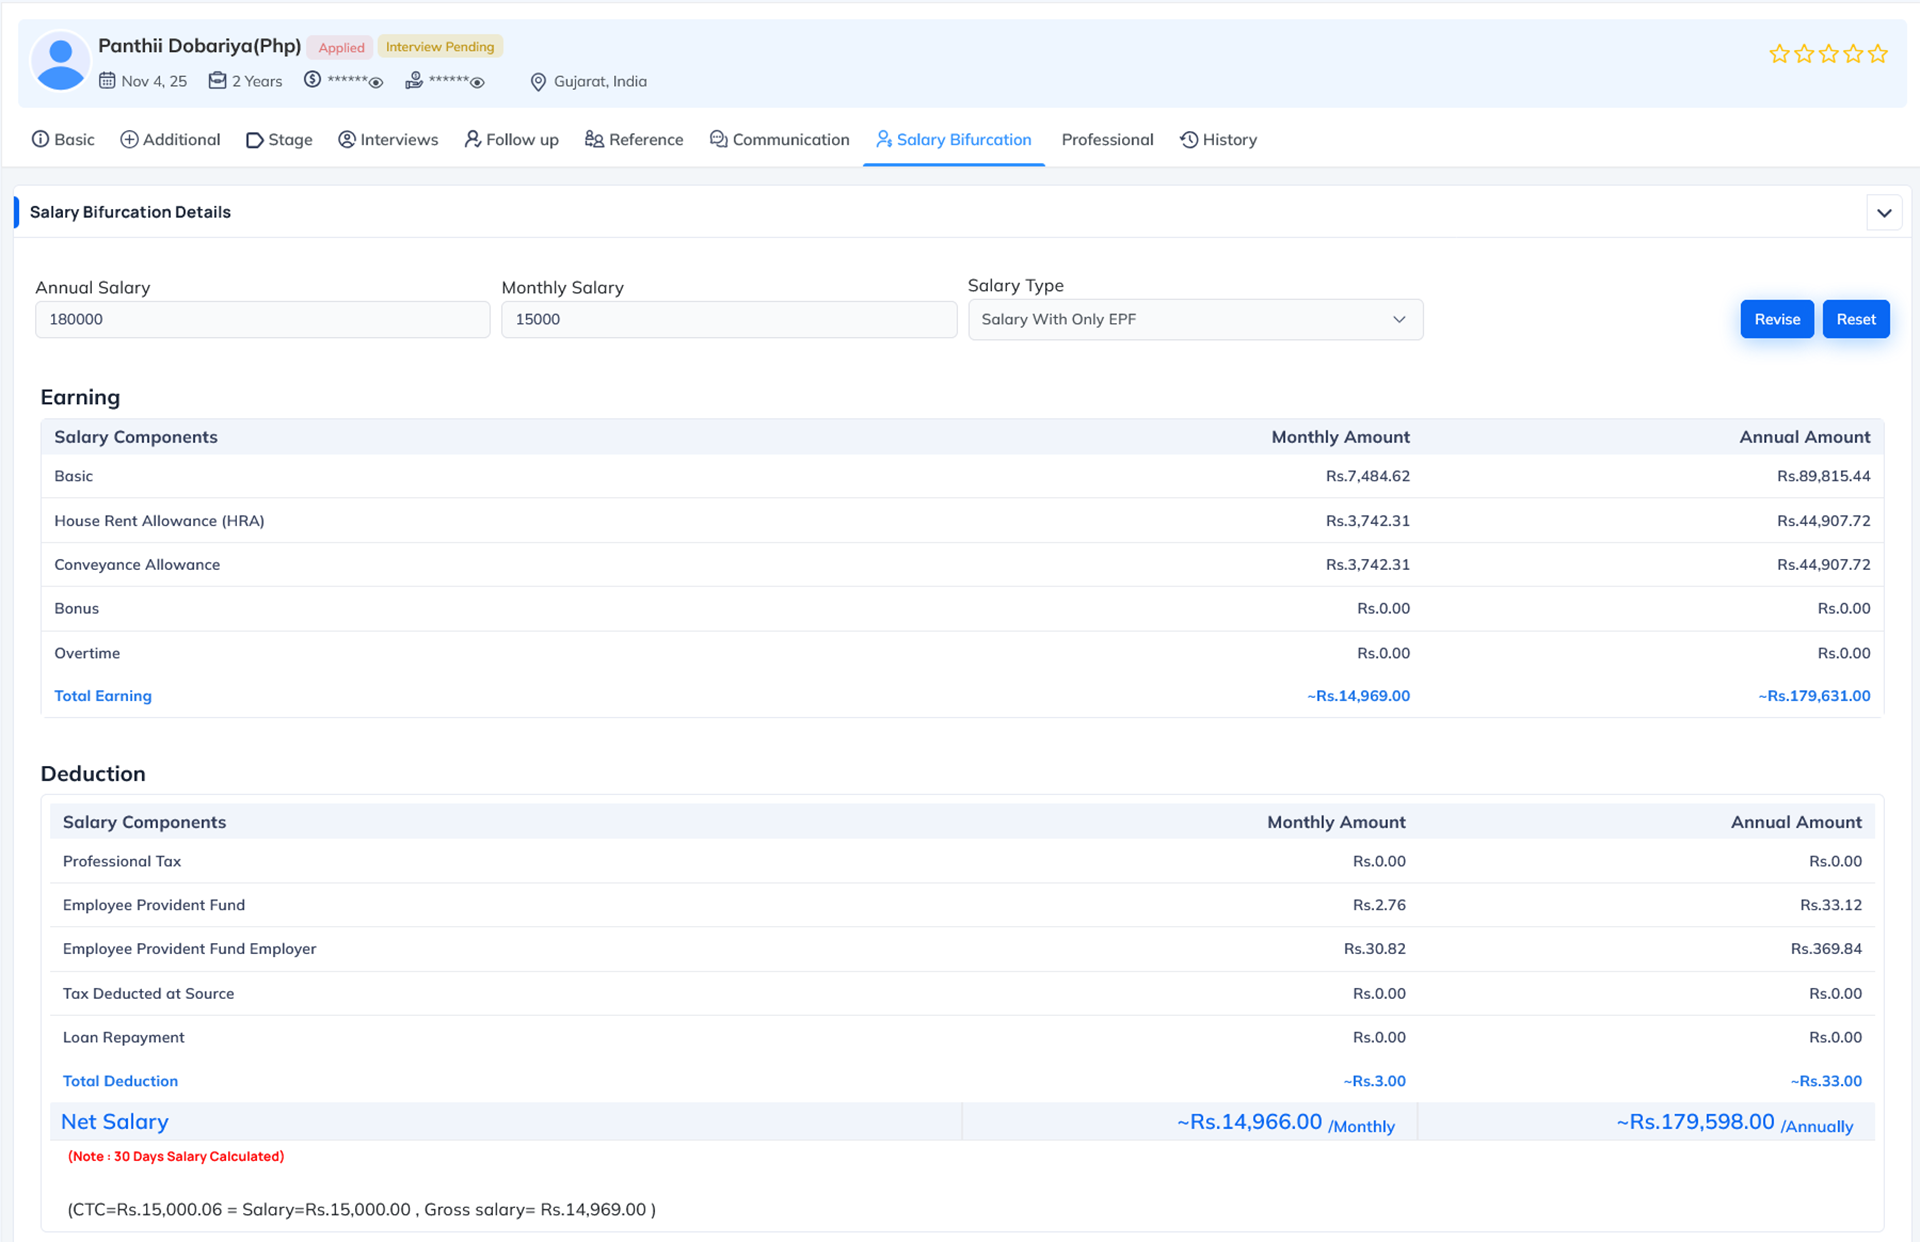
What this permission does Why this permission is important When to Enable When to Disable System Behavior When Disabled The Salary Permission in the Recruitment module controls access to the Salary Bifurcation section inside an applicant's profile.
This section allows authorized users to set initial salary details for selected candidates, including:
- Monthly or Annual salary setup
- Salary type selection (with or without EPF/ESI)
- Assigning a salary structure
- Generating automatic salary bifurcation based on structure
- Viewing full earning and deduction breakdown
- Adjusting salary components if needed
- Verifying Net Salary, Gross Salary and Annual CTC
When this permission is enabled, the user can fully configure and finalize the salary package offered to the applicant during the hiring process.
The Salary section contains highly sensitive information and affects:
- Offer letter preparation
- Cost-to-company planning
- Compliance (EPF, ESI, Taxes)
- Payroll onboarding
- Accurate bifurcation of allowances and deductions
If unauthorized users access salary setup:
- Confidential salary details may be leaked
- Incorrect salary may be offered
- Wrong structure may be applied
- Compliance values may be miscalculated
This permission ensures only senior HR or authorized recruiters can handle salary configuration during candidate evaluation.
Enable Salary Permission for roles such as:
- HR Manager
- Senior Recruiter
- Payroll Manager
- Talent Acquisition Lead
- Admin users responsible for offer creation
- HR Executives who prepare salary proposals
These roles need salary access to finalize job offers and generate accurate salary breakdowns.
System Behavior When Enabled
If Salary Permission is ON, the user can:
- Enter or edit annual or monthly salary
- Select salary type (with EPF/ESI / without EPF/ESI)
- Assign a salary structure from predefined templates
- Generate automatic salary bifurcation
- Review monthly and annual amounts for each component
- View earning and deduction summaries
- Confirm final Net Salary, Gross Salary and Annual CTC
- Prepare an accurate salary breakdown for offer letter generation
This gives the user complete control over the salary-setting process during recruitment.
Disable this permission for:
- Junior HR team members
- Recruiters responsible only for screening or communication
- Department heads reviewing candidates
- Interviewers or team leaders
- Any staff member who should not view or configure salary details
This keeps salary information private and prevents unauthorized modifications.
If Salary Permission is OFF, the user will:
- Not see the Salary Bifurcation tab
- Not be able to set annual or monthly salary values
- Not access salary structure assignment
- Not see earned or deducted components
- Not view CTC, net salary, or gross salary calculations
- Only see non-salary recruitment data
Salary configuration becomes unavailable for that user.
Where this permission applies This permission mainly applies to the Salary Bifurcation section inside the Candidate profile, where the user can set salary, assign structure and view earnings/deductions.
Summary
Salary Permission (Recruitment) = Allows authorized users to access and configure salary, assign salary structure and view salary bifurcation for applicants.
If enabled → User can set salary, assign structure and generate complete CTC breakdown.
If disabled → Salary Bifurcation tab stays hidden and salary setup is not accessible.
-
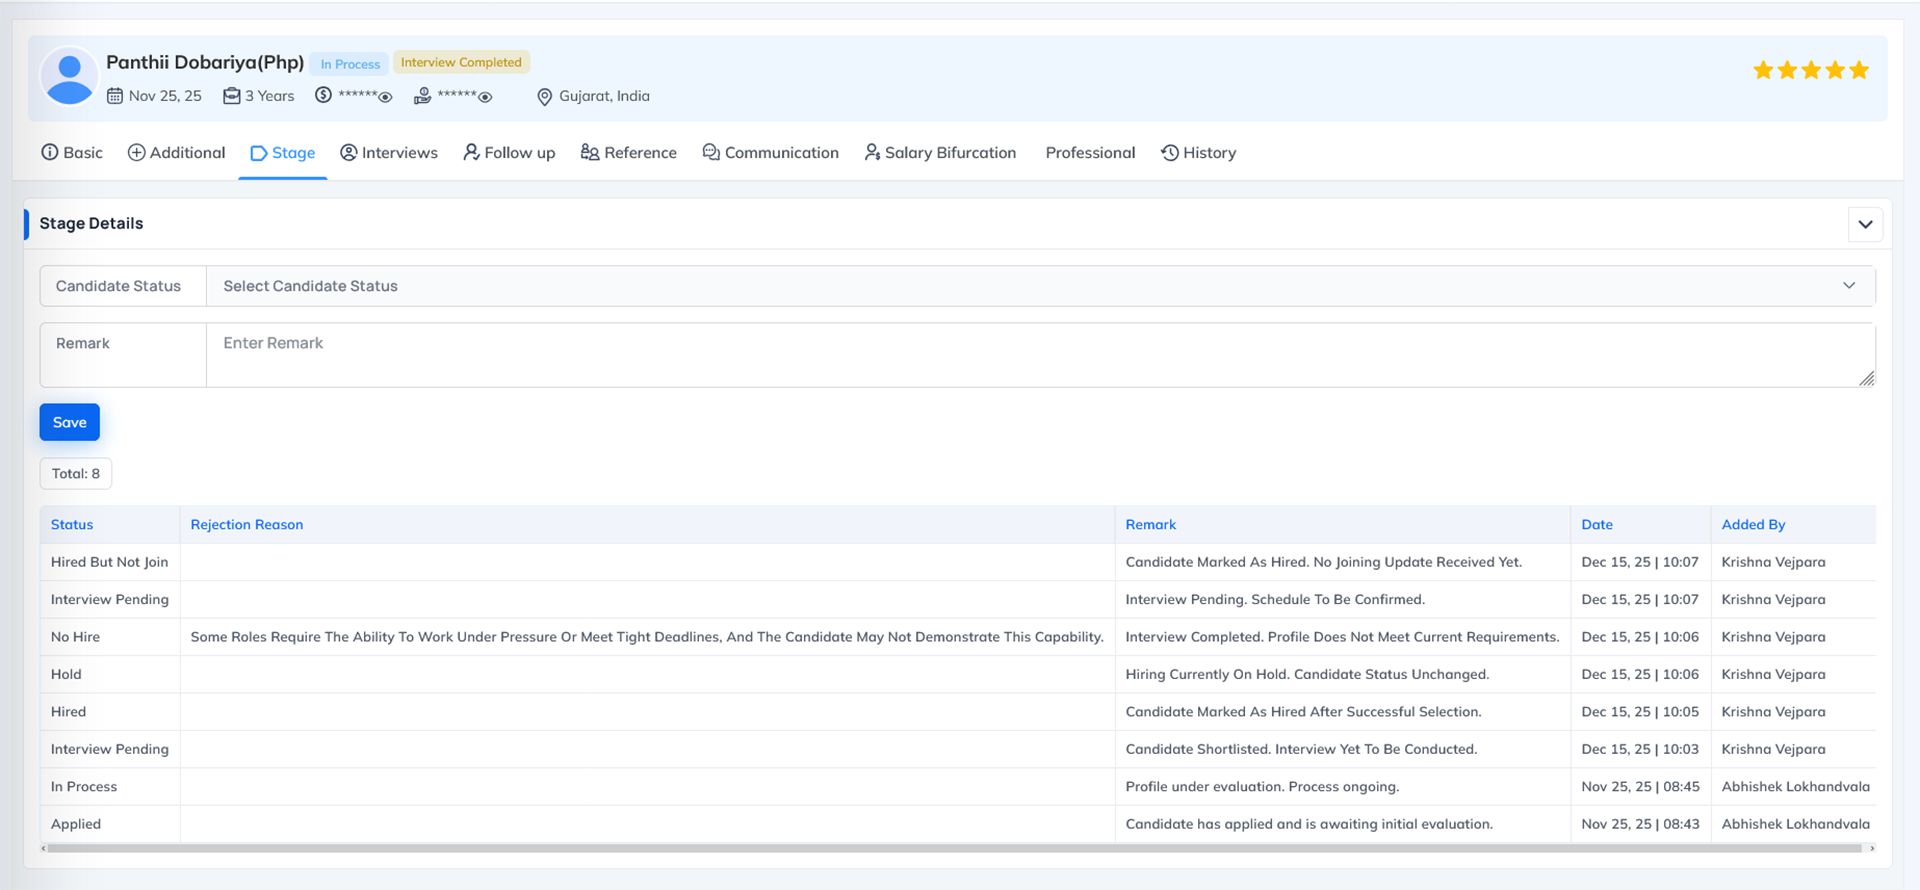
Status Permission
What this permission does Why this permission is important When to Enable When to Disable System Behavior When Disabled The Status Permission controls whether a user can update or change the Candidate Stage / Status in the Recruitment module.
This includes shifting applicants through different stages of the hiring workflow, such as:
- Pending Resume
- Pending Interview
- Interview Scheduled
- Hold
- Future
- Hired
- Not Hired
- Cancelled
- Rejected
- Any custom stage defined by your organization
When this permission is enabled, the user can:
- Change candidate status from the Stage Details section
- Add remarks for each stage update
- Select rejection reasons (if status is unfavourable)
- Maintain a complete stage history for tracking
- Move candidates smoothly through the recruitment pipeline
This ensures recruiters can manage a candidate's progression properly.
Candidate status is a critical part of the recruitment workflow. Unauthorized changes may cause:
- Wrong candidates being moved forward
- Loss of tracking in the hiring pipeline
- Miscommunication with applicants
- Confusion among team members
- Mistakes in marking a candidate as Hired or Rejected
This permission ensures that only authorized recruitment staff can update the hiring stage.
Enable Status Permission for roles such as:
- Recruiters
- HR Managers
- Talent Acquisition Executives
- Hiring Managers
- Senior HR Admins who control the recruitment pipeline
These users handle candidate evaluation and must update the stage as the hiring process progresses.
System Behavior When Enabled
If Status Permission is ON, the user can:
- Update the candidate's stage at any time
- Add remarks explaining the reason for the stage update
- Select rejection reasons if marking the candidate as Not Hired or Cancelled
- View and maintain complete stage change logs
- Control the entire movement of the candidate through the recruitment flow
Disable this permission for:
- Department heads who only review resumes
- Interviewers who should not change candidate stages
- Team leaders not responsible for recruitment pipeline flow
- Interns or junior HR staff
- Anyone who should view candidate status but not update it
This avoids unauthorized or incorrect movement of candidates across stages.
If Status Permission is OFF, the user will:
- Not be able to change candidate status
- Only view the current stage without editing options
- Not add remarks or rejection reasons
- Only observe stage history but not modify it
The hiring pipeline remains controlled and consistent.
Where this permission applies This permission mainly applies to the Stage Details section inside the Candidate's profile, where the user can change the candidate's status.
Summary
Status Permission = Allows users to update, change and manage the candidate's recruitment stage in the Stage Details section.
If enabled → User can update stage, add remarks and control pipeline progression.
If disabled → User can only view status; cannot make any stage changes.
-
-
Assets/Resource
-
Allocate Resources
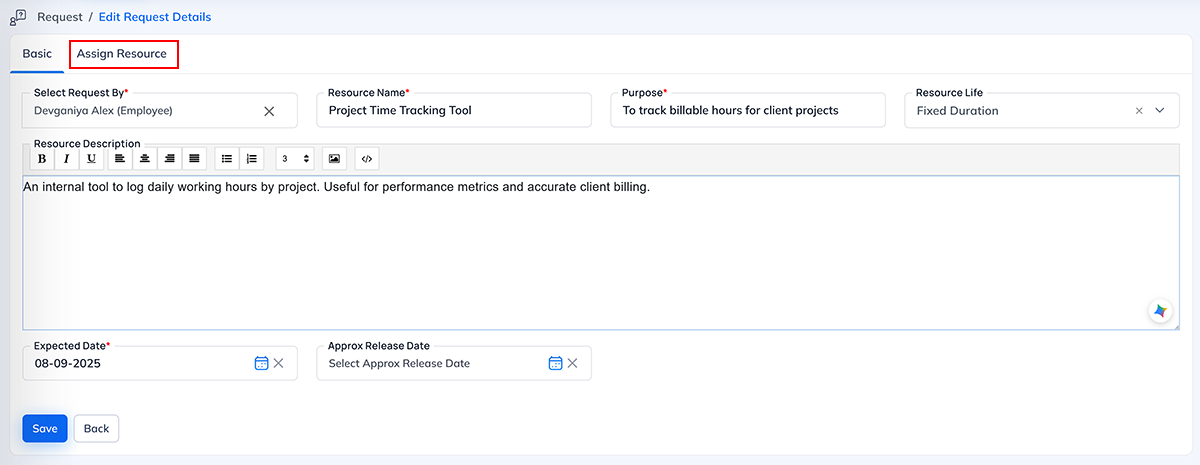
What this permission does Why this permission is important When to Enable When to Disable System Behavior When Disabled The Allocate Resource Details Permission in the Asset module controls whether a user is allowed to allocate resources for an Asset Request.
When this permission is enabled, the user can:
- Open the Assign Resource tab inside the Asset Request
- Change the request status to Allocated / Rejected / Approved (depending on workflow)
- Select and assign a resource (laptop, device, tool, accessory, etc.)
- Add remarks related to allocation
- Finalize allocation so the asset is assigned to the requesting employee
- Update asset request history with allocation details
This permission gives the user the authority to complete the resource assignment process.
Asset allocation involves handling physical items belonging to the company.
- Improper access can lead to:
- Unauthorized allocation of devices
- Misuse of company resources
- Incorrect or duplicate assignments
- Missing audit trail of who allocated what
- Loss or mismanagement of assets
By restricting this permission, only responsible team members can allocate resources and update asset assignment records.
Enable this permission for roles such as:
- Asset Manager
- Admin / Office Admin
- IT Support Team
- Store In-charge
- Inventory Manager
- Any user responsible for issuing company assets
These roles manage the lifecycle of company assets and must allocate resources properly.
System Behavior When Enabled
If the permission is ON, the user can:
- Open the Assign Resource tab
- Update the request status (Allocated, Approved, etc.)
- Select the specific resource/device to allocate
- Enter remarks (if any)
- Save and update the request history
- Complete the resource allocation process end-to-end
This allows the user to manage asset distribution efficiently and transparently.
Disable this permission for:
- Regular employees
- Team members who only create asset requests
- HR staff who only track employee activity
- Managers who approve but do not allocate assets
- Interns or temporary users
- Anyone who should not assign or distribute company assets
This keeps the asset allocation process controlled and secure.
If the Extra Details Permission is OFF, the user will:
- Not see the Assign Resource tab
- Not be able to select or assign any asset
- Not be able to update status related to allocation
- Only view request details without performing allocation actions
- Be restricted from updating resource allocation history
Asset requests will remain unallocated until handled by an authorized person.
Where this permission applies This permission mainly applies to the Assign Resource tab inside an asset request, where the user allocates the requested resource.
Summary
Allocate Resource Permission (Asset Module) = Controls whether the user can allocate resources for an asset request.
If enabled → User can assign devices/resources and update allocation history.
If disabled → User cannot allocate assets; only authorized staff can handle resource assignment.
-
Show Pricing Information
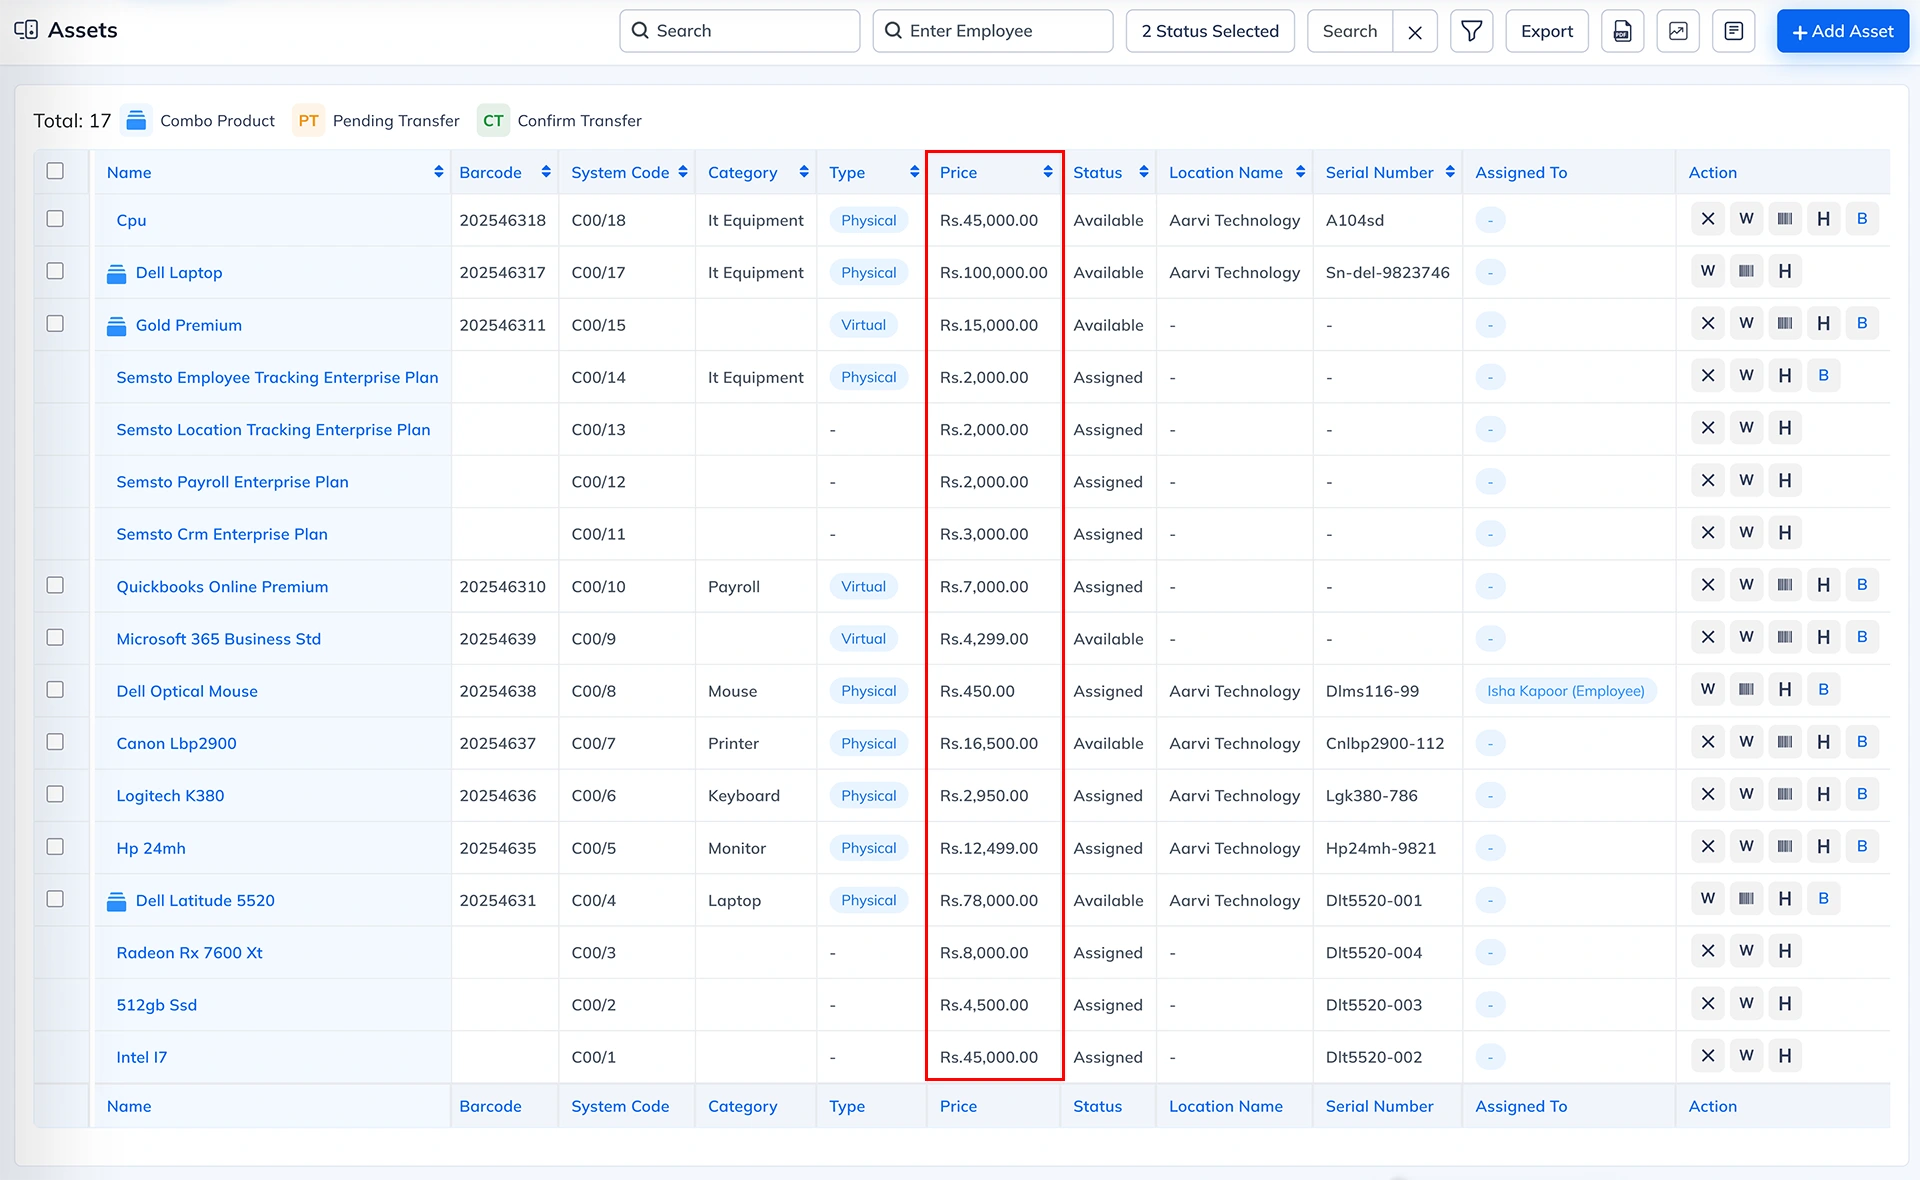
What this permission does Why this permission is important When to Enable When to Disable System Behavior When Disabled The Show Pricing Information Permission in the Asset module controls whether a user is allowed to view price-related information for assets.
This is used to show or hide asset pricing, cost and value details.
When this permission is enabled, the user can:
- View asset purchase price
- View total value and depreciation (if configured)
- View cost-related fields inside the asset details
- See price information during asset request review
- Monitor financial details of assets assigned or available
When the permission is disabled, all asset price fields remain hidden.
Price information for assets is sensitive and often restricted to higher-level employees.
Asset prices must be controlled because they involve:
- Company purchase costs
- Budget insights
- Asset value reporting
- Depreciation amounts
- Vendor pricing
- Replacement cost details
Allowing unrestricted access can lead to:
- Exposure of internal purchase rates
- Misuse of financial information
- Misunderstanding among employees
- Security or compliance concerns
This permission ensures that only authorized users can see financial data related to assets.
Enable this permission for roles such as:
- Asset Manager
- Inventory Manager
- Finance Team
- Senior Admin
- IT Head / Operations Head
- Anyone responsible for asset procurement or budgeting
These roles require pricing details for decision-making and audit purposes.
System Behavior When Enabled If the permission is ON, he user can:
System Behavior When Enabled- View complete asset pricing
- Access financial breakdowns
- See purchase price and valuation details
- Use cost information for budgeting or audits
This gives authorized users full visibility over asset financials.
Disable this permission for:
- Regular employees
- Department staff requesting assets
- HR staff who do not handle asset costing
- Interns or junior staff
- Team members who only need functional access to assets, not price information
This prevents unnecessary exposure of financial data.
If this permission is OFF, the user will:
- Not see purchase price
- Not see total cost or depreciation
- Not see any price-related fields inside the asset profile
- Only view functional information like type, brand, serial number, allocation details, etc.
- Be restricted from financial aspects of the asset lifecycle
Asset requests and asset details remain accessible, but pricing is hidden.
Where this permission applies This permission mainly applies to the Asset Details section, where price, value, depreciation and cost fields are displayed.
Summary
Show Pricing Information Permission (Asset Module) = Controls access to price and cost-related fields in asset details.
If enabled → User can view all asset pricing information.
If disabled → Price fields are hidden; user sees only general asset data.
-
-
Document
-
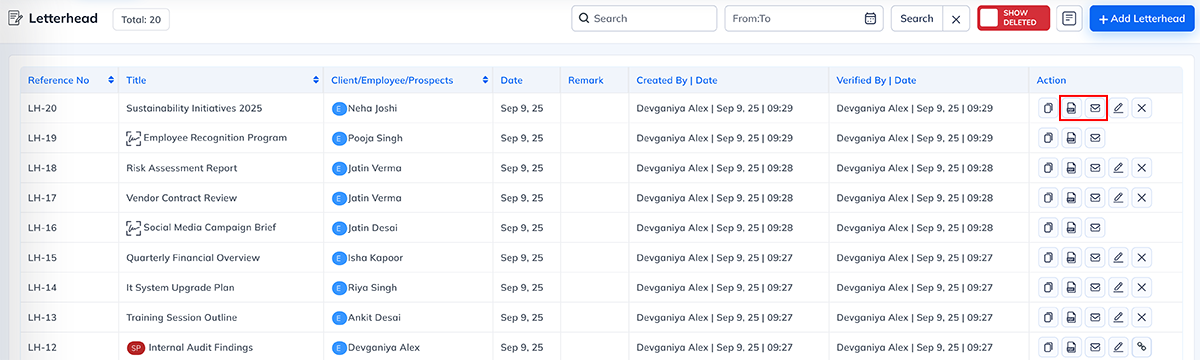
Use Permission (Letterhead Print & Email Control)
What this permission does Why this permission is important When to Enable When to Disable System Behavior When Disabled The Use Permission in the Document module controls whether a user is allowed to use an approved letterhead for official communication.
This includes two critical actions:
- Printing the letterhead for physical documentation
- Sending the letterhead through email for official communication
When this permission is enabled, the user can:
- Print documents using the official letterhead
- Attach or embed letterhead in emails
- Generate certified or official communication using approved templates
- Use letterheads for certificates, letters, memos, notices, offers, etc.
When it is disabled, the user cannot print or email any letterhead, even if they can view it.
Letterheads represent the official identity of the company. They are used for legal, financial, HR and communication purposes.
If unauthorized users can print or email letterheads, it may
lead to:- Misuse of company identity
- Sending unapproved or unauthorized communications
- Internal data or branding leaks
- Fraudulent or misleading documentation
- Loss of control over official announcements
Restricting this permission ensures that only trusted and authorized staff can use the official letterhead in any communication.
Enable Use Permission for roles responsible for official or external communication, such as:
- HR Manager
- Office Administrator
- Finance / Accounts Manager
- Senior Management
- Documentation Team
- Any role approved to issue official letters, certificates, notices, or communication
These users require access to use letterheads for authorized communication.
System Behavior When Enabled
If Use Permission is ON, the user can:
- Print official documents on company letterhead
- Send emails containing letterhead as PDF, attachment, or inline content
- Generate official notices, offer letters, certificates and communication
- Maintain consistent branding in all external communication
It ensures proper and controlled usage of the company's official letterhead.
Disable this permission for:
- Regular employees
- Interns or trainees
- Junior HR team members
- Team leads or supervisors without documentation roles
- Any staff not authorized to send official letters
This helps maintain branding standards and protects official communication channels.
If Use Permission is OFF, the user will:
- Not be able to print letterheads
- Not be able to email documents using letterheads
- Not see print or email options for letterheads
- Only view letterheads (if view permission is granted)
- Be restricted from generating official documentation
This prevents unapproved or unauthorized usage.
Where this permission applies This permission mainly applies to the Letterhead List (Print & Email) within the Document module.
Summary
Use Permission (Letterhead) = Controls whether the user can print or email the company's official letterhead.
If enabled → User can print and send official letterhead documents.
If disabled → Print and email functions are hidden and not available.
-
-
Reports
-
All Employee Visibility for Employee Activity Report
What this permission does Why this permission is important When to Enable When to Disable System Behavior When Disabled The All Employee Visibility permission controls whether a supervisor can view activity reports of all employees in the organization, not just the employees assigned under their supervision.
By default:
- Each supervisor can view activity reports only for team members they directly supervise.
- This ensures department-wise privacy and role-based visibility.
When this permission is enabled, the user can:
- View activity reports of all employees across all departments
- Monitor activity logs of any team member in the company
This permission essentially grants organization-wide visibility for employee activities.
Employee Activity Report contains sensitive operational data such as:
- Daily work logs
- Check-in/check-out times
- Completed or pending tasks
- Internal performance indicators
- Project or department activity
If this data is visible to an unauthorized supervisor, it can lead to:
- Breach of privacy
- Cross-department visibility issues
- Misuse of internal information
- Unnecessary interference in other team operations
This permission ensures that only authorized senior-level supervisors can access activity data of all employees.
Enable the All Employee Visibility permission for:
- Senior HR Managers
- Department Heads
- Operations Managers
- Admin users
- Senior Supervisors responsible for monitoring multiple teams
- Audit or monitoring roles
- Roles requiring multi-department visibility
These users need organization-wide access for performance monitoring, compliance, or operational review.
System Behavior When Enabled
If the permission is ON, the user can:
- View activity reports for all employees in the company
- Access logs across departments
- Perform broader supervision and monitoring
- Use the activity report as an organization-wide oversight tool
This gives full visibility to users requiring higher-level control.
Disable this permission for:
- Regular supervisors
- Team leaders handling only their own team
- Department-specific managers
- Staff who should only see limited or team-based activity
- Any user not authorized to access data of all employees
This maintains data privacy and proper departmental boundaries.
If All Employee Visibility is OFF, the user will:
- Only see activity reports of employees assigned under their supervision
- Not access reports of other teams or departments
- Work strictly within their designated team boundary
- Maintain proper division of supervisory responsibility
This ensures controlled data visibility aligned with organizational hierarchy.
Where this permission applies This permission mainly applies to the Employee Activity Report screen, where supervisors can view activity logs for employees.

Summary
All Employee Visibility Permission = Enables supervisors to view activity reports for all employees, not just their assigned team.
If enabled → User gets full organization-wide activity visibility.
If disabled → User can view reports only for employees they supervise.
-
-
Additional
How to Use
- Tick the checkbox for each permission you want to allow for this group.
- You can enable full access for a module or selectively allow certain actions.
Example:
For Finance group:
- Enable View + Add + Edit for Expense
- Enable View only for Income
- Do NOT enable Delete for safety
Both sections together allow complete setup of a permission group.
Real Life Example
Example 1 - HR Manager
- Group Name: HR Manager
- Short Name: HR
- User Type: Employee
- Permissions:
- Attendance: View + Add + Edit
- Leave: View + Approve
- Employee Master: View only
Example 2 - Finance Team
- Group Name: Finance
- Short Name: FIN
- User Type: Admin
- Permissions:
- Expense: Add + Edit
- Budget: View + Edit
- Income: View only
Example 3 - Sales Team
- Group Name: Sales Group
- Short Name: Sales
- User Type: Employee
- Permissions:
- Leads: View + Add + Edit
- Follow-Up: Add + Edit
- Deals: View
- Meetings
- Prospects: Add + Edit
Example 4 - IT Admin
- Group Name: Admin Group
- Short Name: AG
- User Type: Admin
- Permissions:
- Configuration: Full access
- Users: Add/Edit/Delete
- Masters: Full access
Example 5 - Project Manager
- Group Name: Project Manager
- Short Name: PM
- User Type: Employee
- Permissions:
- Projects: Add + Edit
- Tasks: Add + Edit + Assign
- Time Log: View + Add
6. Summary
The Add Group page is used to:
- Create permission groups
- Assign module access
- Control user activities
- Ensure secure and role-based access across Semsto
FAQs
- What is the purpose of the Group Master in Semsto?
The Group Master is used to create permission groups that define what each user can view or perform inside the Semsto system. It centralizes access control for employees and administrators.
- Who can access and modify Group permissions?
Only authorized users such as Super Admin, System Admin, or IT Administrator can create, update, or delete permission groups.
- What is the difference between Admin User and Employee
User?
- Admin User Type groups apply to backend/admin users and include admin-level modules.
- Employee User Type groups apply to regular employees and only show modules relevant to employee operations.
- Why do I need a Group Short Name?
Group Short Name is a quick identifier shown in the top-left switch panel. It helps users toggle between employee and admin roles if they have dual access.
- How can I create a new permission group? Go to:
Settings → Administration → Groups → Add Group
Enter Group Name, Short Name, User Type, then assign module and sub-permissions.
- What are module-specific permissions?
These are permissions that go beyond simple view/add/edit/delete, such as:
- Payment Permission
- Approve Income/Expense
- Approve Budget Increase
- Allow Assign (Task)
- Owner Confirm (Attendance/Salary)
- Interview Permission (Recruitment)
- Extra Details (Assets)
Each module has its own advanced permission settings.
- What happens if I disable a particular permission?
The user will not see or access that functionality anywhere in the system. For example:
- If Owner Confirm Attendance is OFF → the user cannot verify attendance
- If Show Pricing (Asset Pricing Permission) is OFF → the user cannot see cost-related details
- What is the purpose of the Payment Permission in Sales or
Petty Cash?
It allows the user to record payments:
- Sales Payment Permission → Receive customer payments
- Petty Cash Payment Permission → Release cash to staff for petty expenses
- Who should have Income/Expense Approval permission?
Only authorized roles such as Finance Manager, Senior Accountant, or Company Administrator who are responsible for financial validation and control.
- What is Owner Confirm in Attendance and Salary?
These permissions allow specific HR or senior staff to verify attendance and salary data before payroll is generated. This prevents errors and unauthorized changes.
- Can employees see salary information of other
employees?
No. Salary-related sections are restricted through Salary Permission, which hides salary, promotion, increment and salary setup screens from unauthorized users.
- What does the Allocate Resources permission in Asset
Module do?
It allows a user to allocate resources for asset requests. Without this permission, the user cannot assign laptops, devices, or tools to employees.
- Why is price visibility in Asset Module restricted?
Asset pricing includes confidential purchase costs. Only authorized users should view cost, valuation and depreciation data. This is controlled by Interview Permission (Asset Module).
- What does Status Permission in Recruitment allow?
It allows users to update candidate stages such as: Pending Interview, Hold, Future, Hired, Not Hired, Cancelled, etc.
- How does All Employee Visibility work in Activity
Report?
Supervisors normally see only their own team. If this permission is enabled, they can view activity reports of all employees in the company.
- Can we delete a group that is already assigned to
employees?
You can delete it, but only after reassigning all employees to another group. This prevents accidental loss of access.
- How should I decide which permissions to assign?
Follow these guidelines:
- Assign only what the user really needs
- Keep admin and employee roles separate
- Restrict financial and salary permissions
- Give delete permission only to senior staff
- Use descriptive group names like “HR Manager”, “Finance Executive”, “Project Lead”
- What are some common mistakes to avoid while creating
permission groups?
- Giving admin permissions to employee users
- Assigning salary permissions to non-HR users
- Allowing change price to sales staff unnecessarily
- Granting All Employee Visibility to juniors
- Forgetting to assign group to newly added users
- Can a user belong to more than one group?
No, one user can belong to only one active group at a time. This ensures clean and predictable permission Behavior.
- How quickly do permission changes apply?
Immediately. Once you save the group, the user's access updates in real time.