


Employee Location
Overview
The Location Master module in Semsto allows administrators to create and manage multiple company or branch locations. Each location can include detailed information such as address, manager contact, payroll details, compliance identifiers and customized letterhead configuration.
This module ensures accurate branch management, geo-tagging and consistent documentation for all organizational units.
- Manage all company branches or office locations centrally.
- Store location-specific details such as contact info, compliance numbers and address details.
- Configure each location's payroll, bank and tax-related settings.
- Customize official letterheads for documents like invoices, employee letters and payslips.
- Enable accurate distance and geolocation-based tracking for attendance systems.
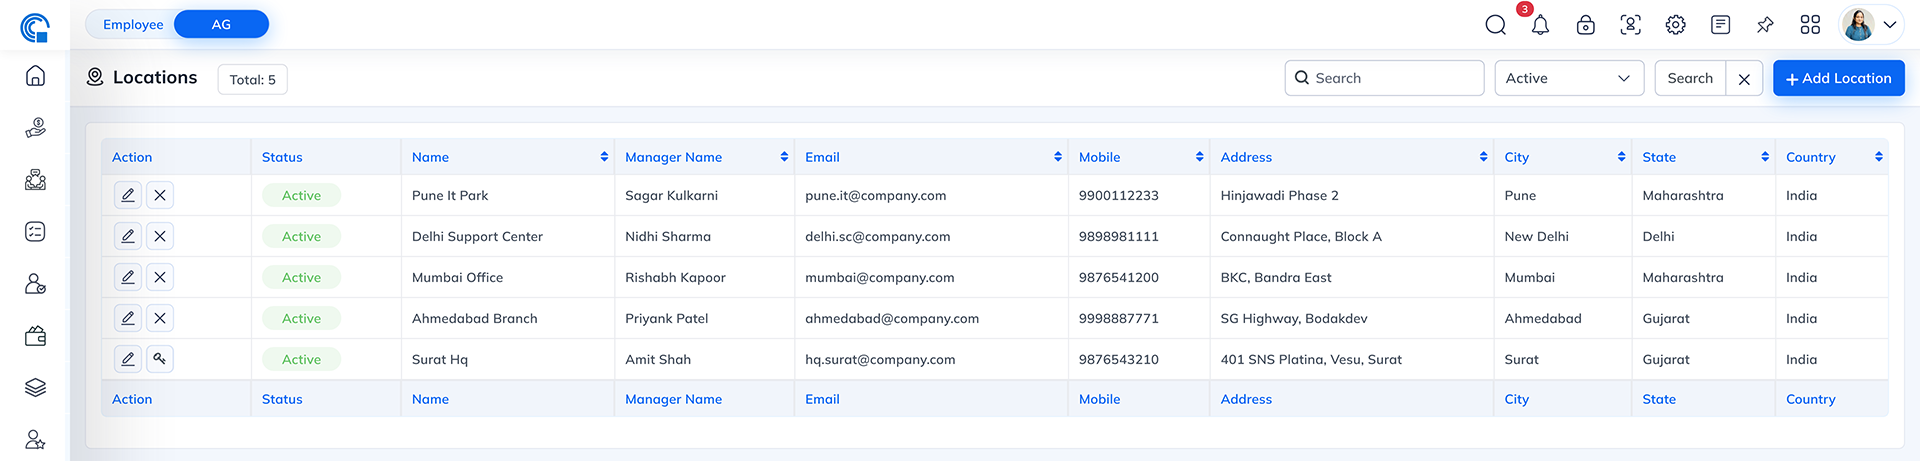
| Field Name | Description |
|---|---|
| Action | Allows you to Edit or Delete a location record. |
| Status | Displays whether the location is Active or Inactive. |
| Name | Shows the location name (e.g., “Aarvi Infotech”, “Head Office”). |
| Manager Name | Displays the name of the manager responsible for this location. |
| Shows the manager's or location's contact email address. | |
| Mobile | Displays the contact number associated with the location. |
| Address | Displays the physical address of the location. |
| City | Indicates the city where the location is situated. |
- Search Bar: Search by location name, manager, or city.
- Filter by Status: View Active or Inactive locations.
- Add Location: Opens the form to create a new location record.
- Basic Information
- Settings
- Letterhead Configuration
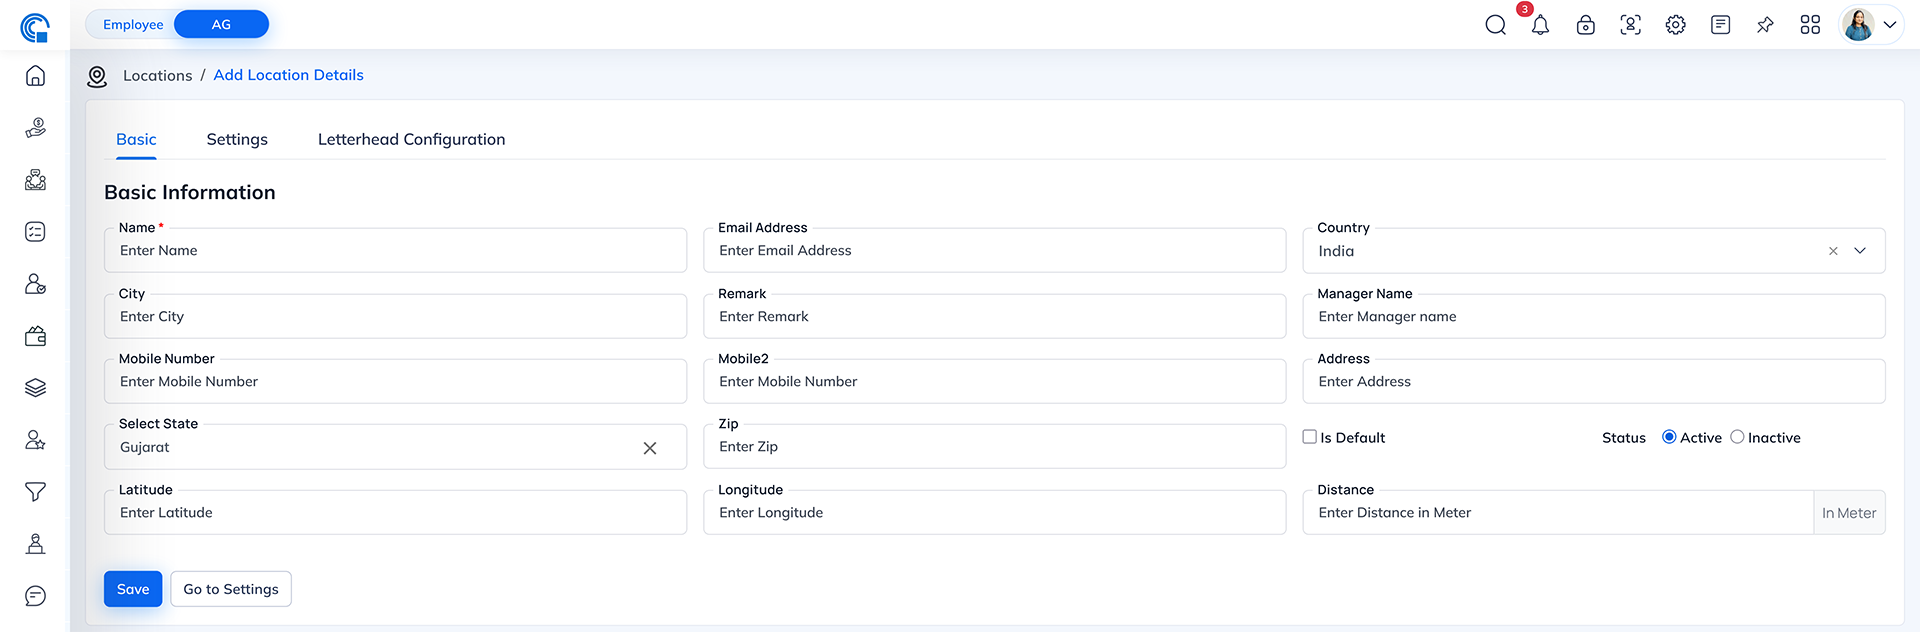
| Field Name | Description |
|---|---|
| Name | Enter the name of the location (Mandatory field). |
| Email Address | Enter the location or manager's email address. |
| Country / State / City | Enter the geographical details of the location. |
| Manager Name | Specify the name of the location manager or contact person. |
| Mobile Number / Mobile 2 | Enter one or two contact numbers for communication. |
| Remark | Add internal notes or comments related to this location. |
| Address | Enter the full address, including street and building details. |
| Zip | Enter the area ZIP or postal code. |
| Latitude / Longitude | Enter GPS coordinates for accurate map or geo-based functions (optional). |
| Distance | Define the radius (in meters) for geo-fencing or attendance range. |
| Is Default | Mark this location as the company's primary default address (if applicable). |
| Status | Set the location as Active or Inactive. |
- Save: Saves the basic information for the location.
- Go to Settings: Moves to the next configuration tab.
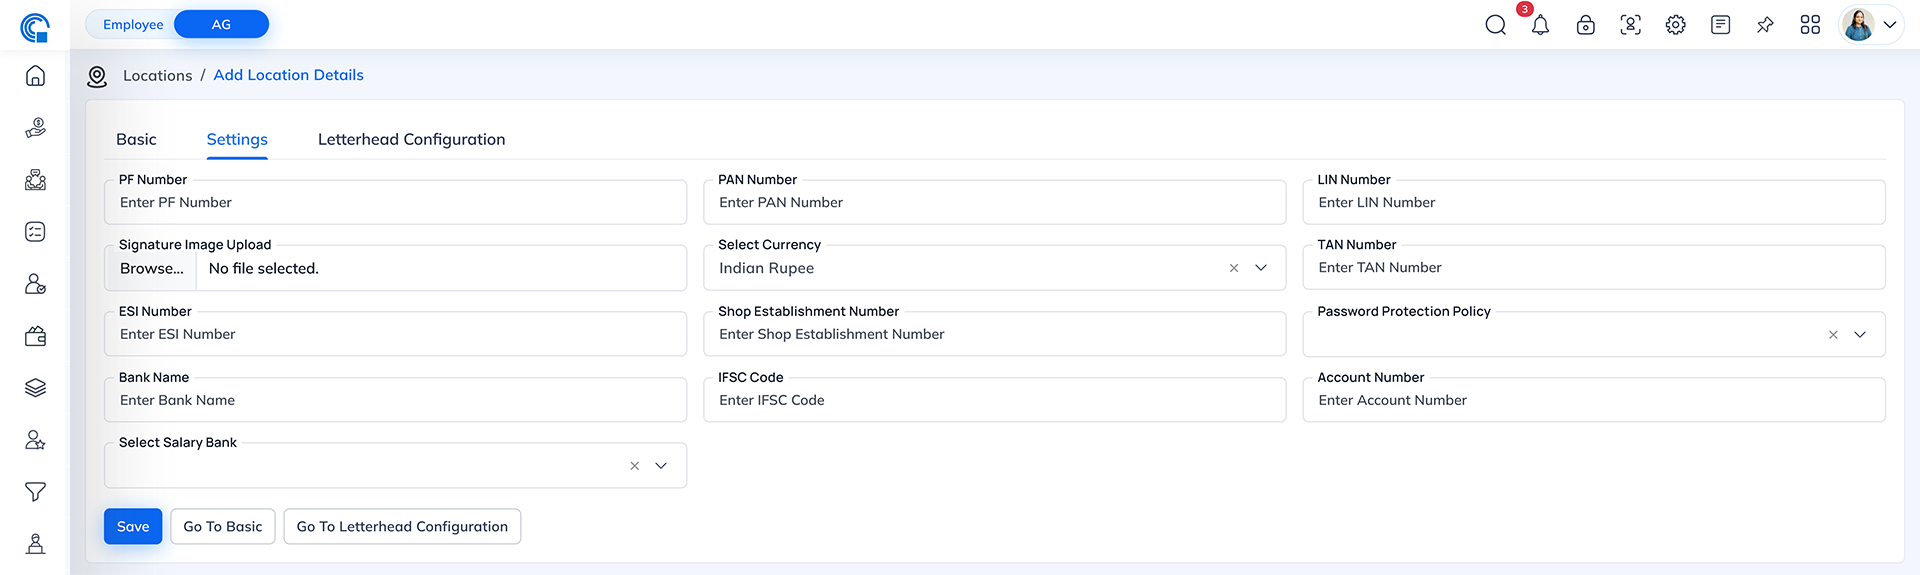
| Field Name | Description |
|---|---|
| PF Number | Enter the Provident Fund registration number for this branch. |
| ESI Number | Enter the Employee State Insurance number. |
| PAN Number | Enter the Permanent Account Number for tax identification. |
| LIN Number | Enter the Labour Identification Number. |
| TAN Number | Enter the Tax Deduction and Collection Account Number. |
| Shop Establishment Number | Add the registration number for the shop/branch under the Shops and Establishment Act. |
| Bank Name | Enter the name of the bank associated with payroll or transactions. |
| Account Number | Enter the bank account number. |
| IFSC Code | Enter the IFSC code for the salary or transaction bank. |
| Select Salary Bank | Choose the default salary bank from the dropdown list. This bank is considered for salary of employee who are location in this location. |
| Currency | Select the operational currency (e.g., Indian Rupee). |
| Signature Image Upload | Upload a digital signature image for official documents. Upload the authorized signature image that will appear automatically on all salary slips. This signature is used as the default digital sign for payroll documents and helps validate salary slips without manual signing. |
| Password Protection Policy |
You can choose PAN Number, UAN Number, Bank Account Number, or Name Birth. Based on the selected option, the system will create a password using that specific employee detail. This ensures every password is unique and secure. If no rule is needed, keep it as Select.
1. PAN Number Password will be generated using the employee's PAN details, usually by using a few characters or digits from the PAN. This helps create a unique and secure password based on government-verified information. 2. UAN Number Password will be created using digits from the employee's UAN (Provident Fund) number. This ensures the password is employee-specific and not easily guessed. 3. Bank AC Number Password will be generated using selected digits from the employee's bank account number. This provides a stronger and more personalized password. 4. Name Birth Password will be generated using a combination of the employee's name and date of birth. This makes the password easier to remember but still unique for each employee. |
- Save: Saves the settings data.
- Go to Basic / Letterhead Configuration: Navigate between tabs easily.
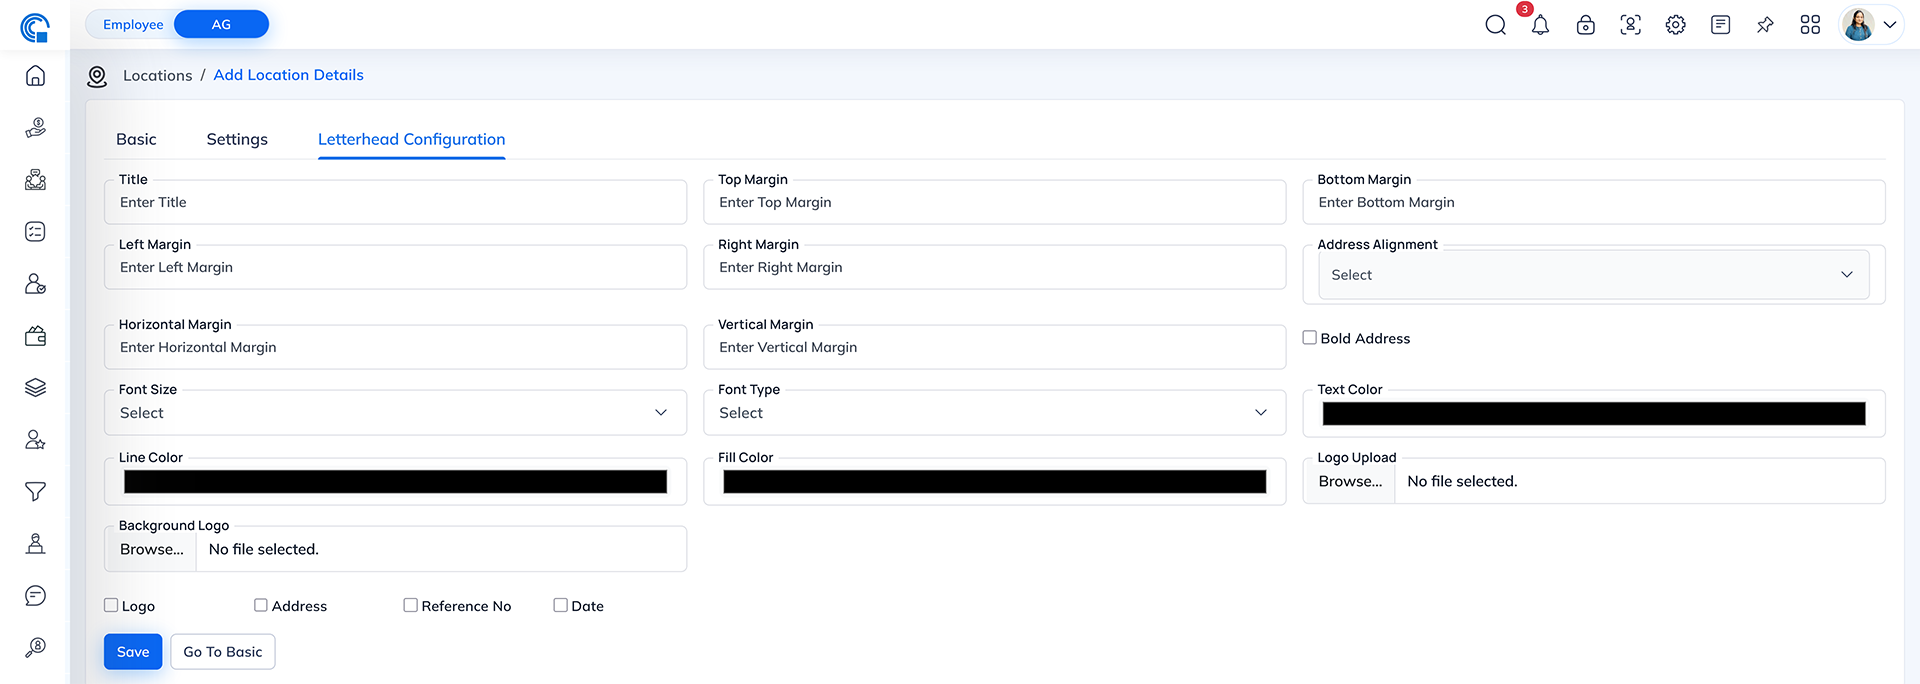
| Field Name | Description |
|---|---|
| Title | Enter the title for the letterhead (e.g., “Aarvi Infotech Official Letterhead”). |
| Margins | Set custom margins for letterhead layout. |
| Horizontal / Vertical Margin | Fine-tune additional space between layout elements. |
| Font Type / Size | Select font family and size for the letterhead text. |
| Line / Fill / Text Color | Customize colors for design and text appearance. |
| Address Alignment | Choose alignment (Left, Center, or Right) for address placement. |
| Bold Address | Option to make the address text bold. |
| Logo Upload | Upload a logo image for display on the letterhead. |
| Background Logo | Upload a faded logo or watermark for background use. |
| Display Options | Enable or disable specific elements: |
- Logo
- Address
- Reference No
- Date
- Save: Saves all letterhead design settings.
- Go to Basic: Returns to the first tab.
- Navigate to Master → Location.
- Click + Add Location.
- Fill in the details under Basic Information, including name, address, contact info and coordinates.
- Proceed to the Settings tab to add compliance and financial details.
- Configure Letterhead Settings for the location's official documents.
- Click Save to store all details.
- Edit: Click the pencil icon beside a location to modify its details and click Save.
- Delete: Click the trash icon beside a location to remove it. Confirm deletion when prompted.
| Field | Sample Data |
|---|---|
| Name | Aarvi Infotech |
| Manager Name | Krishna Vejpara |
| sales@aarvitechnology.com | |
| Mobile | 9537056859 |
| Address | 5800 S Main St, Los Angeles, CA |
| City / State / Country | Los Angeles / California / USA |
| Status | Active |
- Centralized management of multiple branches.
- Accurate geo-location data for attendance systems.
- Simplified compliance and payroll integration.
- Professional letterhead customization for branding consistency.