Event and Event Register
Events
The Event Module allows users to create events, manage registrations, and send reminders. This system supports both Paid and Free events, and visitors can register for events by filling out a registration form. Event organizers can track visitor details, send notifications/Tickets (via email & WhatsApp), and handle entry/exit using QR codes.
Key Features:
- Create Events: Event details like title, date, registration type (Paid/Free), and visitor limits can be defined etc.
- Registration Form: A form is used by participants to register for an event. You can also create a custom registration form based on the event requirement, and all the added fields will automatically appear in the form for visitors.
- Registration Tracking: Total registrations, fees collected, and visitor data are displayed for each event.
- Notifications:Notifications (email/WhatsApp) for registration confirmation, Tickets, reminders, etc., can be sent automatically.
- QR Code Scanning: Visitors can use QR codes to register their entry/exit.
- Visitor Tracking: Allows tracking of who is present at the event via the visitor registration system.
- Real payment system integration (Online payment collection): The Real Payment System is seamlessly integrated within the event management module to enable online payment collection for paid events. Currently we support Razorpay.
- Event Dashboard: The Event Dashboard provides a complete overview of each event, allowing organizers to track and manage everything from a single screen. It shows all important details in real time and helps in making quick decisions.
"Create. Register. Track. Celebrate---Your Entire Event Managed Seamlessly."
How to Open the Event Module:
To access the Event Module, go to the left-side navigation menu, open the Visitor section, and click on Event. This will take you directly to the event listing and management screen.
(Leftside menu > Visitor > Event => Event List)
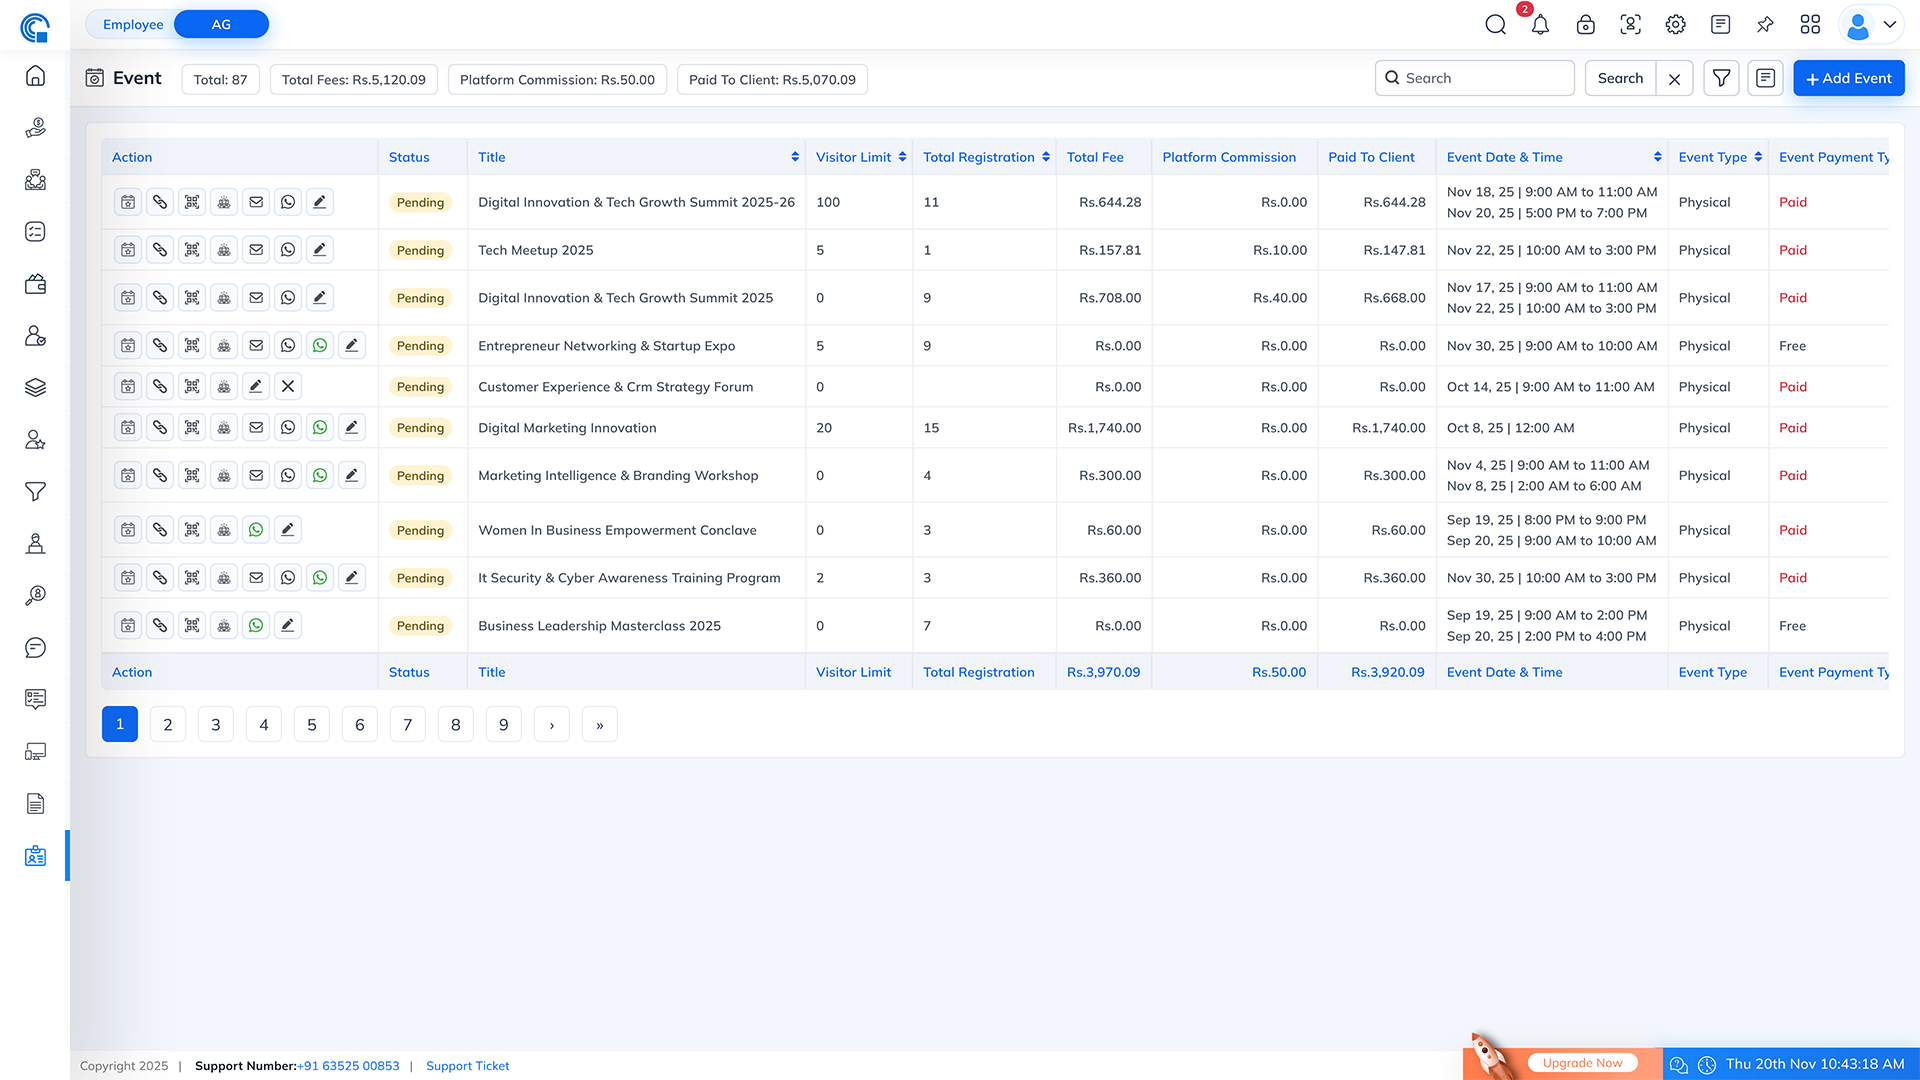
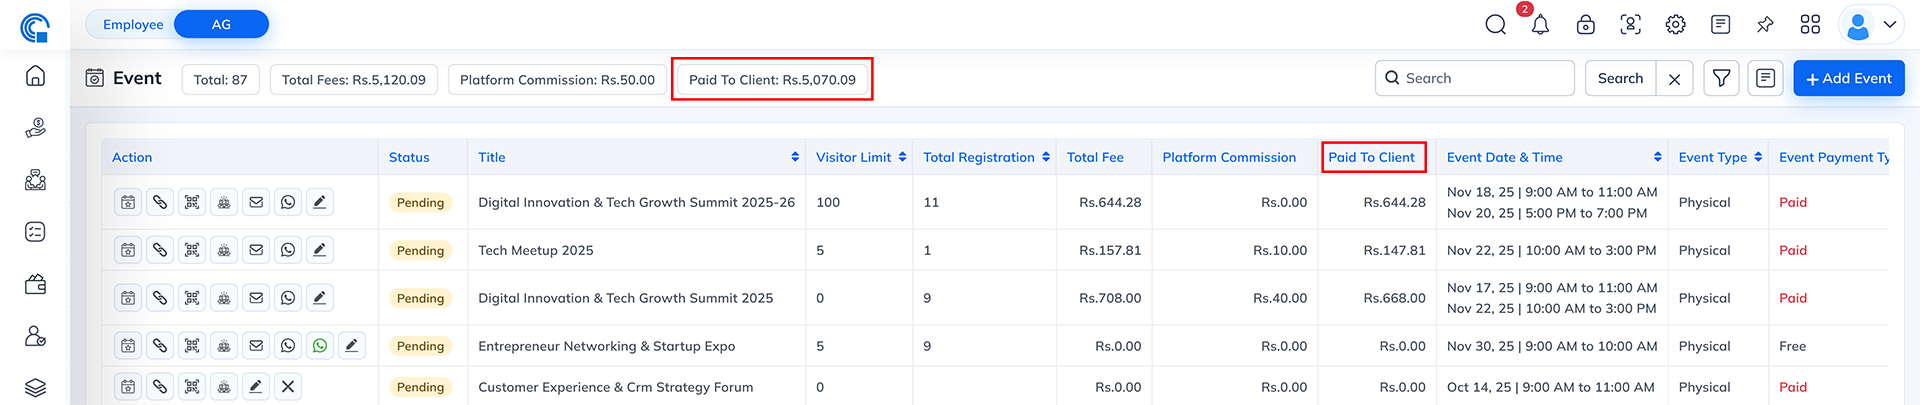
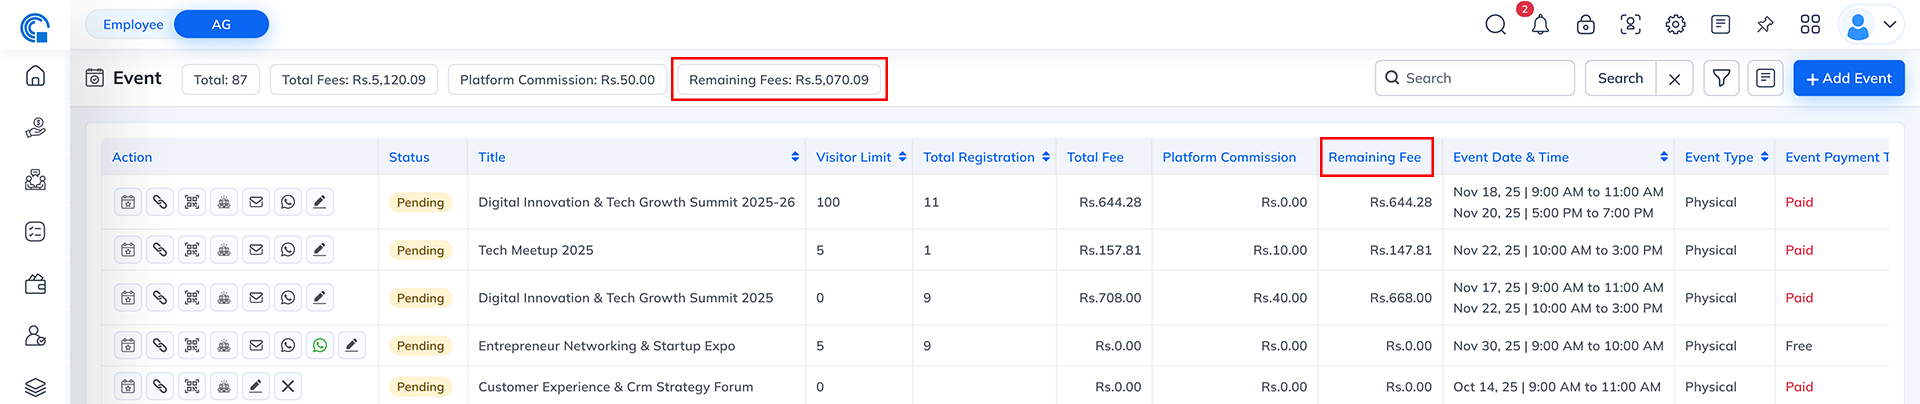
Event Summary Details (Section Wise Description):
This section is displayed at the top of the Event screen. It provides a quick real-time overview of your event performance. Each box shows important information at a glance.
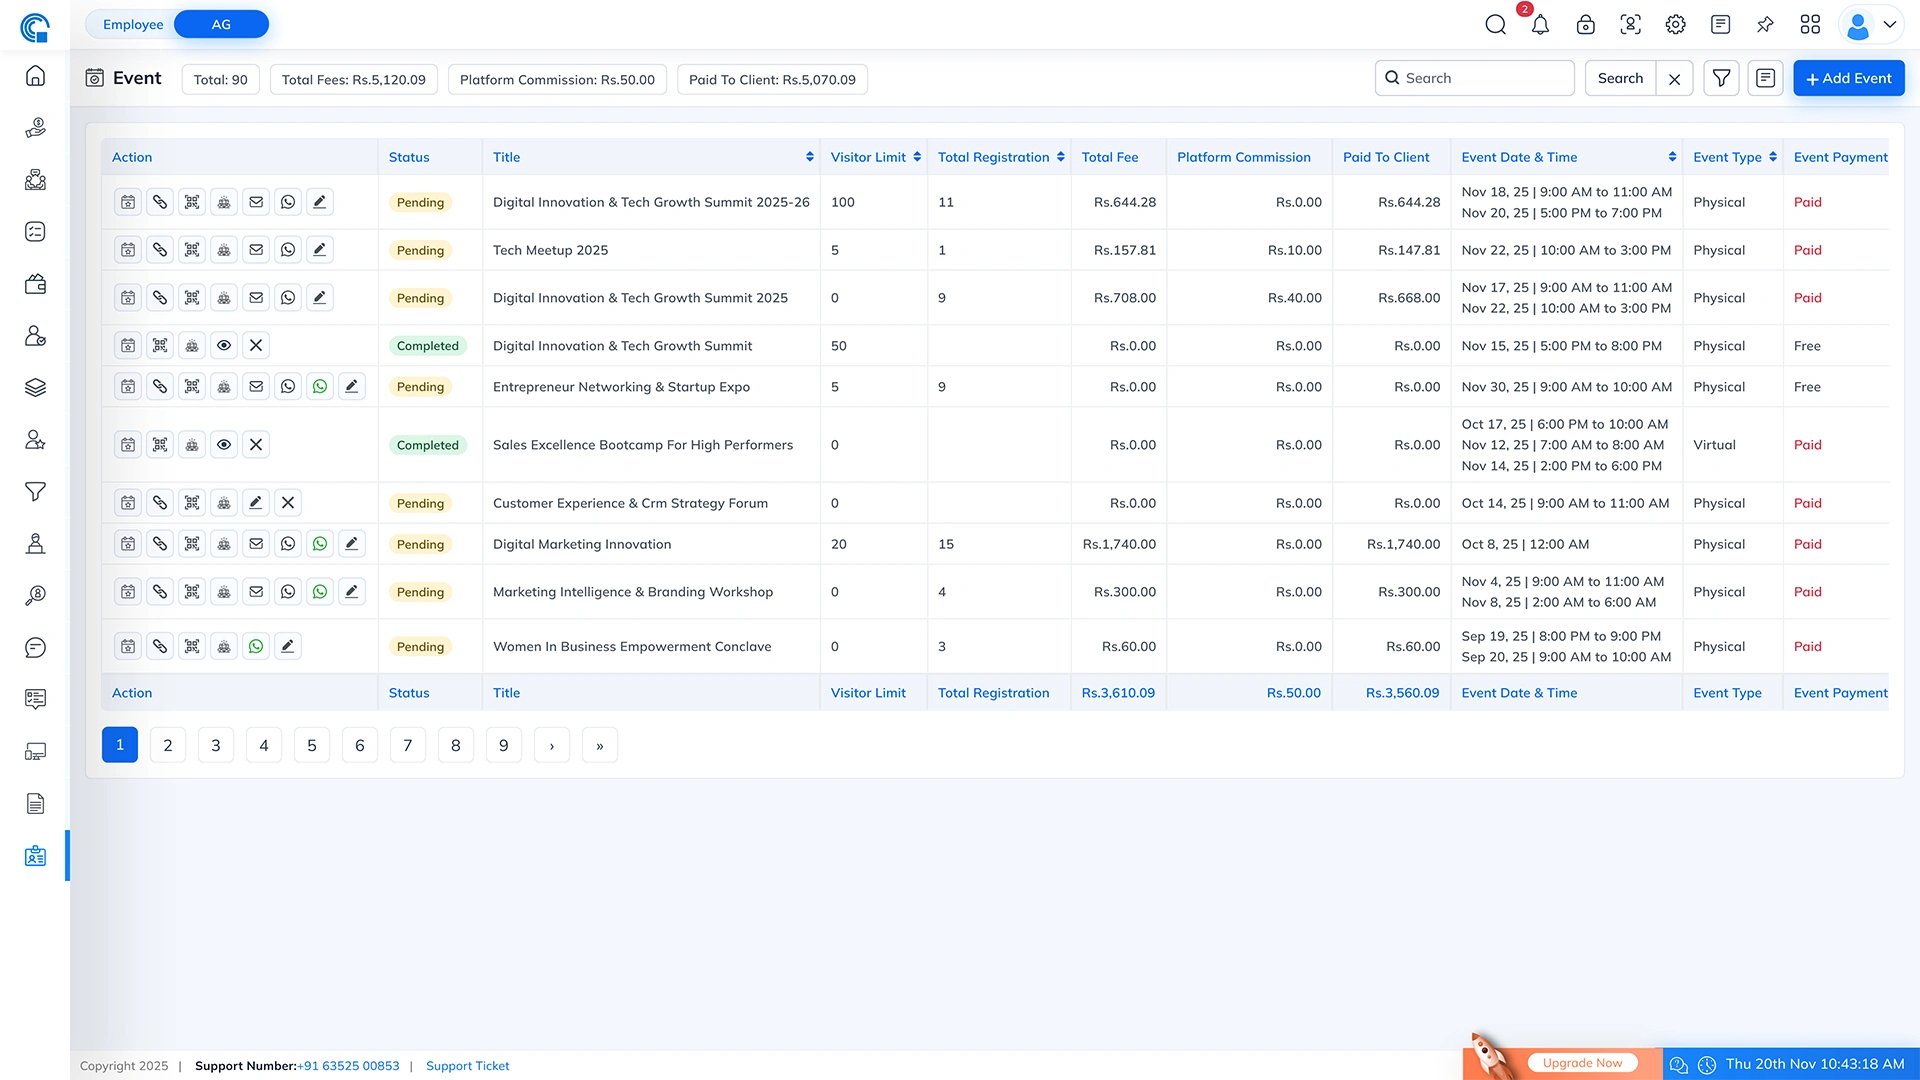
- Total: Shows the total number of events created in the system.
- Total Fees: Displays the total registration fees collected from all Paid events. This is the gross amount collected from participants before any platform deductions.
- Platform Commission: Shows the total commission amount earned by the platform (your system). This is automatically calculated based on the commission percentage configured in the system.
- Paid To Client: The amount transferred to the event organizer after deducting platform commission. This value updates automatically after every successful registration.
Search Control Description
- The Search box allows users to quickly find specific events from the event list. Simply type a keyword related to the Event Title, and the system will automatically filter and display the matching events.
- How it Works?
- Type the event name or partial text (example: Digital, Marketing, Summit).
- After typing, click on the Search button or press Enter to execute the search.
- The list below will update instantly and show only those events whose titles match your search keyword.

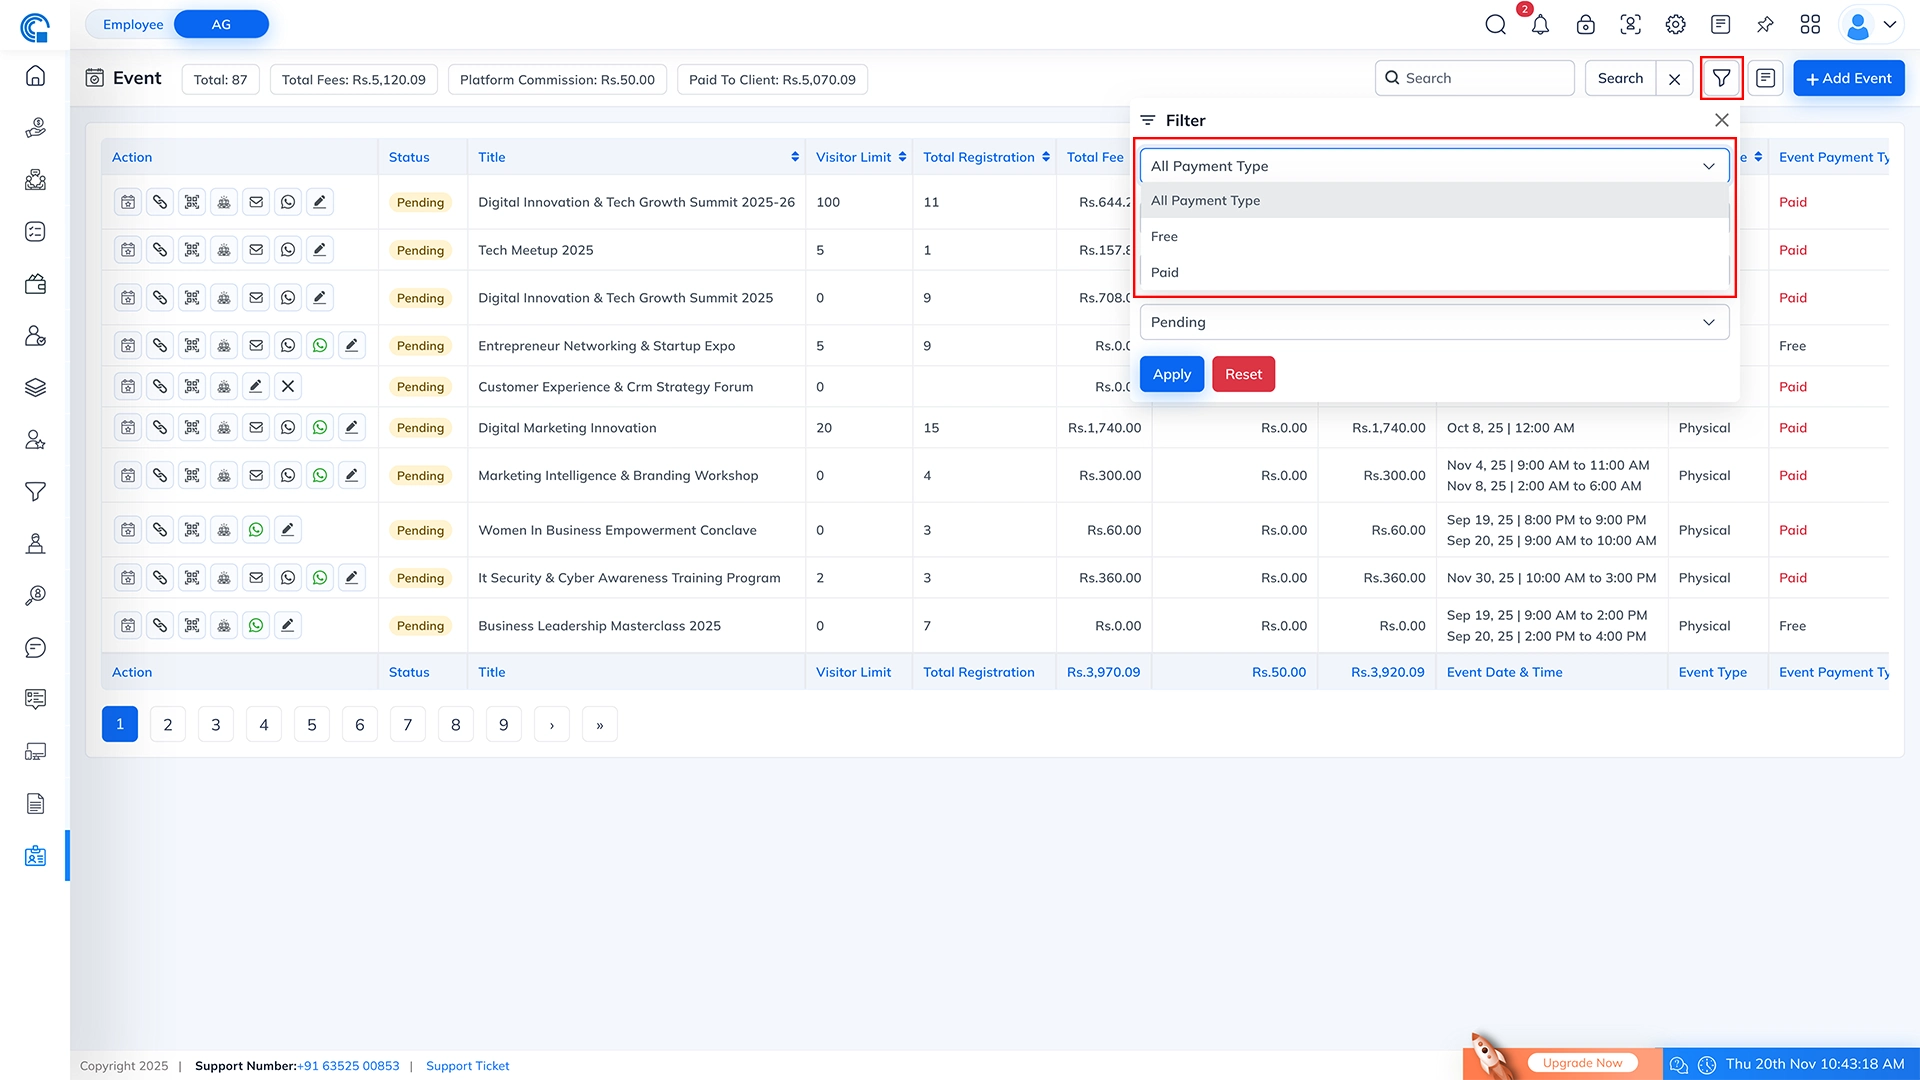
Payment Type Filter
- The Payment Type Filter allows you to quickly narrow down events based on whether they are Paid or Free. This helps in easily managing and reviewing events according to their payment category.
- How it Works?
- Select Paid to view only paid events.
- Select Free to view only free events.
- Select All Payment Type to display both paid and free events together.
(Once you choose a payment type, the event list will refresh and show only the events matching your selected filter.)
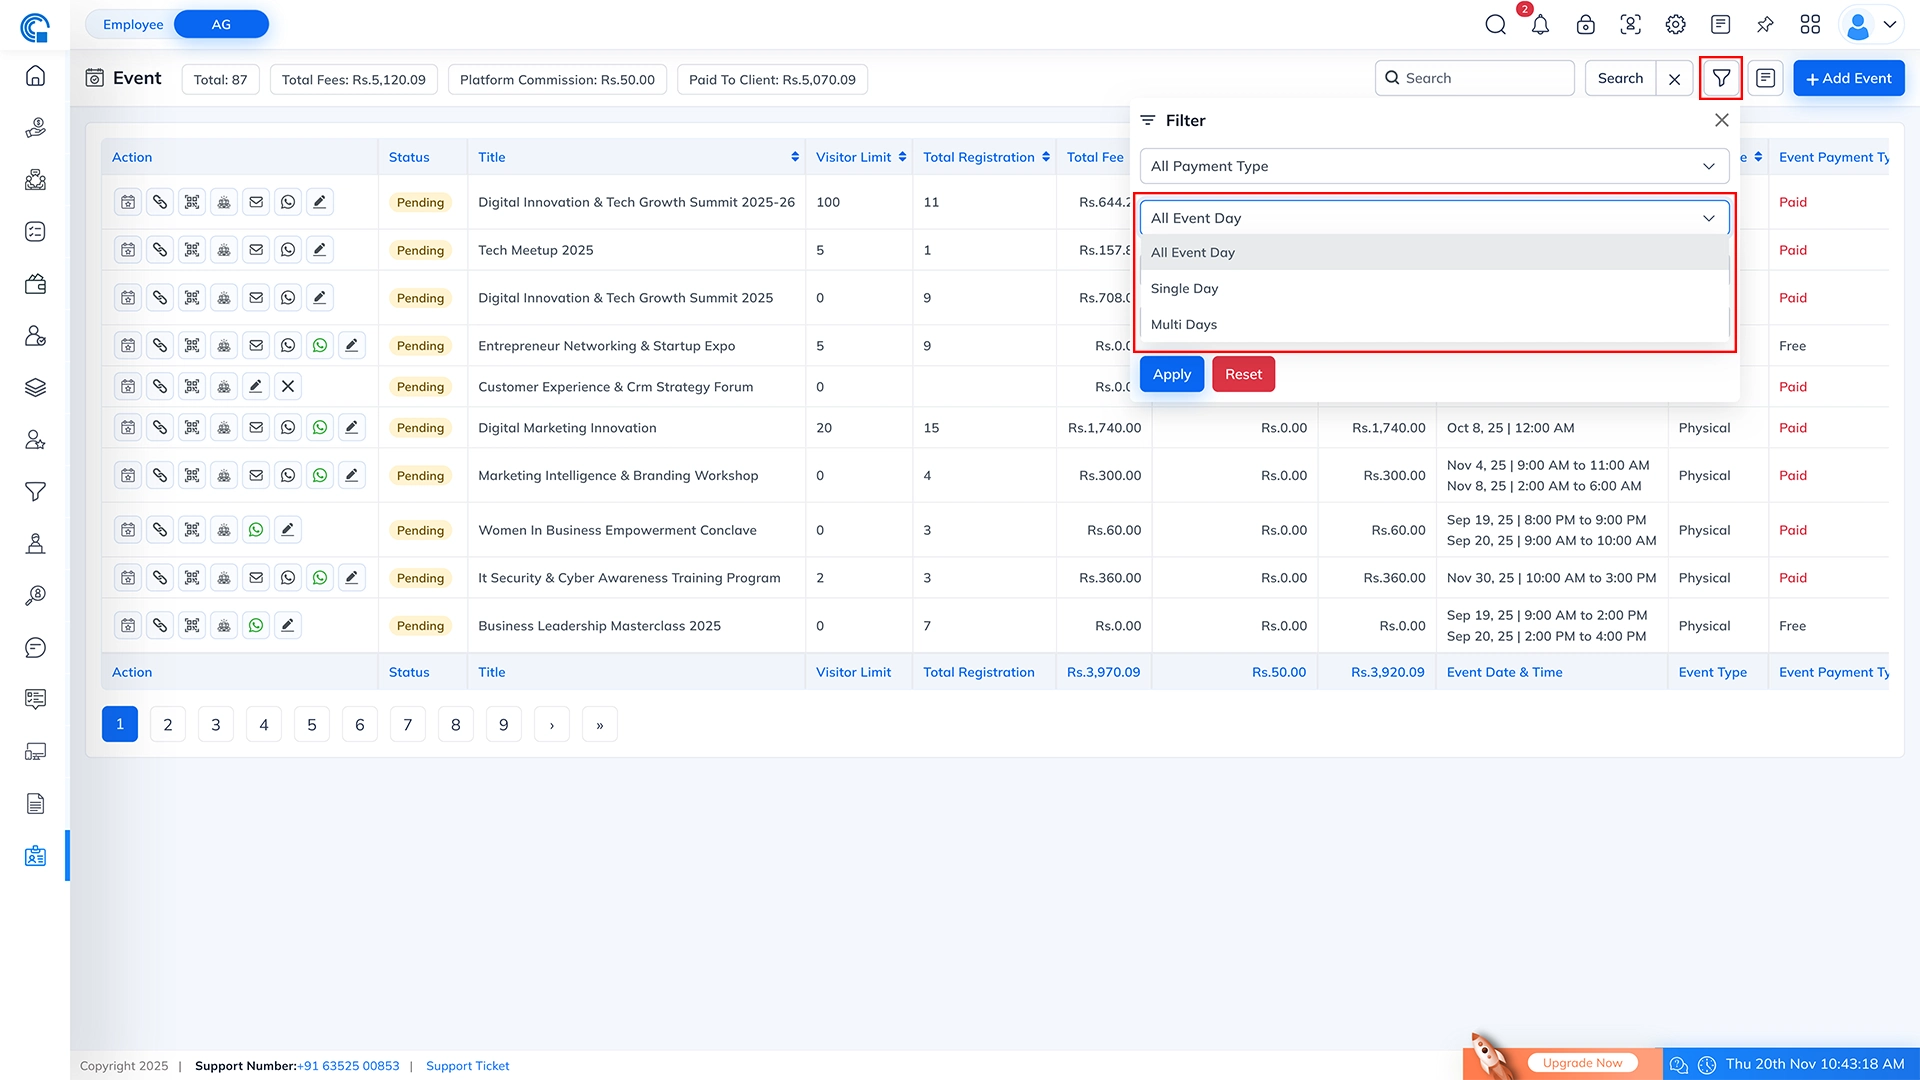
Event Day Type Filter
The Event Day Type Filter allows you to quickly view events based on their duration. This helps you separate one-day events from multi-day programs for better event management and reporting.
How it Works?
- Select Single Day to view events that are scheduled for only one specific date.
- Select Multi Days to view events that run across two or more days.
- Select All Event Day to view both single and multi-day events together.
(When you choose a day type, the event list will instantly refresh and show only the events that match your selected option.)
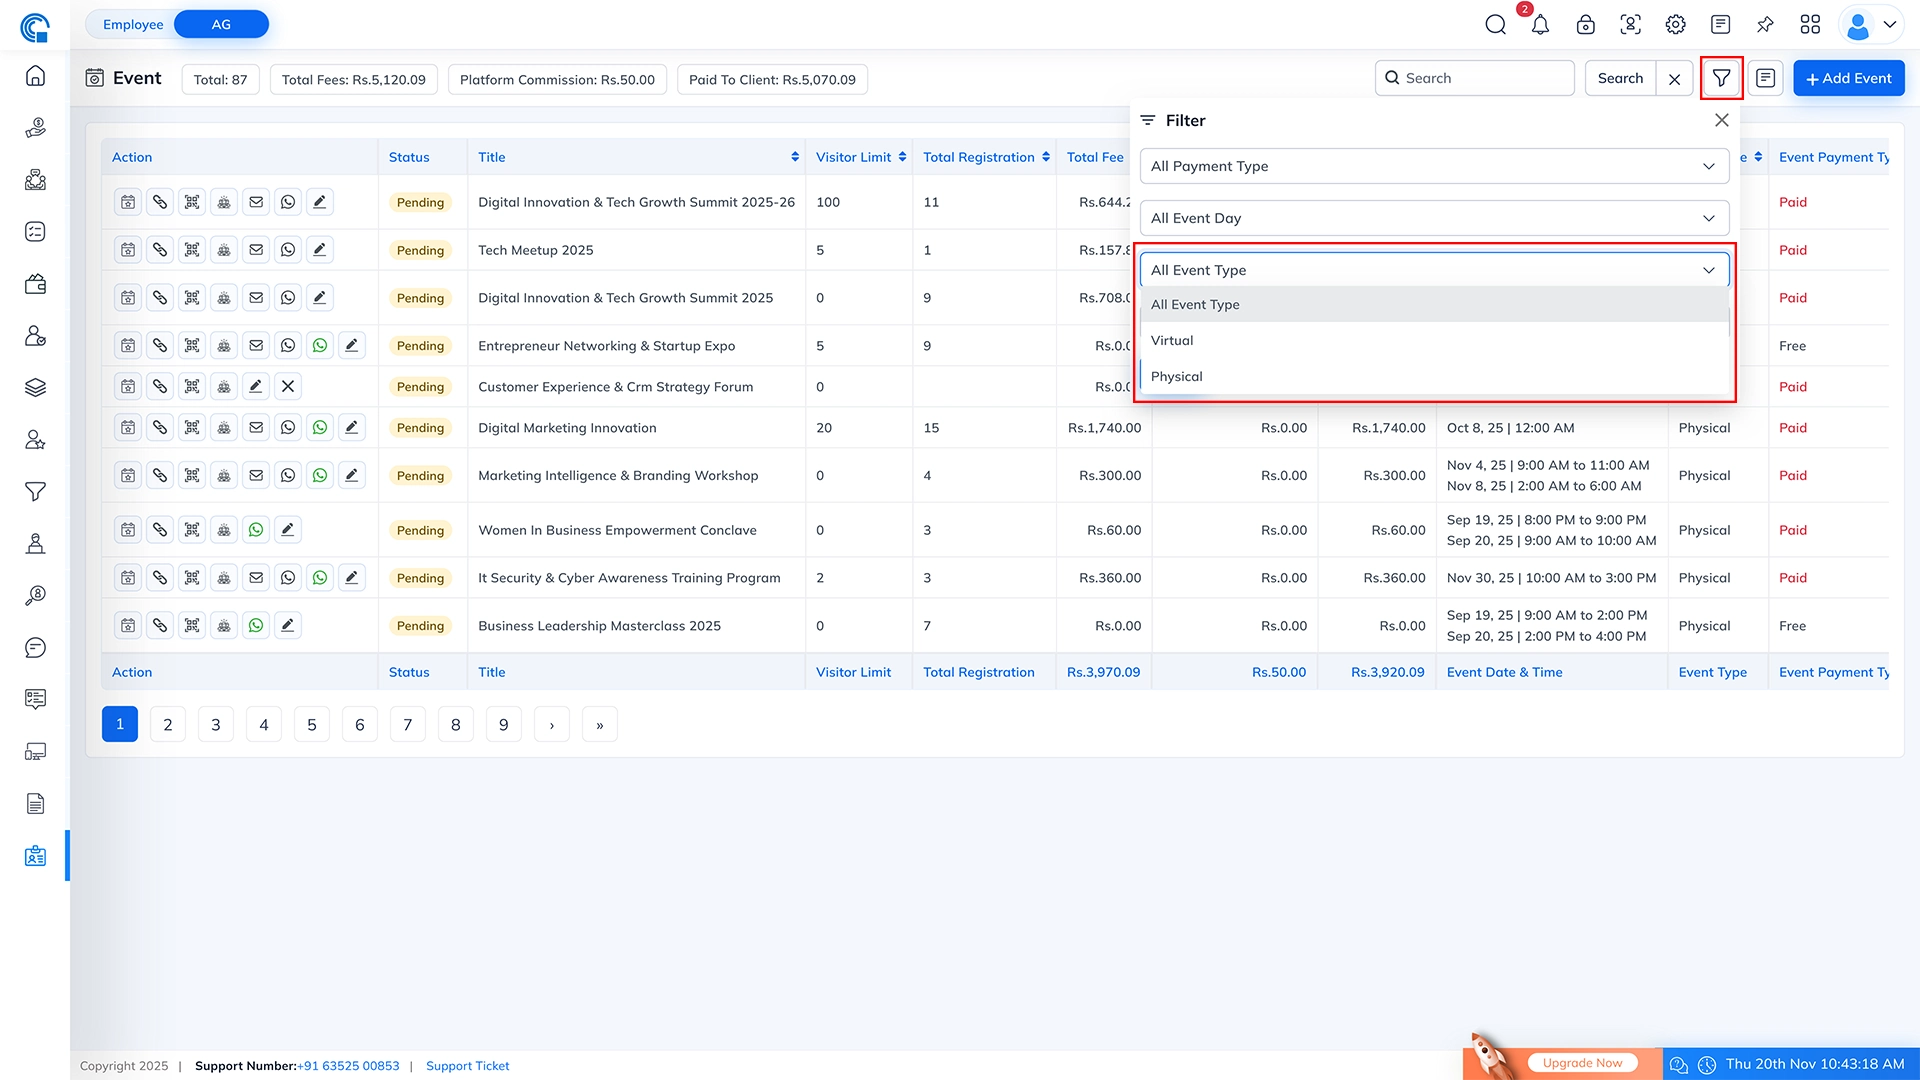
Event Type Filter:
The Event Type Filter helps you quickly narrow down events based on whether they are conducted online (Virtual) or in person (Physical). This makes event tracking and management easier when handling different kinds of event formats.
How it Works?
- Select Physical to view events that require attendees to be present at a physical location.
- Select Virtual to view online events conducted through video conferencing platforms or webinars.
- Select All Event Type to display both physical and virtual events together in the list.
(Once you choose an event type, the list will automatically refresh and show only the matching events.)
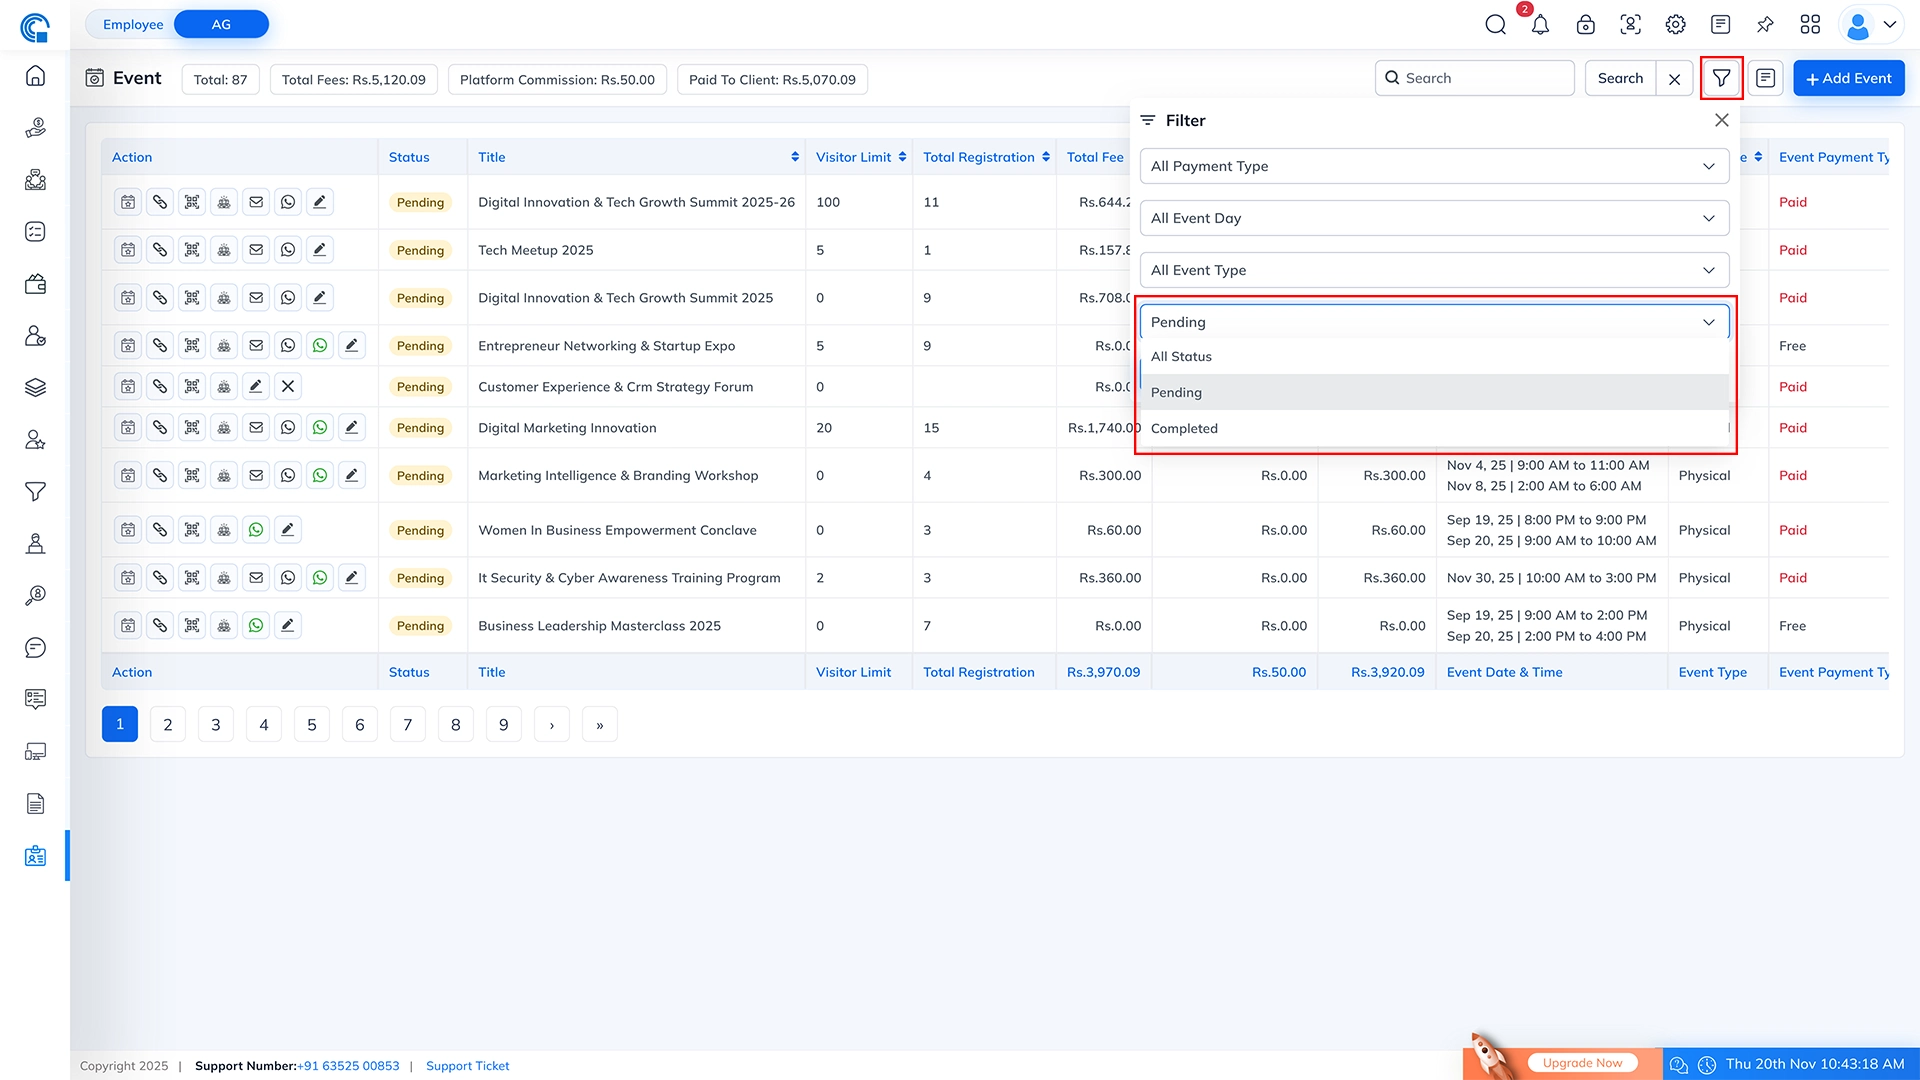
Event Status Filter:
The Event Status Filter allows you to quickly view events based on their current progress or completion stage. This helps in monitoring which events are active, which are finished, and which still require actions.
How it Works?
- Pending: Shows all events that are created but not yet completed. These events may still be open for registrations, updates, or preparation.
- Completed: Displays events that have been successfully finished. All registrations, payments, and attendance activities are closed for these events.
- All Status: Shows all events regardless of whether they are pending or completed.
(After selecting a status, the event list will automatically update and show only the events matching your selection.)
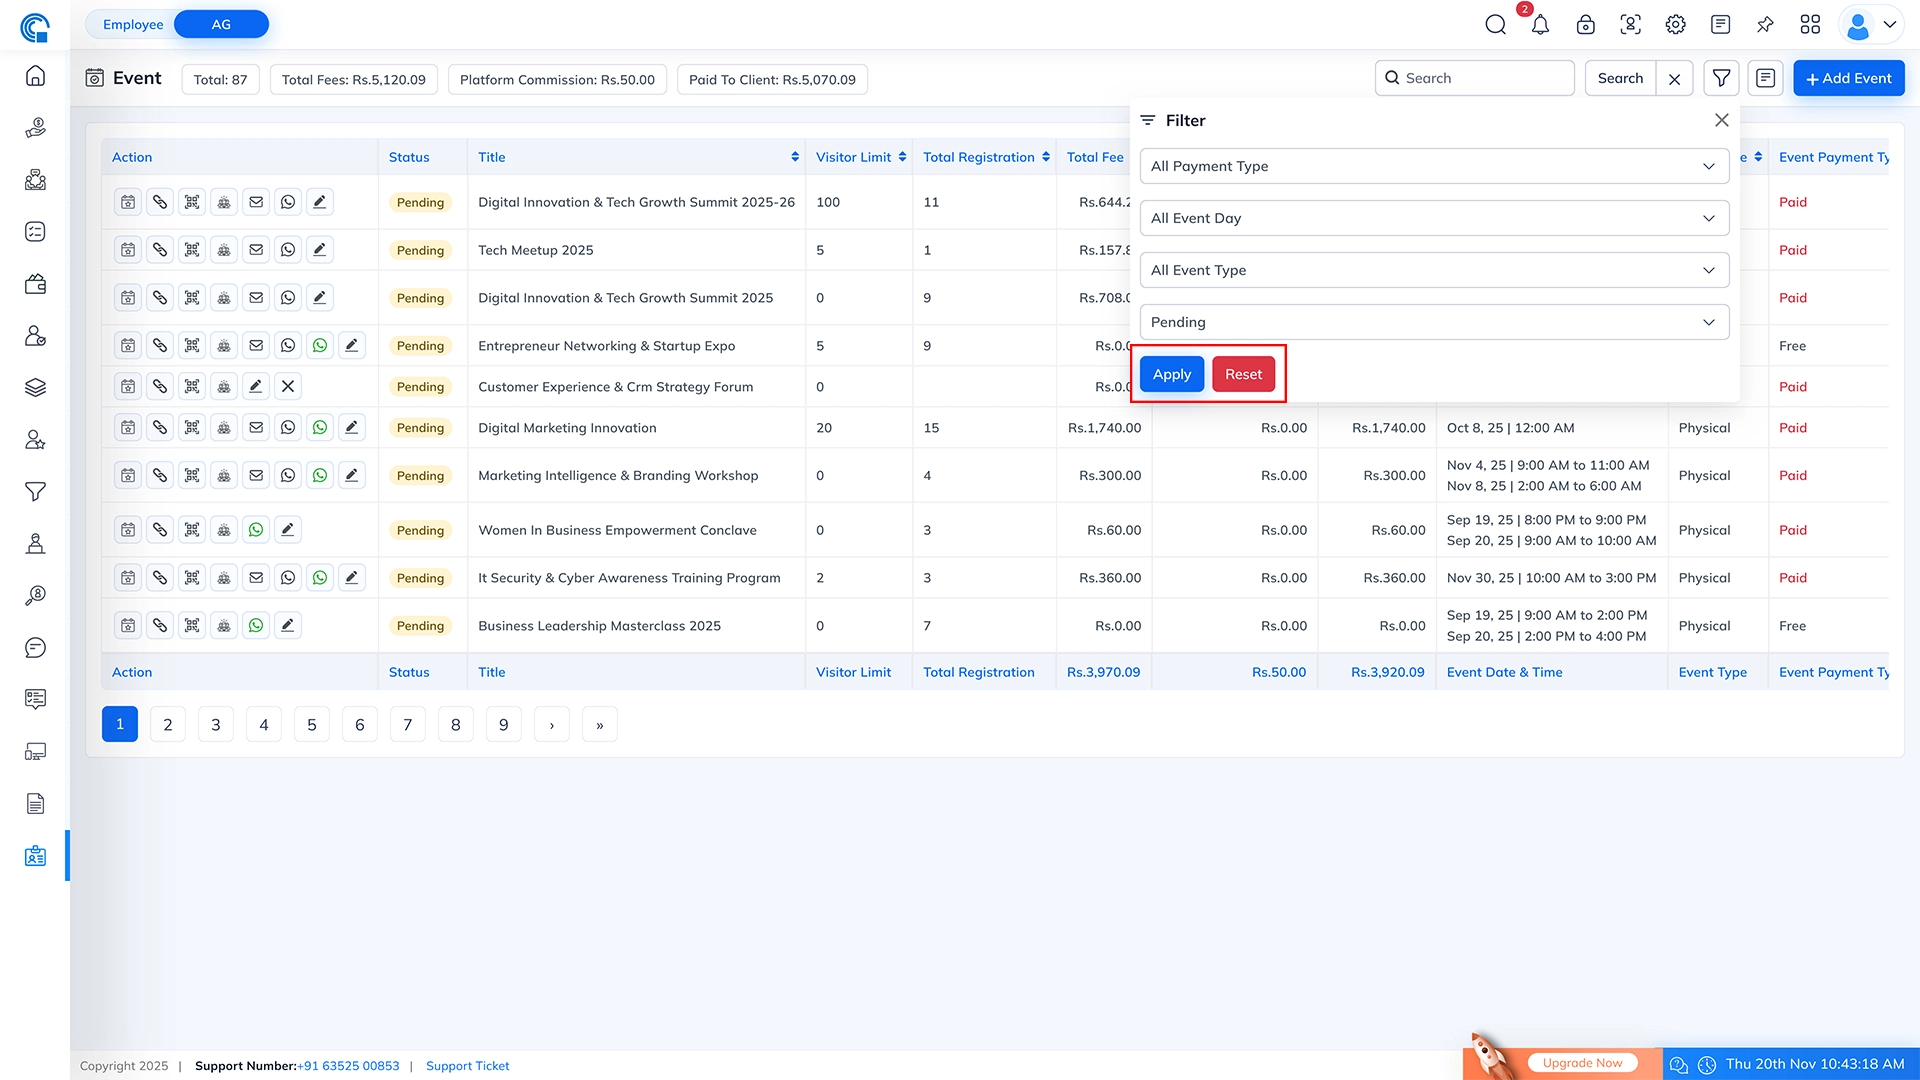
Apply & Reset Buttons (Filter Actions):
- Apply Button: The Apply button is used to execute the filter you have selected. Once you choose any filter option (such as Payment Type, Event Day Type, Event Type, or Status), clicking Apply will refresh the event list and show only the records that match your selected criteria.
- Reset Button: The Reset button clears all the selected filter options and restores the event list to its default view. After clicking Reset, you will see all events again, without any filters applied.
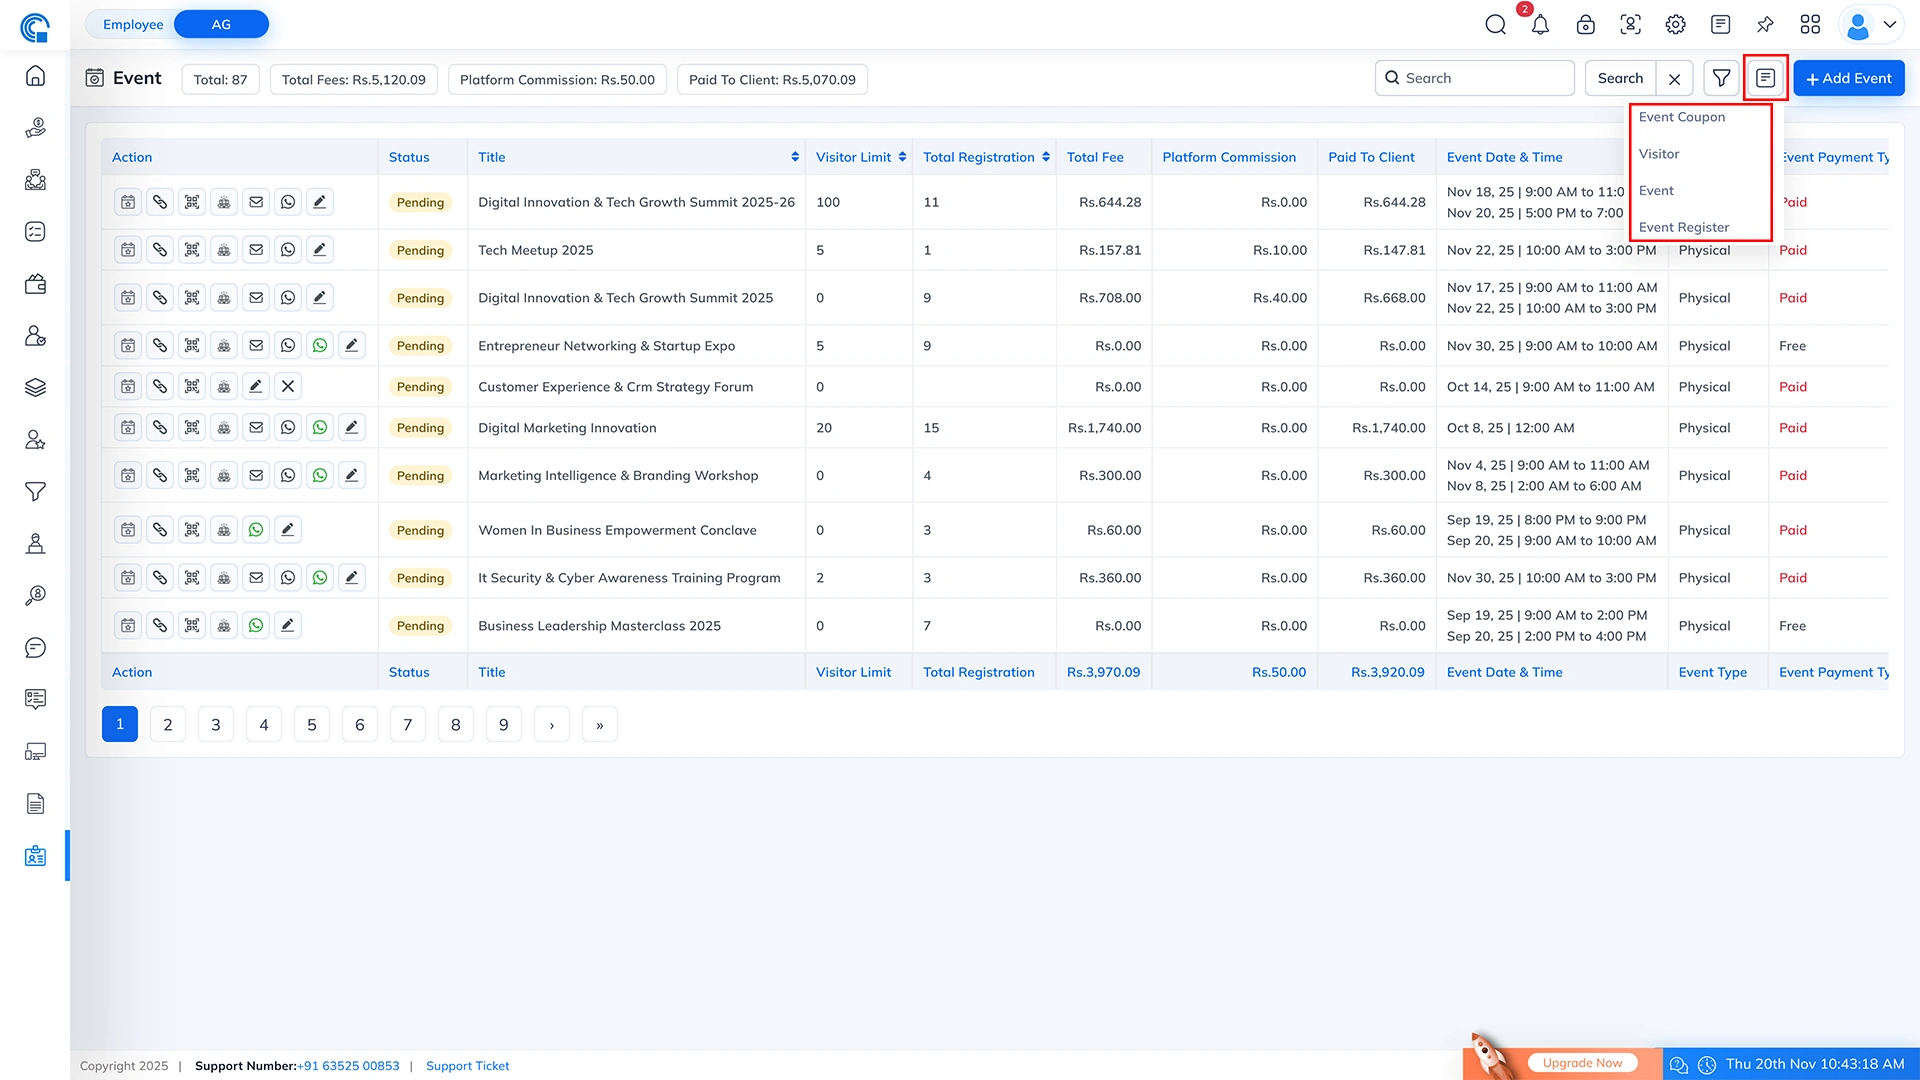
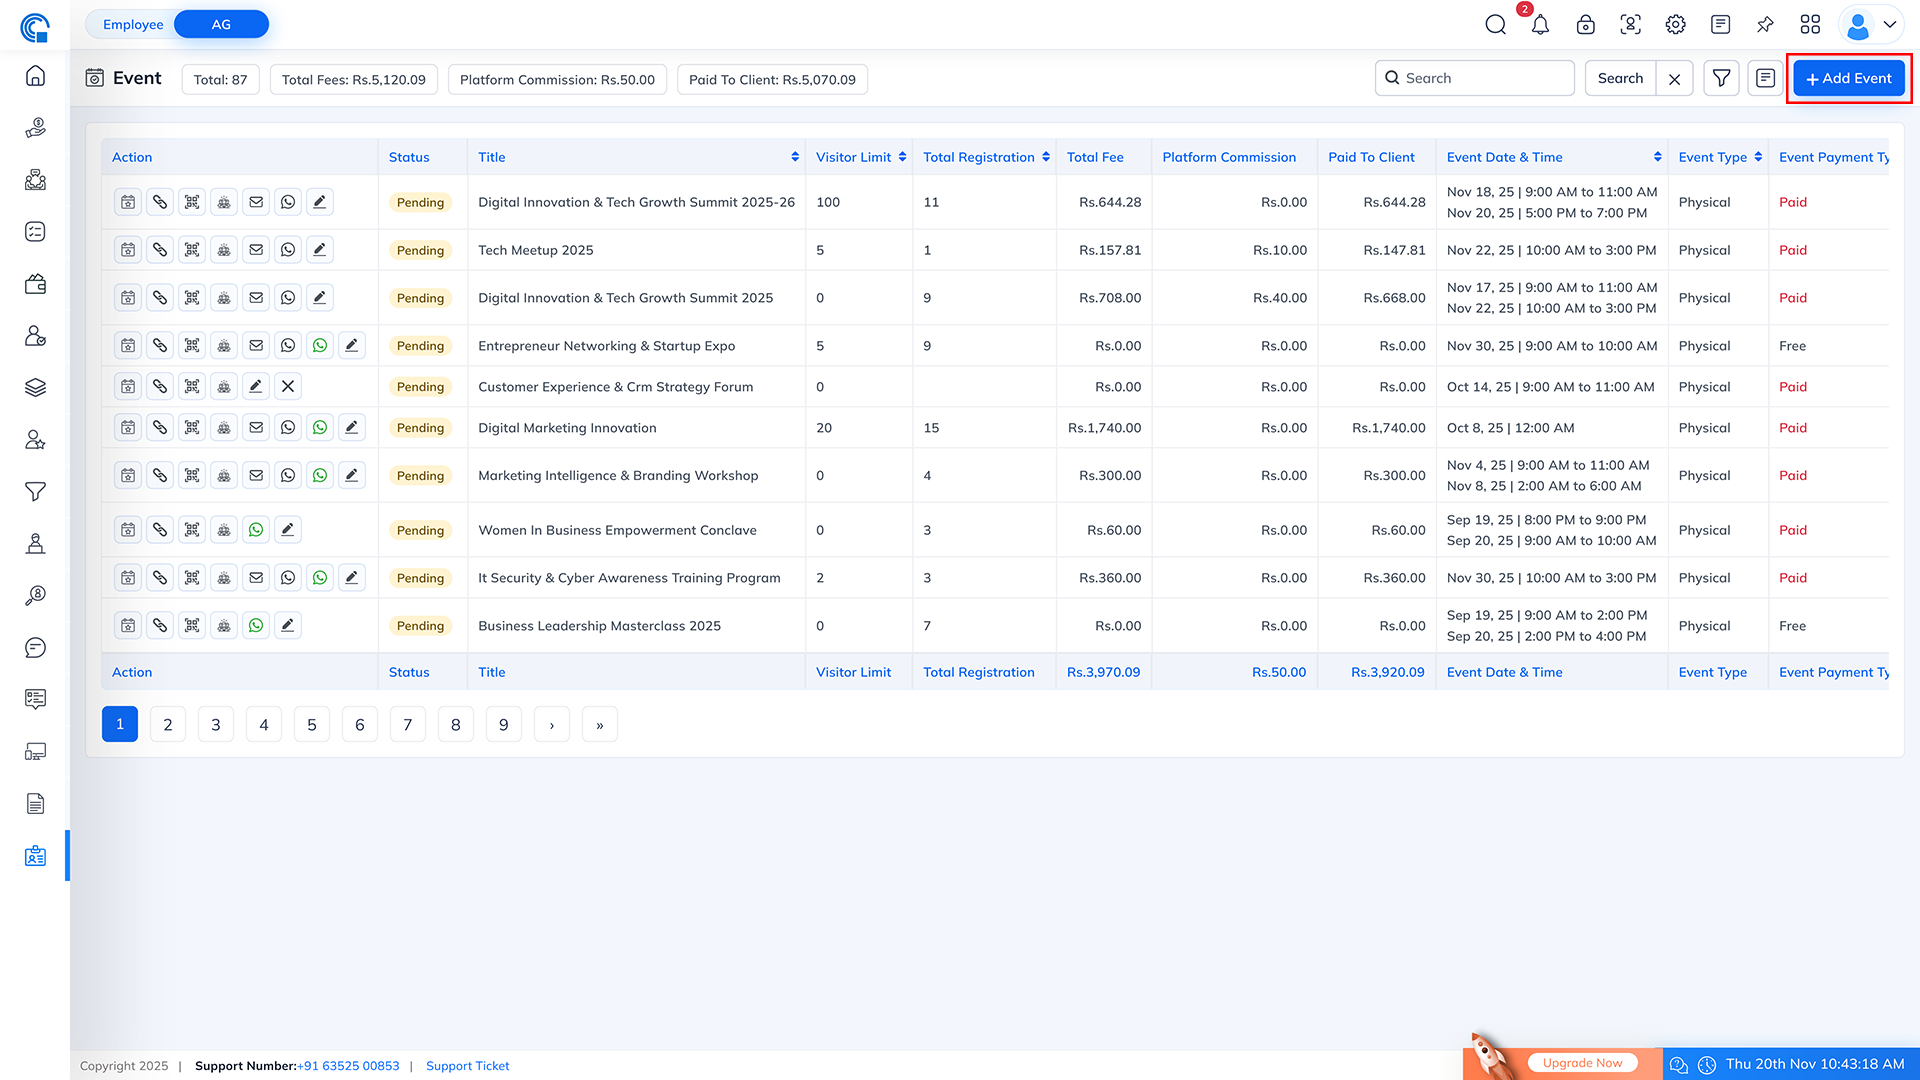
Navigation Pages Icon (Event Related Pages):
- When you click on this icon, a quick navigation dropdown opens showing all event-related pages. This allows you to instantly switch between different event modules without going back to the main menu.
- Event Coupon: Direct access to the Event Coupon module for creating and managing event discount coupons.
- Visitor: Opens the Visitor list where you can view and manage all visitors registered for events.
- Event: Takes you to the Event listing page to view, edit, or manage all events.
- Event Register: Opens the Event Registration module where all registration entries are listed and managed.
- Purpose: This dropdown provides quick, one-click navigation to all event-related layouts, helping you move between sections faster and manage events more efficiently.
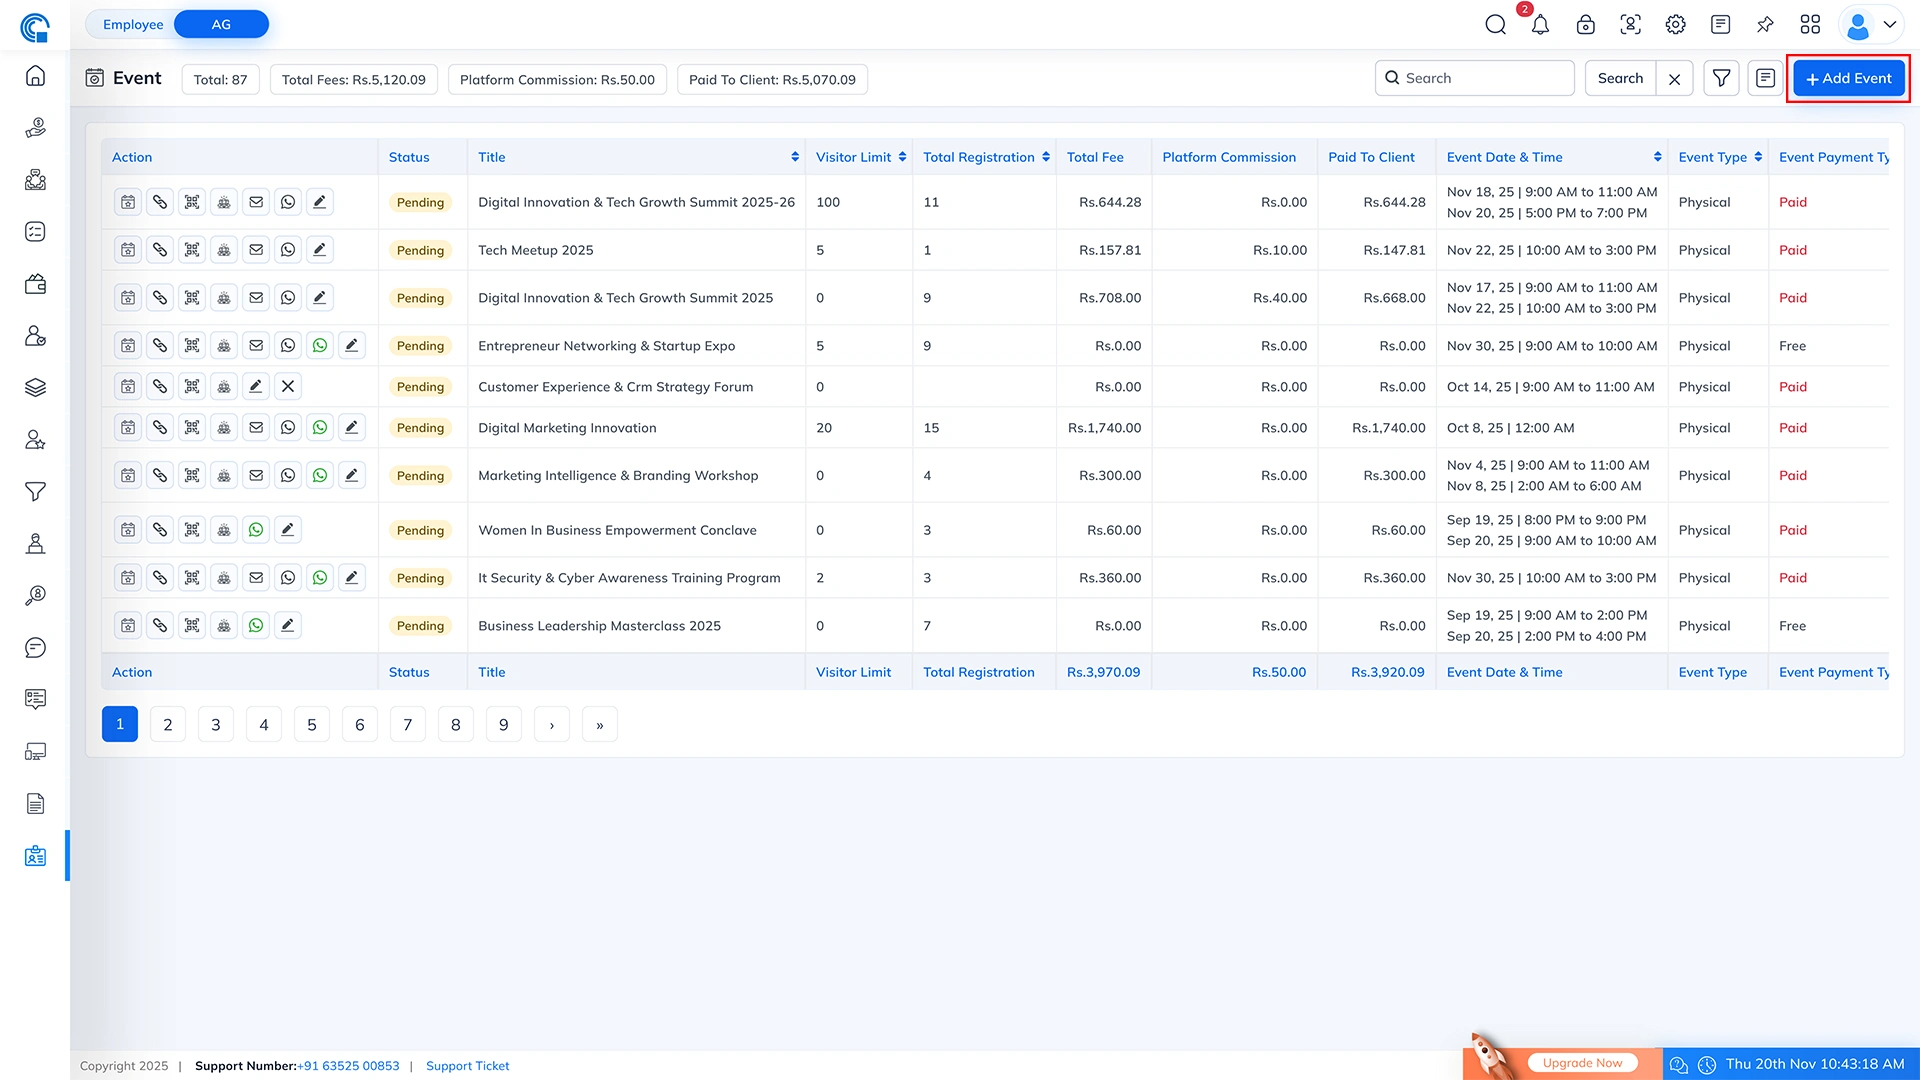
- Add Event Button: Clicking the Add Event button opens the Event Creation Form, where you can create a new event with all required details.
- Purpose: This button is used to add a new event into the system.
- Why It’s Useful: The Add Event button helps in quickly creating and managing events, ensuring all information is captured in one place before the event goes live.
Columns Description(Event Listing Layout):
- Action Column – Icon Wise Description
Icon & Caption Description Event Dashboard Opens the event dashboard where you can track all event-related data including registrations, attendance, payments, and analytics. Generate Link For Visitors Generates a unique registration link for the event. Users can fill out the registration form using this link. Registration QR Code Opens a QR code popup. Scanning this QR code allows visitors to access the registration form instantly. Show Registration Shows a complete list of all visitors who registered for the event. Attendance, check-in, check-out, and visitor details are shown here. Send Reminder In Email Sends an email reminder to all registered visitors for the selected event. Send Reminder In WhatsApp Sends a WhatsApp reminder message to all registered visitors. Send Confirmation In WhatsApp Sends a WhatsApp message specifically for attendance reminders (e.g., "Event starting soon"). Edit Opens the event edit form where you can update event details such as title, date, fees, visitor limit, etc. Remove Removes the event record from the system. (A confirmation popup appears before final deletion.) - Other Column Description:
Column Name Description Status Shows the status of the event. Pending = the event is upcoming. Completed = the event has already finished. Title Displays the title of the event. Example: Digital Innovation & Tech Growth Summit. Visitor Limit Shows the visitor limit set for the event. 0 = Unlimited visitors. Any number greater than 0 indicates a fixed visitor limit. Total Registration Displays the total number of users who have registered for the event. Total Fee Shows the total amount of fees collected from registrations for paid events. Platform Commission Shows the commission amount deducted by the platform/system. Paid To Client Shows the total amount that needs to be paid to the client after deducting platform charges, if any. Event Date & Time Displays the scheduled date and time of the event. Event Type Indicates the type of event (Physical / Virtual). Event Payment Type Indicates whether the event is Free or Paid. Event Day Type Shows whether the event is a Single-Day or Multi-Day event. - Pagination
- Pagination allows you to navigate through event records when there are too many entries to display on a single page.
- Pagination allows you to navigate through event records when there are too many entries to display on a single page.
- Other Functionality in Listing Layout:
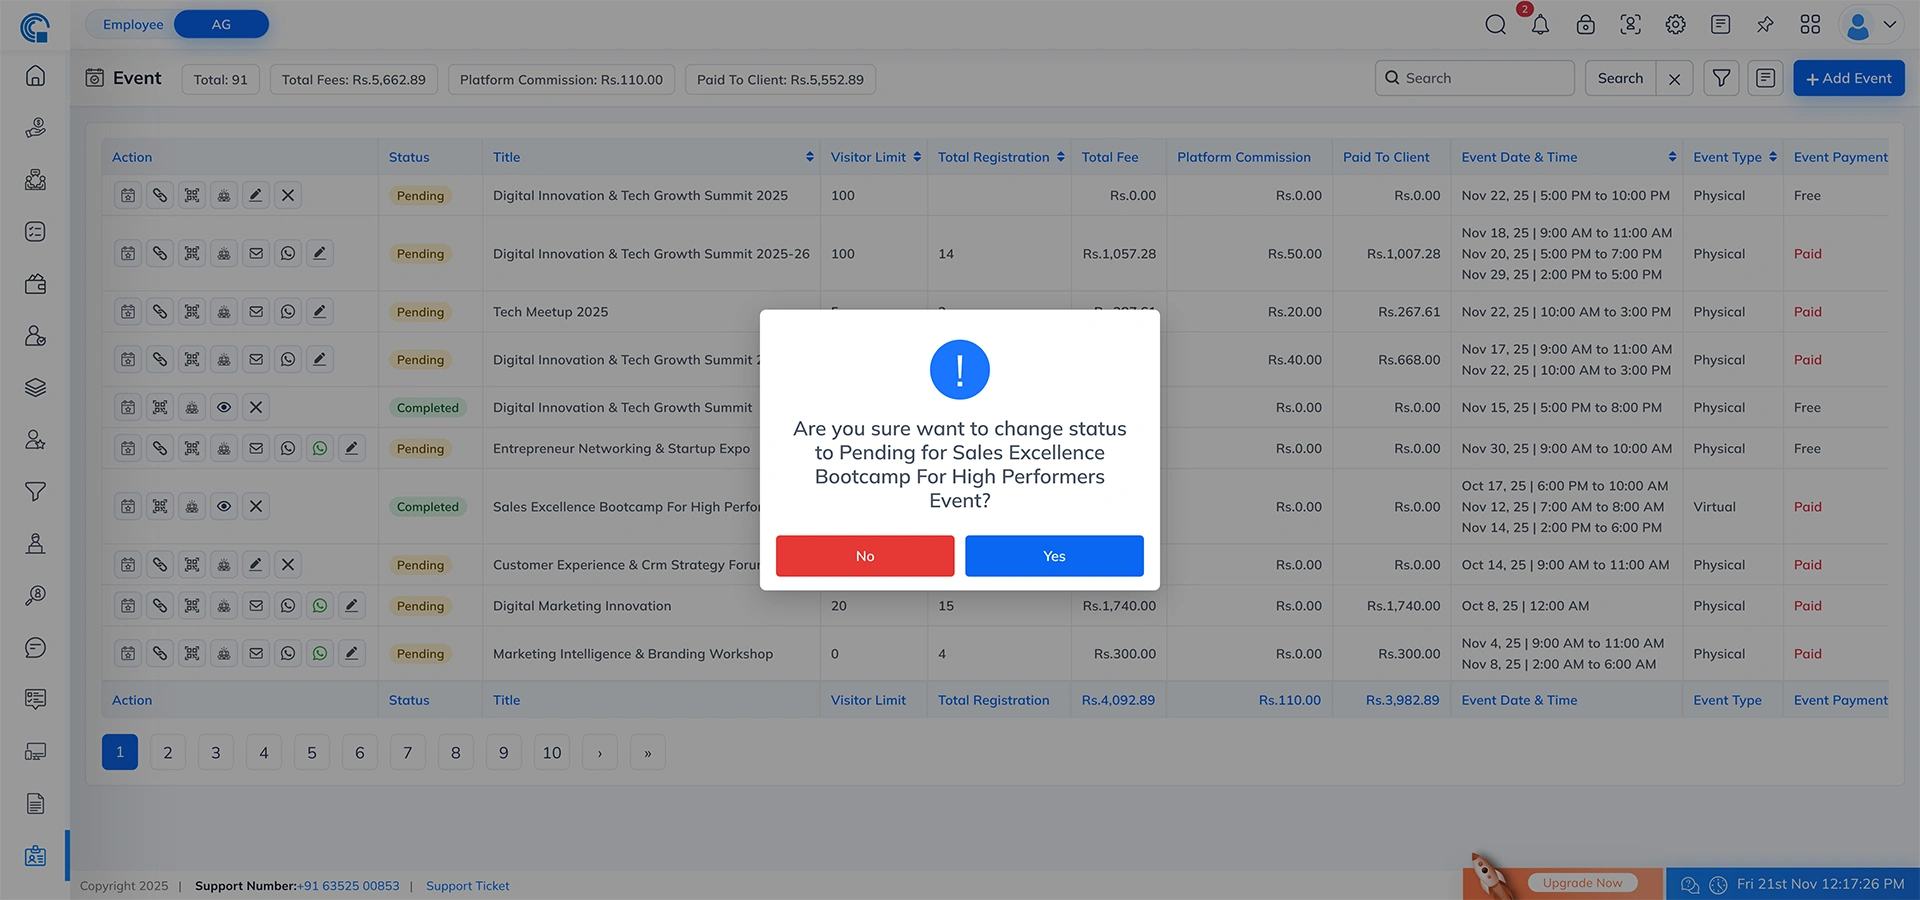
- Change Event Status (Completed ? Pending):
- You can easily update the status of any event directly from the event listing page.
- When an event is marked as Completed but you need to re-open it (for corrections, additional registrations, or updates), you can convert it back to Pending.
- How It Works?
- Go to the Status column in the event list.
- Click on the Completed status badge.
- A confirmation popup will appear asking:
- Are you sure want to change status to Pending for this event?
- If you click “No” → The popup will close and no changes will be made.
- If you click “Yes” → The event status will be updated to Pending, and it will again behave like an active event.
- Why This Feature Is Useful?
- Allows correcting mistakes made during event closure
- Helps reopen events for additional registrations
- Useful when event details need modification after completion
- Enables better control and flexibility in event management
(This feature ensures that event status changes are intentional, secure, and fully confirmed by the user before being applied.)
- Change Event Status (Completed ? Pending):
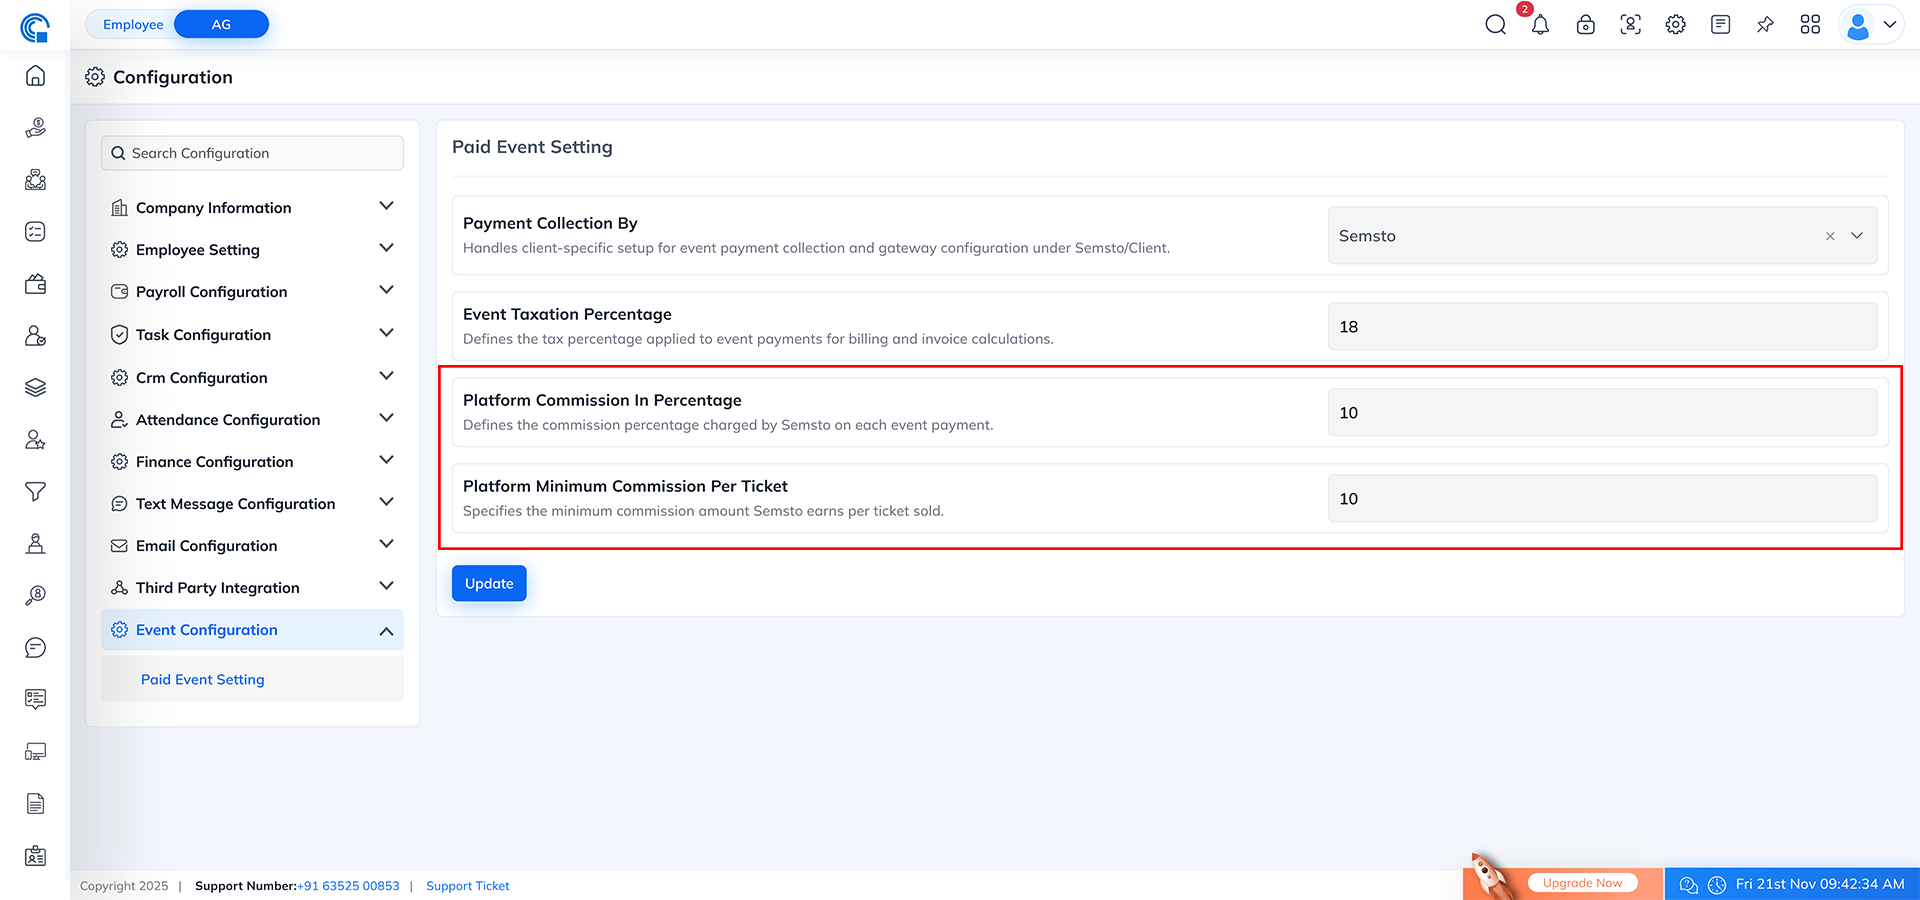
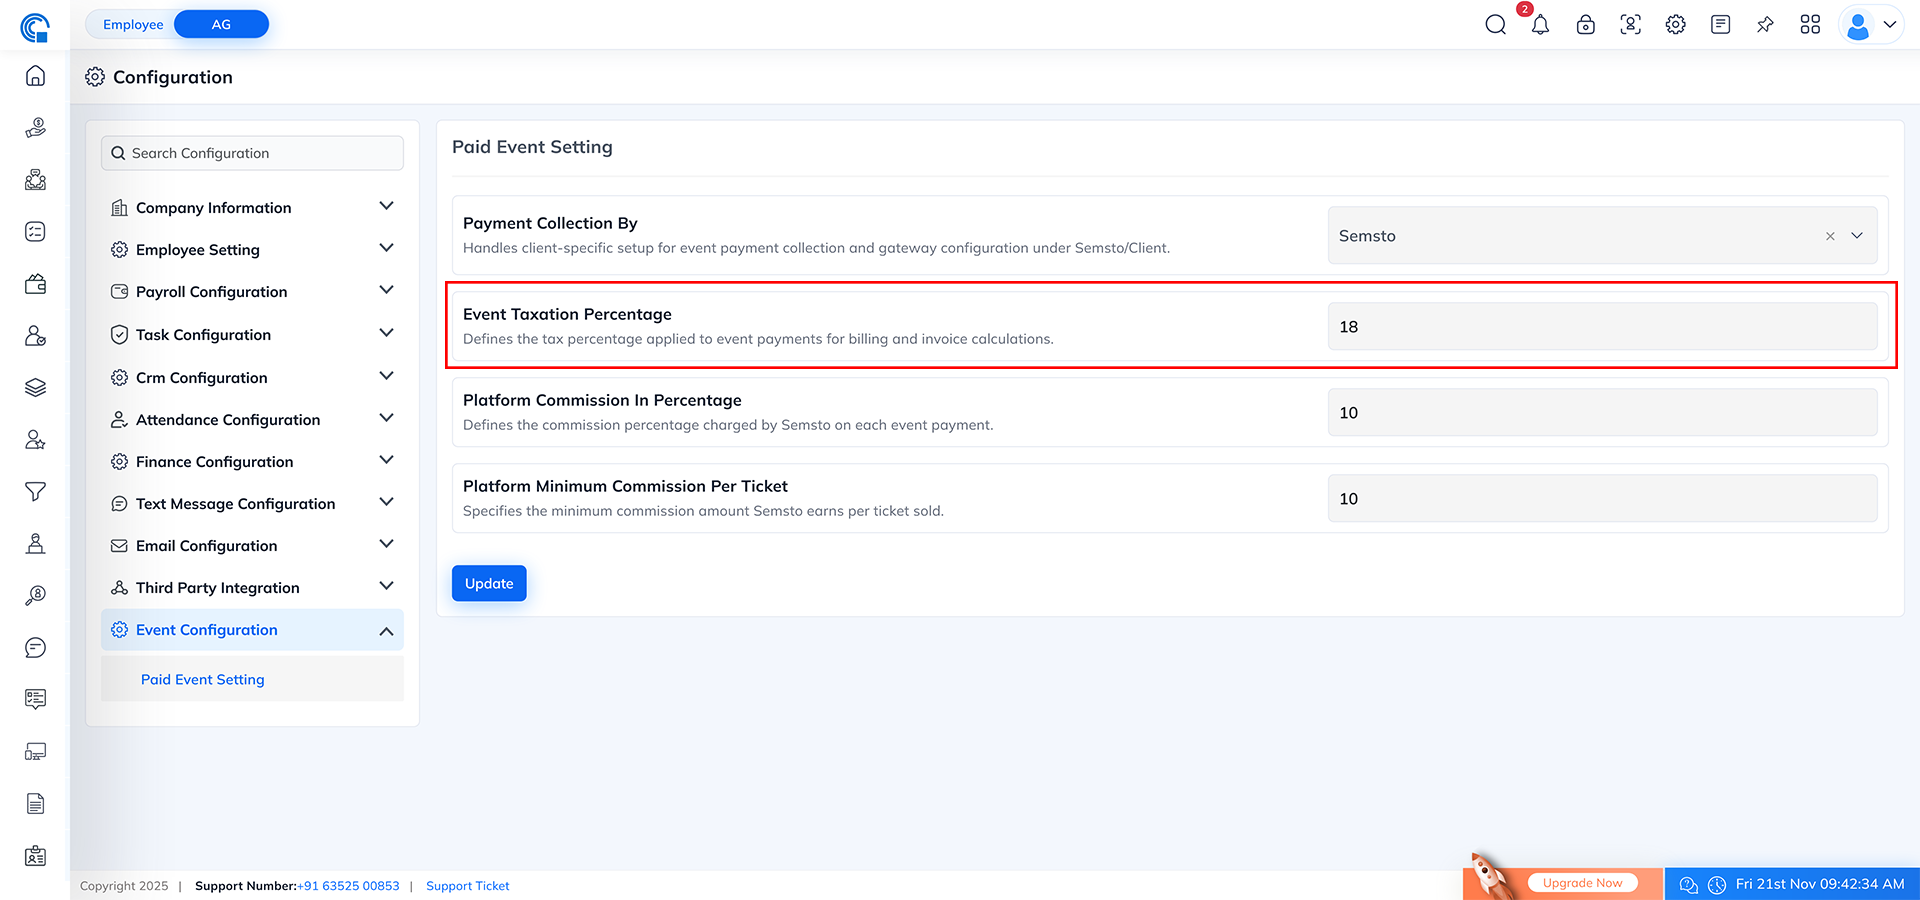
Know how payment collection work?
This is based on configuration, Go to Setting-> Configuration -> Event Configuration -> Paid Event Setting. Here we have configuration Payment Collection By, based on this configuration payment will be managed.
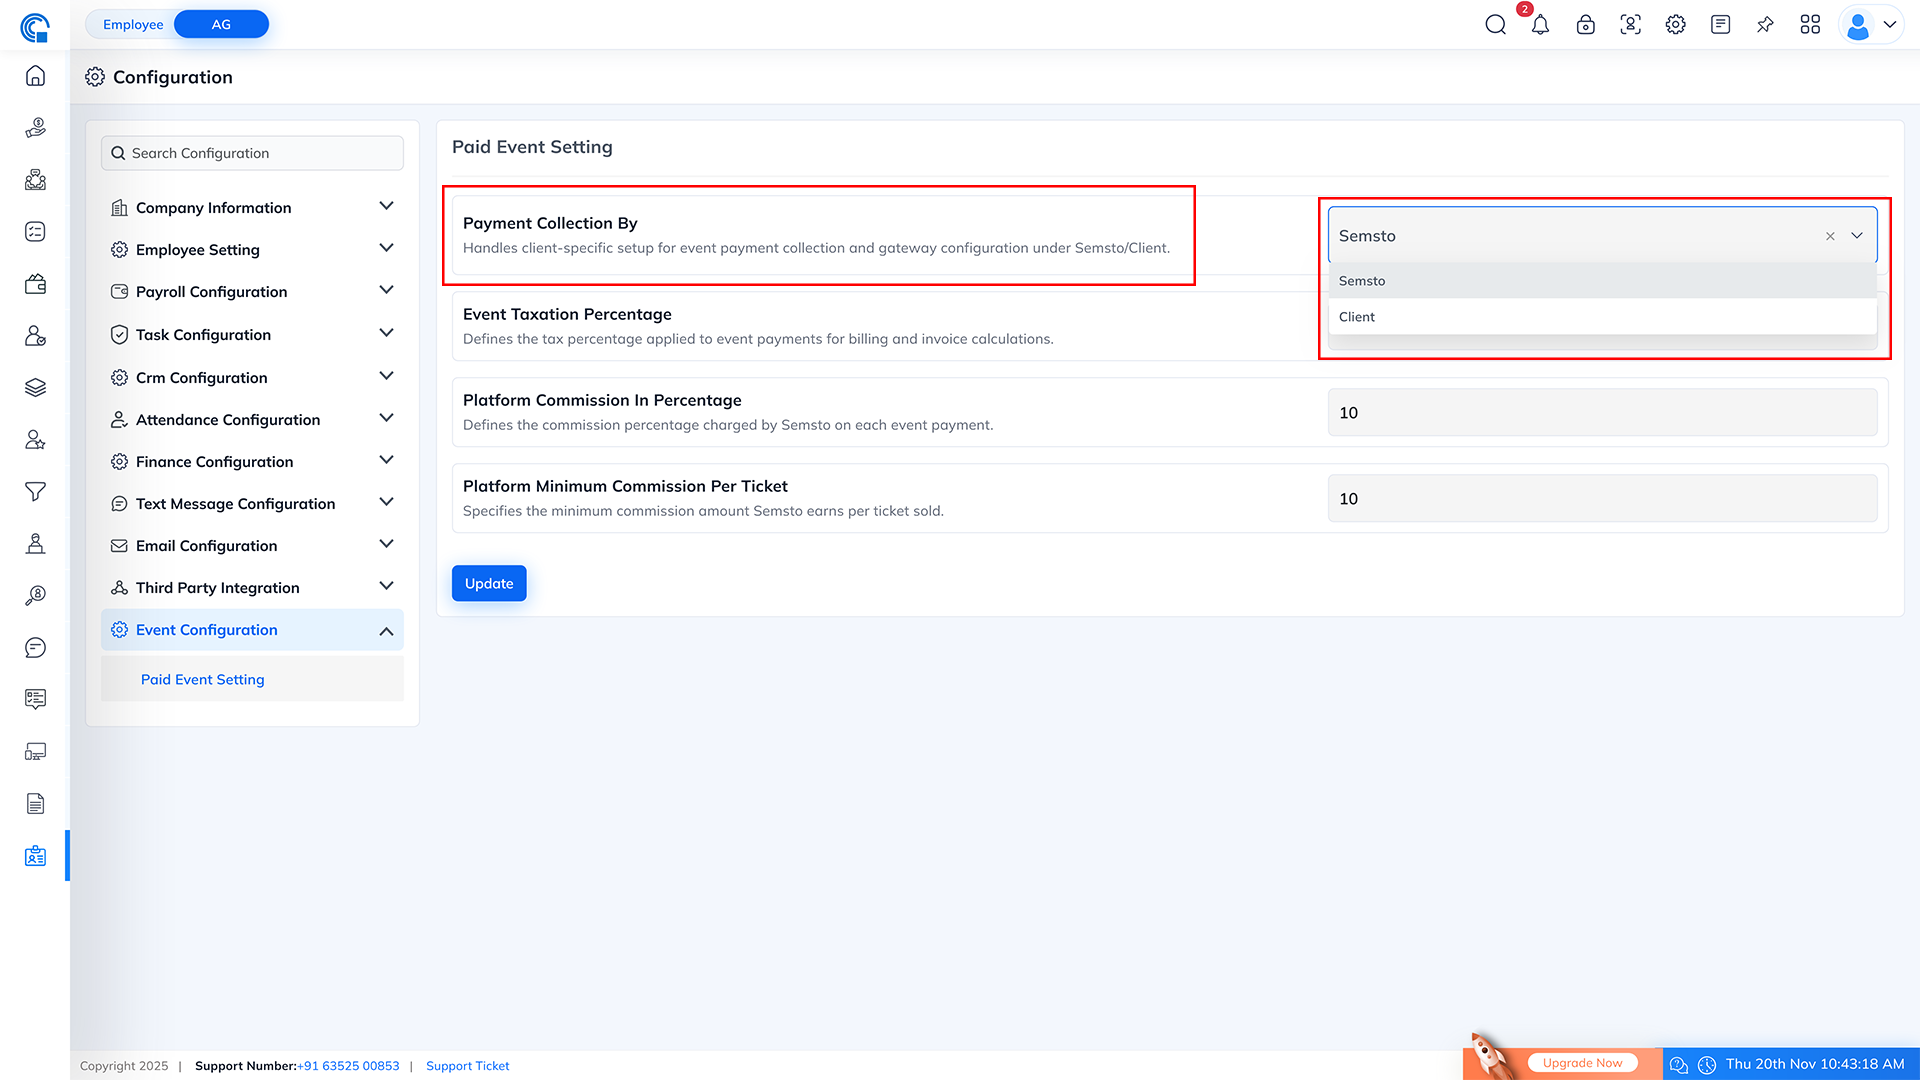
- Payment Collection Configuration Logic:
- Payment Collection By: Semsto
- If the configuration is set to Semsto, it means that all event payments are collected directly by Semsto through the system’s payment gateway.
- In the event listing page, the column will show the label “Paid To Client”.
- Meaning: After deducting platform commission and taxes, the remaining amount is what Semsto has to pay to the client.
- Example:
- If total fee collected = Rs. 5,000
- Platform commission = Rs. 500
- Then Paid To Client = Rs. 4,500
Payment Collection By: Client
- If the configuration is set to Client, it means that the client collects event payments directly, not Semsto.
- In the event listing page, the column will show the label “Remaining Fees”.
- Meaning: This shows how much payment belongs to the client after deducting platform fees.
- Example:
- If event fee expected = Rs. 5,000
- Platform Commission = Rs. 500
- Remaining Fees = Rs. 4,500
Summary Table
| Configuration Option | Listing Column Label | Meaning |
|---|---|---|
| Semsto | Paid To Client | Amount Semsto needs to pay to the client after commissions and deductions. |
| Client | Remaining Fees | Amount the client still needs to collect from users/registrations. |
How to Create a New Event?
Overview
This section guides you on how to create a new event in the system. You can easily add event details, schedule timings, set visitor limits, configure payment settings, and publish your event for registrations.
Where to Access the Event Creation Option?
- Go to the left navigation menu.
- Open the Visitor section.
- Click on the Event menu.
- On the top-right corner of the listing page, click the + Add Event button.
(Once you click the button, the Event Creation Form will open where you can enter all necessary event details.)
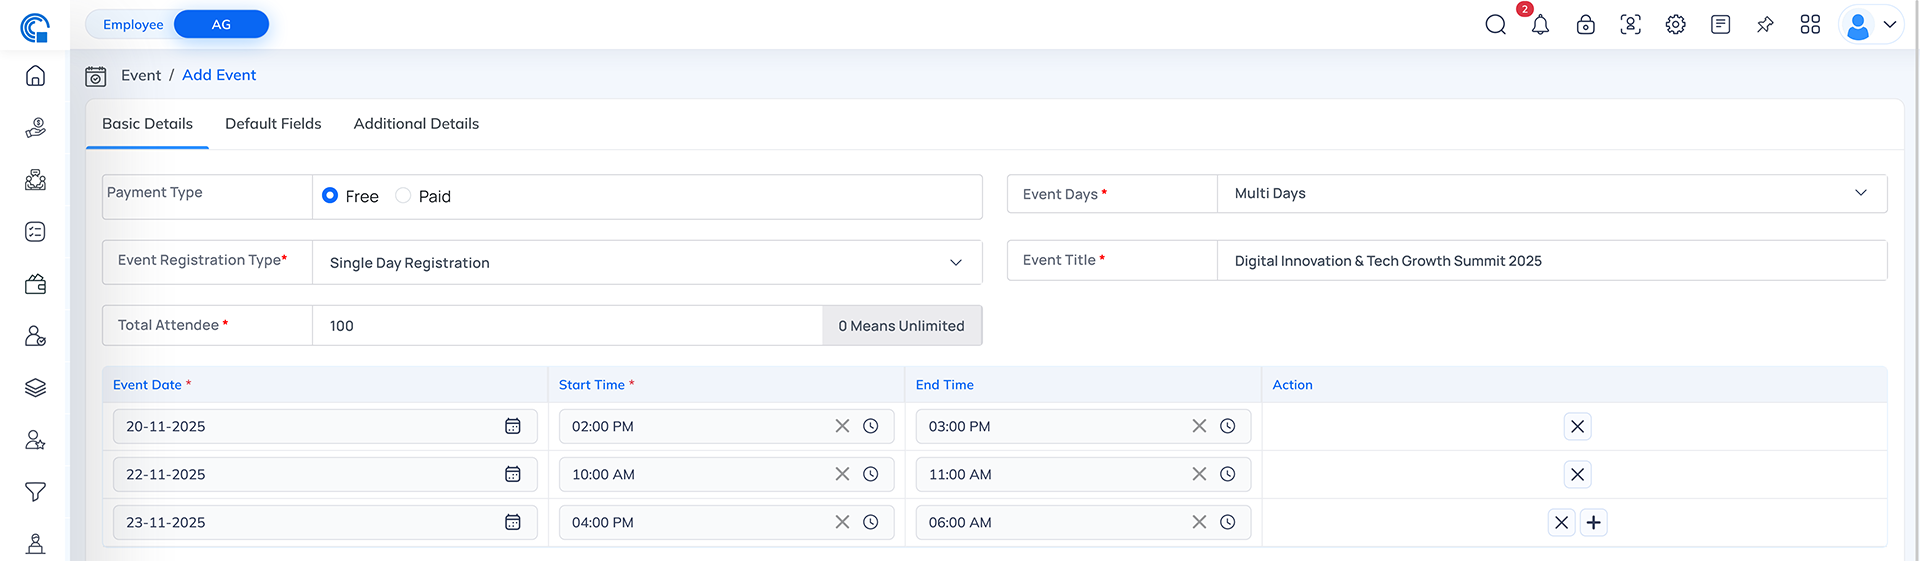
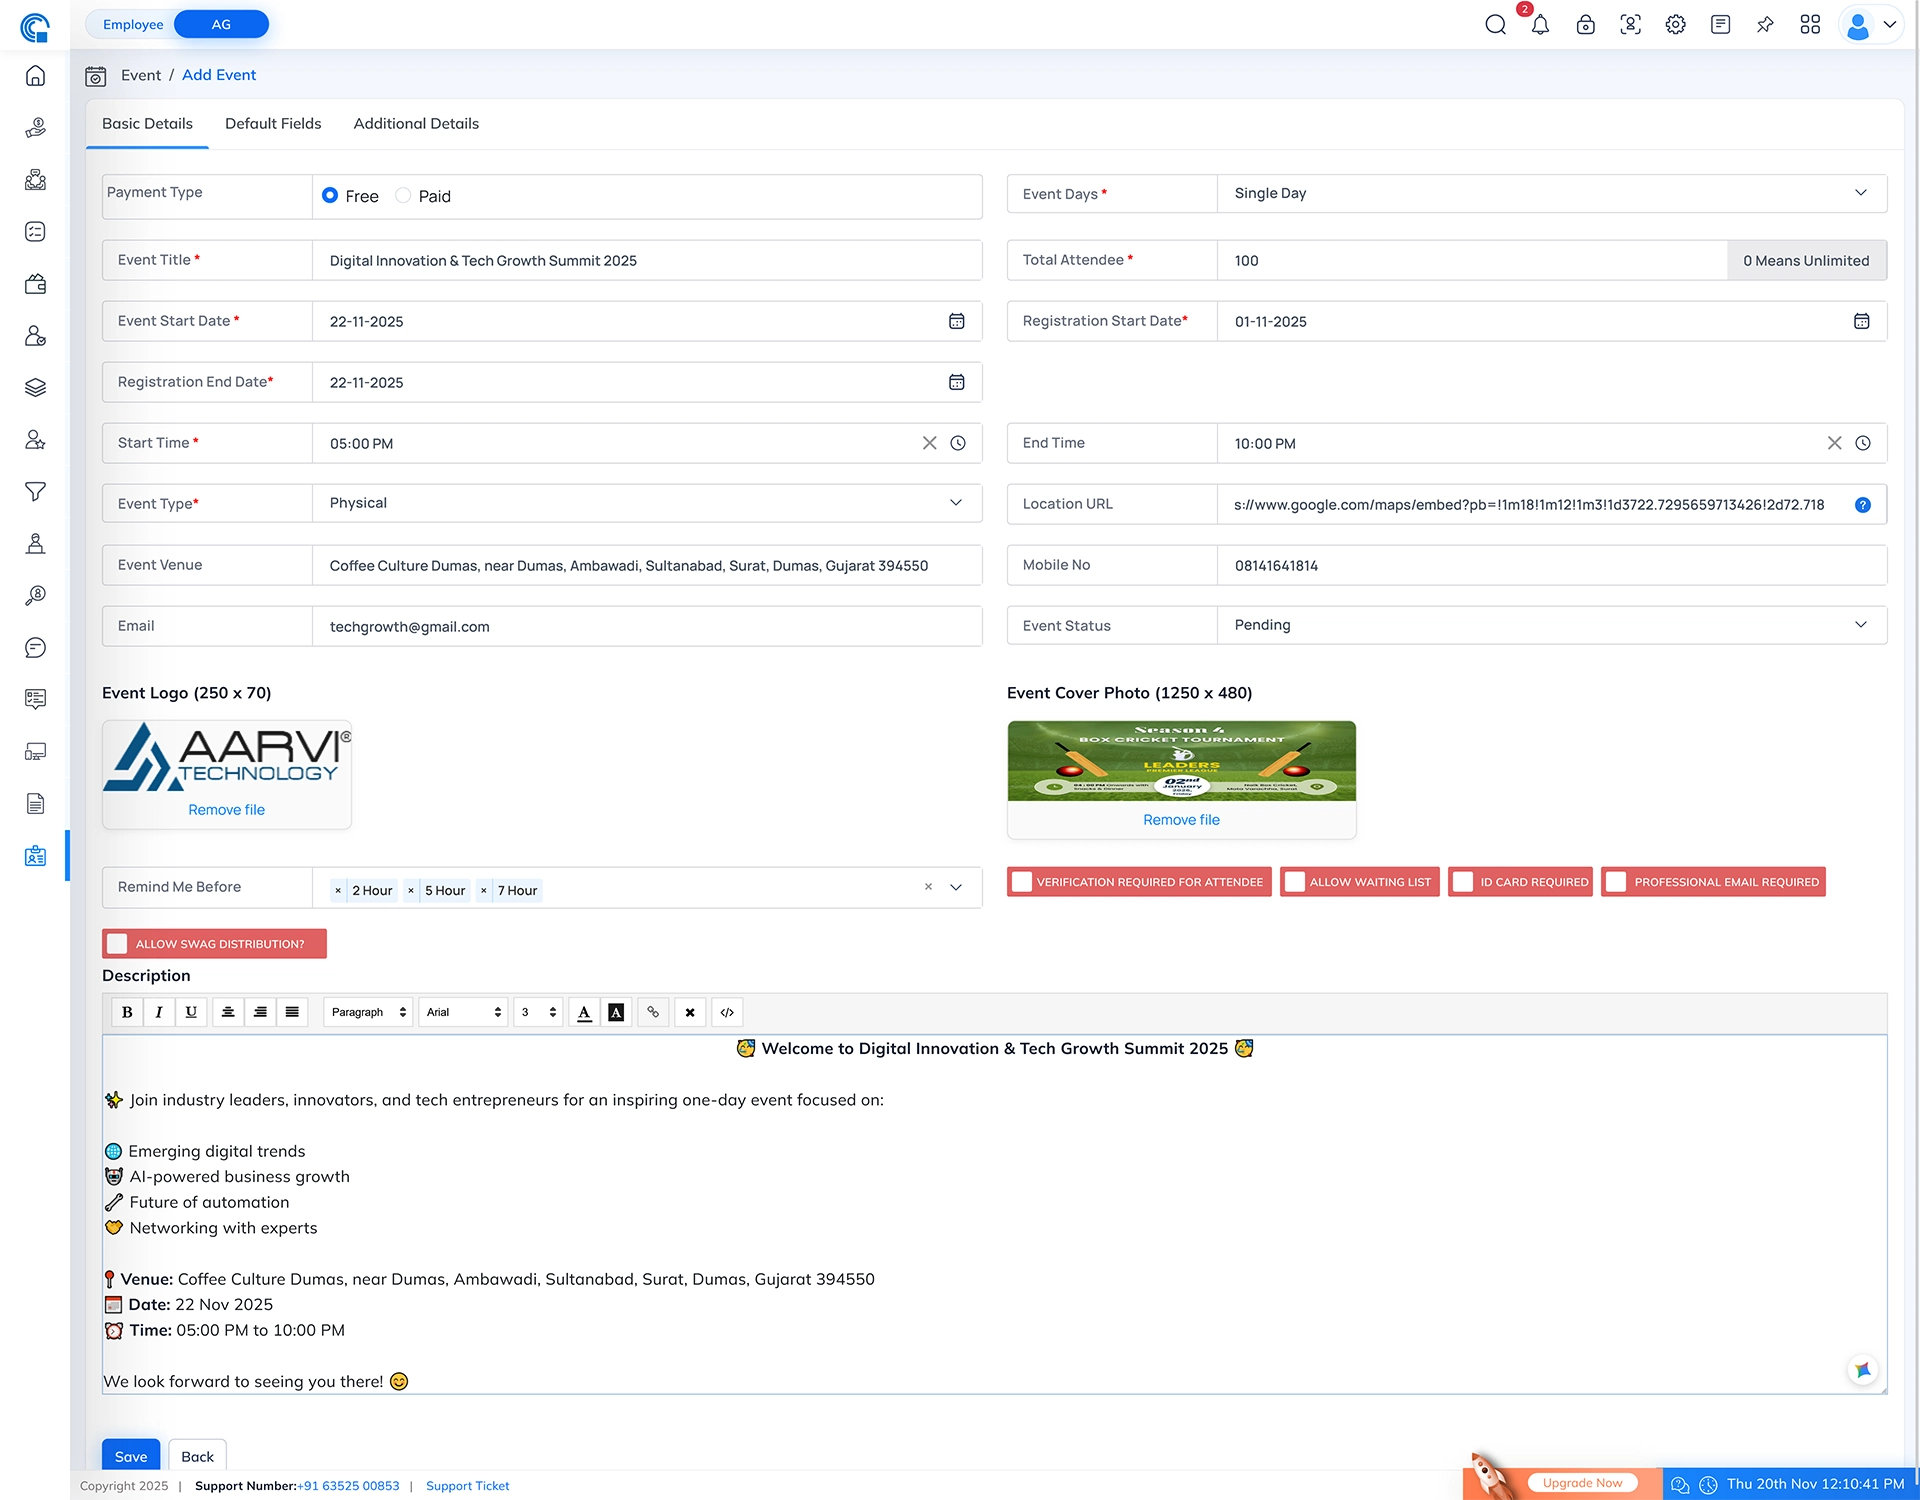
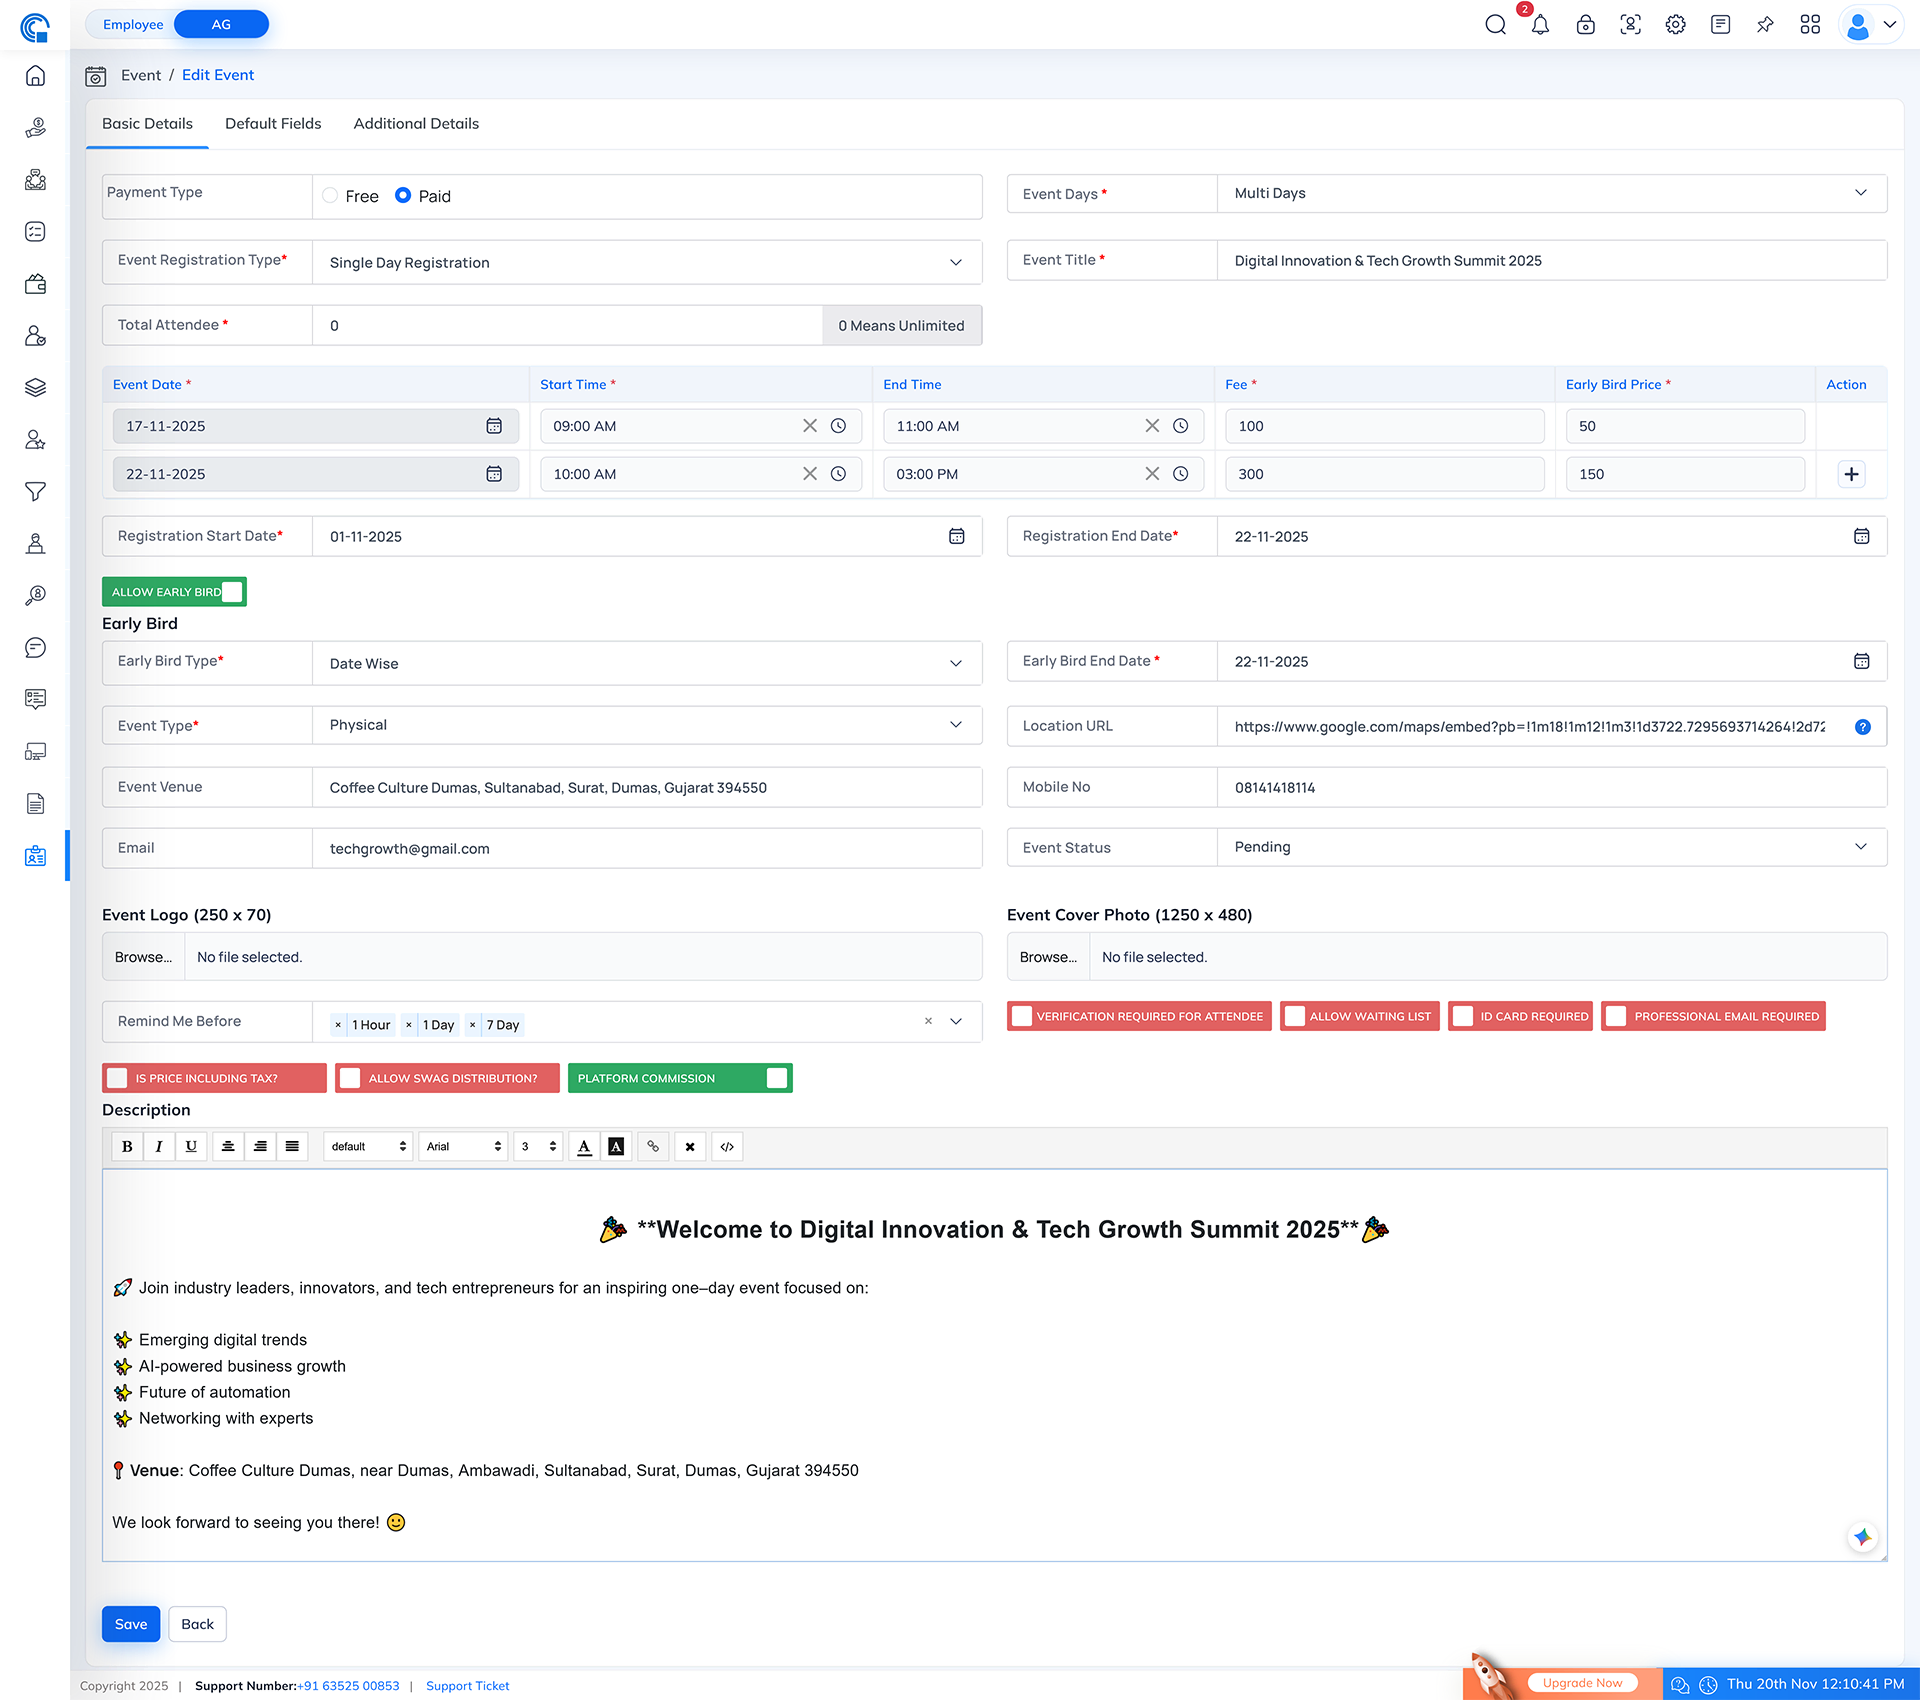
Add Event(Basic Details Tab)
- When you click on + Add Event, the system opens the Basic Details tab by default. This tab contains the primary information required to create any event.
- Event (Breadcrumb Navigation): Click to go back to the main Event Listing page. Useful for navigating out of the form and reviewing all events.
- Add Event (Breadcrumb Navigation): Indicates the current page you are working on. This label changes automatically based on whether you are adding a new event or editing an existing one.

Add Event(Basic Details Tab)
If you want employee codes to begin with a specific prefix, enter it here. For example, to generate codes like "AT-0001", enter "AT-". The system will automatically apply this prefix to all employee codes to maintain consistent identification.
Example: AT-.
Field-wise Explanation
| Field Name | Description |
|---|---|
| Payment Type | Select whether the event is Free or Paid. Paid events will collect fees during registration. |
| Event Days* | Define if the event runs for Single Day or Multi Days. Multi Days option opens more fields. |
| Event Title* | Enter the official title of the event displayed to users. |
| Total Attendee* | Maximum number of participants allowed. 0 Means = Unlimited attendees. |
| Event Start Date* | Select the event date. |
| Registration Start Date* | Date from which registrations start. Registration link will work only from this date. |
| Registration End Date* | Last date for attendees to register. Registration link will work only till this date. |
| Start Time* | Starting time of the event. |
| End Time | Ending time of the event. |
| Event Type* | Choose the event format: Physical or Virtual. |
| Location URL (For Physical) | Add an embedded map link (Google Map Embed URL) to display the exact event location in the registration form. Users will see the map preview when registering. |
| Event Venue (For Physical) | Enter the event venue location. |
| URL (For Virtual) | Appears only when Event Type is Virtual. Enter the online access link for attendees to join the event (Zoom, Google Meet, Teams, etc.). Attendees receive this link in their ticket or confirmation message. |
| Mobile No | Organizer contact number for communication. |
| Organizer or event coordinator email ID. | |
| Event Status | Status of the event: Pending or Completed. |
| Event Logo (250×70) | Upload the event logo to show across listings. |
| Event Cover Photo (1250×480) | Upload banner image for event display. |
| Reminder Me Before | System will auto-send reminder before the event begins. |
| Verification Required for Attendee (Toggle) | If ON, every registration stays Pending until verified by admin manually. |
| Allow Waiting List (Toggle) | If ON, after reaching attendee limit, new registrations go to waiting list instead of being rejected. |
| Number of Attendee in waiting list* | Visible only when Allow Waiting List is enabled. Enter max waiting list attendees. After this limit, no further registrations accepted. |
| ID Card Required (Toggle) | If ON, user must upload ID card during registration. |
| Professional Email Required (Toggle) | Only corporate domain emails allowed for registration. |
| Allow Swag Distribution (Toggle) | Enable if swag/corporate goodies will be given to attendees. |
| Description | Detailed event overview shown on event page. |
| Save Button | Saves all event details entered in the form. After saving, the event is created or updated successfully. |
| Back Button | Returns to the Event Listing page without saving any new changes. Useful when you want to exit the form. |
Field-wise Explanation
| Field Name | Description |
|---|---|
| Event Registration Type* | Controls how attendees register in a multi-day event. Appears only when Event Days = Multi Days. Options:
|
| Dynamic Multi-Day Panel | Automatically appears in Multi-Day events. Allows adding multiple event days with separate Event Date, Start Time and End Time. Builds the complete event schedule. |
| Add (+) Button | Adds a new day entry to the event schedule. Use this to create Day 1, Day 2, Day 3, etc. |
| Remove (X) Button | Removes a day entry only if no attendee is registered for that specific date. If registration exists:
|
| Locked Day Row (Auto-Restriction) | When attendees have already registered for a specific day, that day’s row cannot be removed or edited. This prevents accidental loss of registration data. |
Paid Event – Other Field-wise Explanation
| Field Name | Description |
|---|---|
| Fees* | Enter the base registration fee per attendee. Users must pay this amount to complete the registration. This field appears only when Payment Type = Paid. |
| Allow Early Bird (Toggle) | When enabled, it shows the Early Bird discount section. Admin can offer discounted pricing to attract early registrations. |
| Early Bird Type* | Defines how the Early Bird discount should be applied. Two options: Date Wise and User Wise. |
| Early Bird Price* | Discounted registration fee applicable till the selected end date. |
| Early Bird End Date* (For Date Wise) | Last date on which users can avail Early Bird Price. After this date, normal event fees will be applied. |
| Early Bird User Limit* (For User Wise) | How many users can get Early Bird Price. After this limit is reached, normal fee will apply. |
| Ticket Type | Enter the name of the ticket category. Example: Student Pass, VIP Pass, VVIP, Gold Pass. |
| Amount | Set the standard ticket price for this ticket type. |
| Early Bird Price | (Visible only when Early Bird toggle is ON) Set the discounted Early Bird fee for this ticket type. If Early Bird is OFF, this field remains hidden. |
| Sort Order | Determines the display order of ticket types on the event registration page. Example: Sort 1 = first shown, Sort 2 = second, etc. |
| Action (+) | Adds a new row to create multiple ticket types. Used for adding unlimited ticket categories. |
| Action (X Icon) | Removes a ticket type row. Note: If any registration exists for that ticket type, remove icon will NOT appear for safety. |
| Is Price Including Tax? (Toggle) | If OFF, system applies tax based on your Event Taxation Configuration and calculates final amount during registration. If ON, it means your entered fee already includes tax, so no additional tax will be applied. This switch appears only in Paid events. |
| Is Platform Commission? (Toggle) | If OFF, no commission is deducted from ticket sales. If ON, platform commission is applied per attendee based on your configured commission rates. This switch appears only in Paid events. |
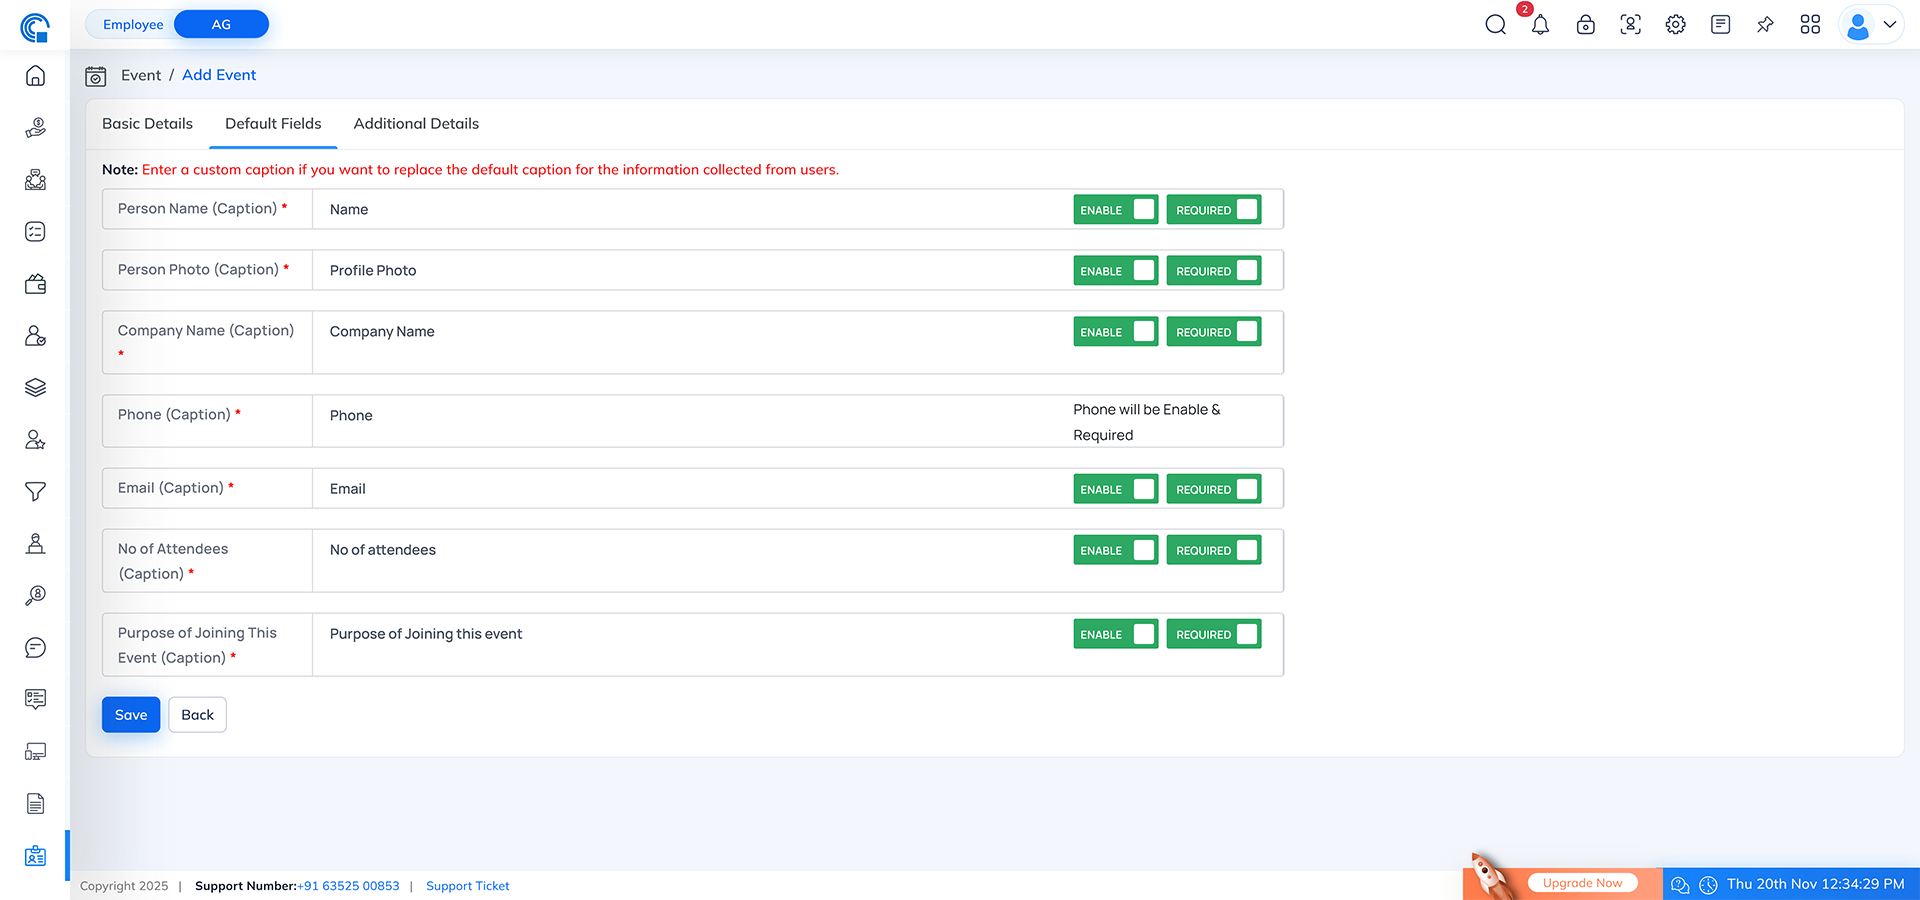
Add Event(Default Fields Tab)
- The Default Fields tab allows you to customize which fields appear in the event registration form.All fields (except Phone) are fully customizable using:
- Enable Switch → Show or hide the field in registration
- Required Switch → Make the field mandatory or optional
- Caption Input → Change the field label as per your event needs
(The Phone field is always enabled & required by system default.)
| Field Name | Caption (Customizable) | Enable Switch | Required Switch | Description |
|---|---|---|---|---|
| Person Name* | Yes | ON ? Field visible OFF ? Field hidden |
ON ? Mandatory OFF ? Optional |
Collects attendee’s full name. Caption can be changed. |
| Person Photo* | Yes | ON ? Field visible OFF ? Field hidden |
ON ? Mandatory OFF ? Optional |
Lets users upload profile photo for event badges or attendance verification. |
| Company Name* | Yes | ON ? Field visible OFF ? Field hidden |
ON ? Mandatory OFF ? Optional |
Useful for corporate or networking events. |
| Phone* | No (Fixed) | Always Enabled | Always Required | Mandatory system field for OTP, communication and event reminders. Cannot be disabled. |
| Email* | Yes | ON ? Field visible OFF ? Field hidden |
ON ? Mandatory OFF ? Optional |
Used for sending event confirmation and tickets. |
| No of Attendees* | Yes | ON ? Field visible OFF ? Field hidden |
ON ? Mandatory OFF ? Optional |
Allows users to register multiple attendees at once (if allowed). |
| Purpose of Joining This Event* | Yes | ON ? Field visible OFF ? Field hidden |
ON ? Mandatory OFF ? Optional |
Helps organizer understand user intent like Networking, Learning, Marketing, etc. |
Key Functional Points
- Dynamic Custom Captions:
- You can rename any field based on event needs.
- Example: “Person Name” ? “Attendee Name”, “Company Name” ? “Organization / Startup Name”
- Enable Switch:
- When ON ? Field appears in registration form.
- When OFF ? Field is completely hidden.
- Required Switch:
- When ON ? User cannot submit without filling the field.
- When OFF ? Filling the field is optional.
- Phone Field (System Mandatory):
- Cannot be disabled & optional.
- Always visible with required.
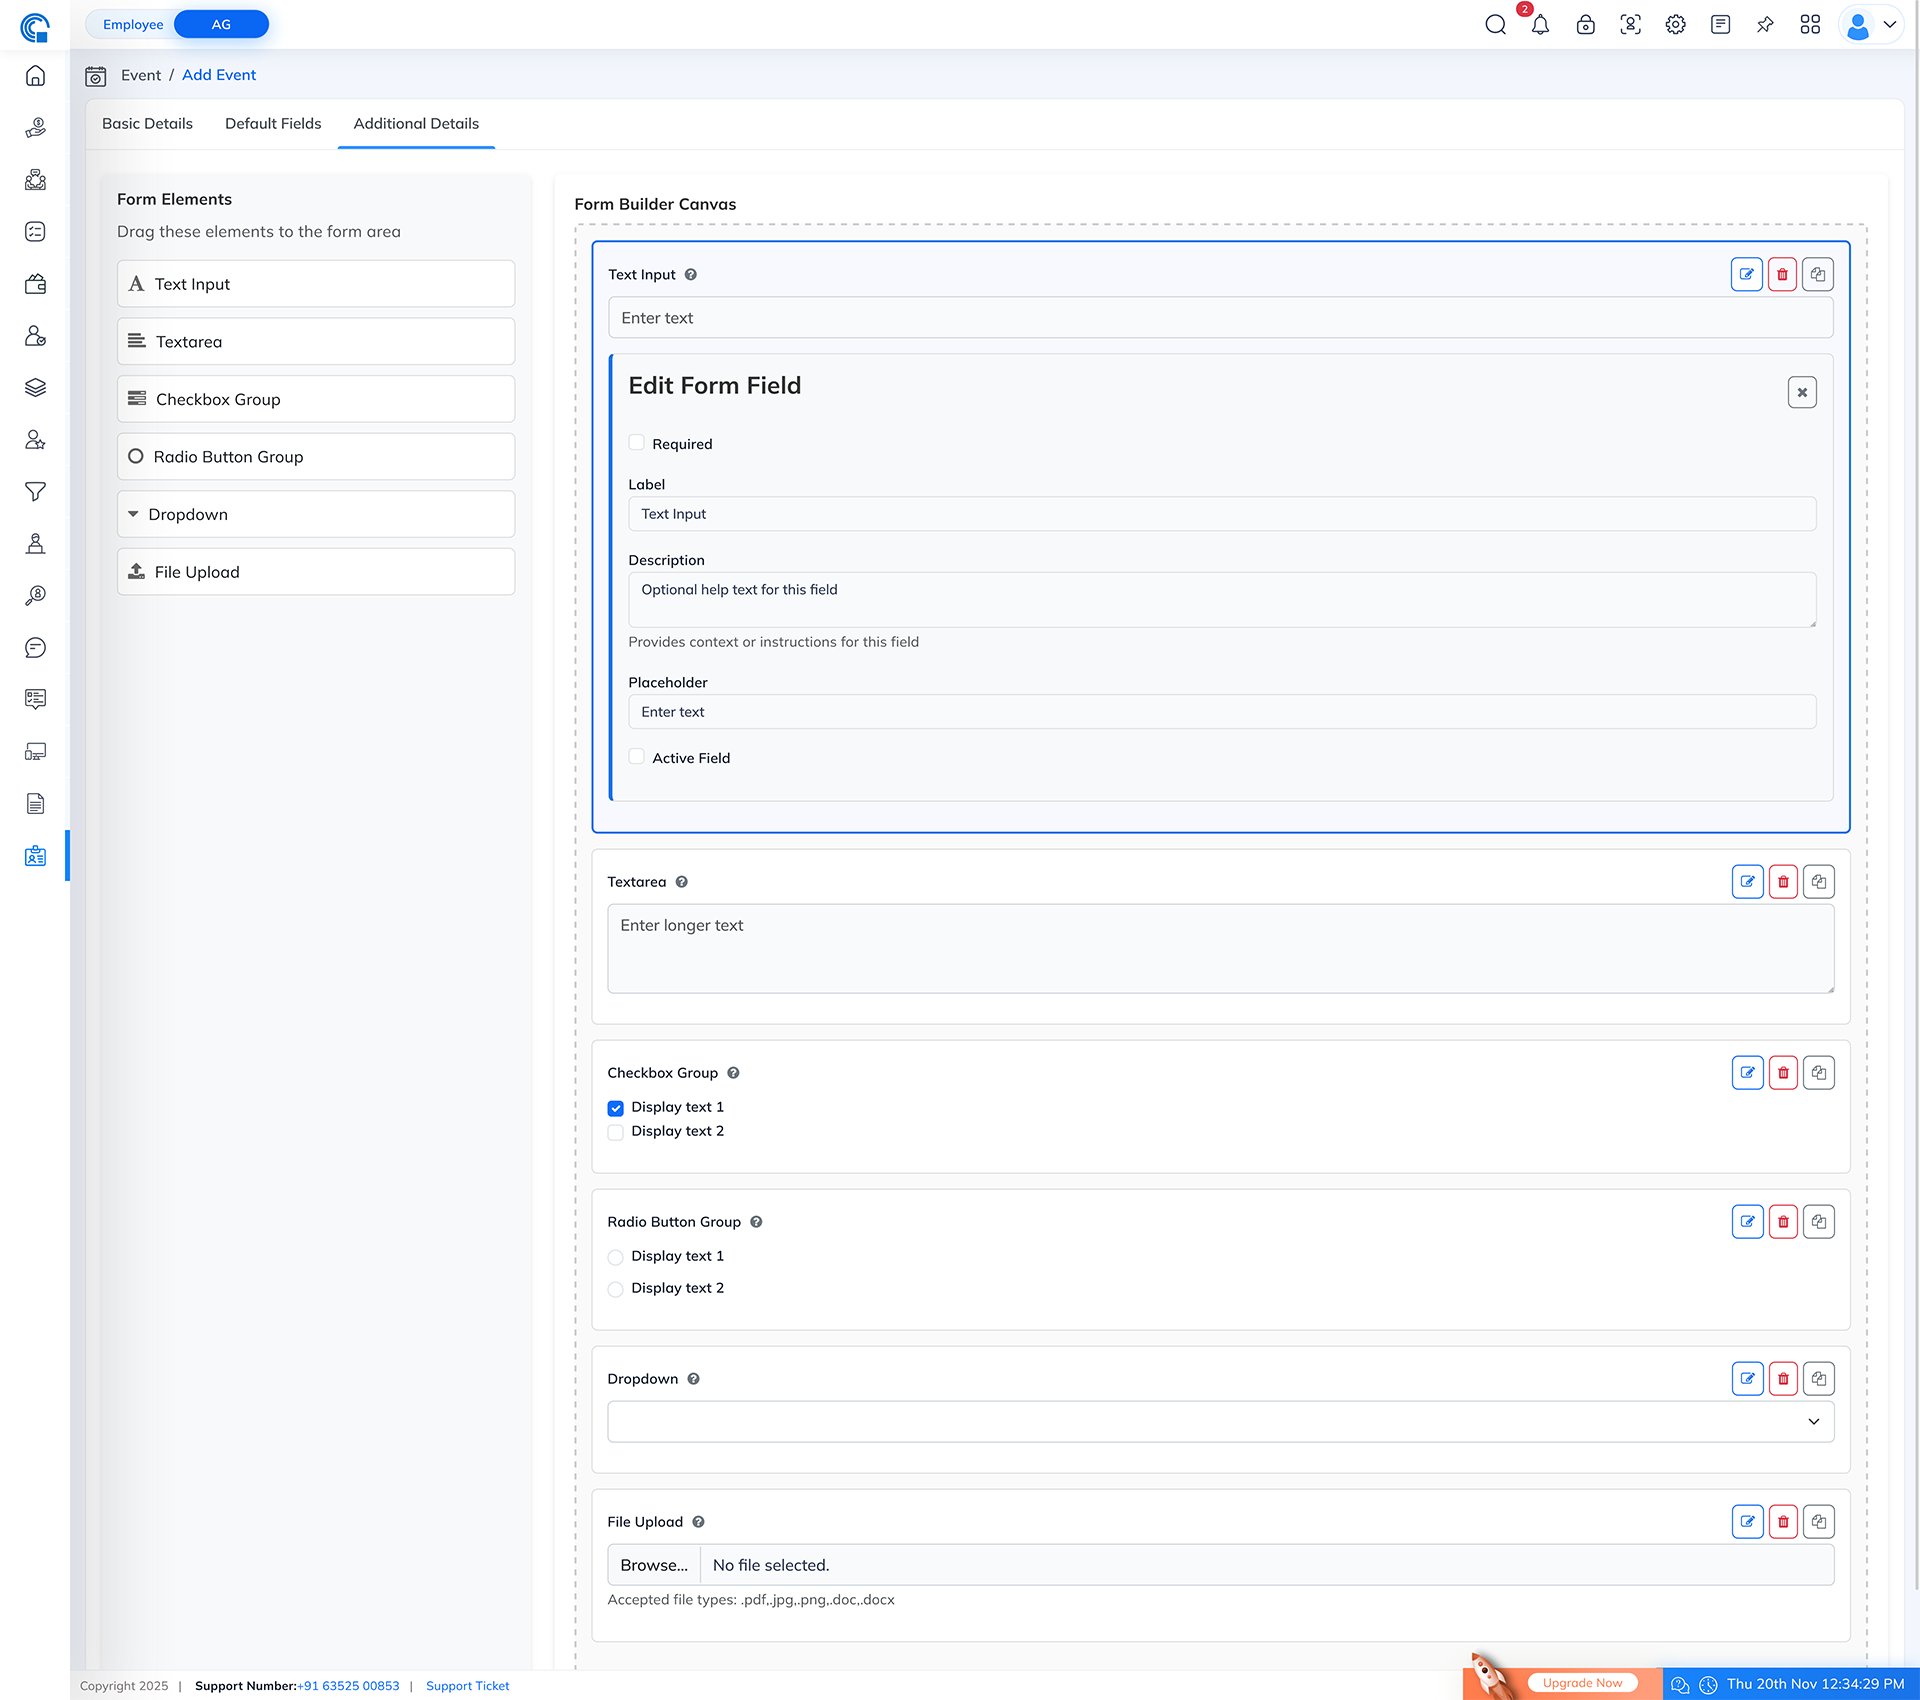
Add Event(Additional Details Tab)
- The Additional Details tab allows you to create a fully custom registration form for your event.
- Whatever fields you add here will appear in the public event registration form, allowing you to collect event-specific details from attendees.
- This section works as a drag-and-drop form builder, where you can add, edit, copy, reorder, or remove fields based on your event requirements.
| Field | Description |
|---|---|
| Form Elements Panel | Contains draggable form controls like Text Input, Textarea, Checkbox Group, Radio Button Group, Dropdown, File Upload. Users can drag any element to the canvas to create their custom registration form. |
| Form Builder Canvas | Displays the currently added custom fields. Users can reorder, edit, duplicate or remove fields. These fields will appear exactly in the event registration form. |
| Edit Icon | Opens the “Edit Form Field” panel where the selected field’s settings can be customized. |
| Copy Icon | Creates an exact duplicate of the selected field. Useful for making multiple similar fields quickly. |
| Remove Icon | Removes the selected field from the form builder. |
| Close Icon | Closes the field edit panel without removing the field. |
| Required | When enabled, the field becomes mandatory in the registration form. Users must fill it before submitting the form. |
| Label | The title or name of the field shown on the registration form. Example: “Company Name”, “Designation”, etc. |
| Description (Help Text) | Optional helper message shown below the field. Used to guide the user. Example: “Enter your official company name”. |
| Placeholder | Light-grey hint text inside the input field that disappears when typing begins. Example: “Enter text”, “Select option”, etc. |
| Active Field | If active is OFF, the field will not appear on the registration form. If ON, it becomes visible to users. |
| Checkbox Group Options | Allows adding multiple checkbox options such as “Option 1”, “Option 2”. Each checkbox can be added, edited or removed. |
| Radio Button Group Options | Allows adding single-select options like “Male”, “Female”, “Other”. Only one option can be selected by the user. |
| Dropdown Options | Allows adding multiple dropdown values. Users can choose only one from the dropdown. |
| File Upload | Allows users to upload files (PDF, JPG, PNG, DOC, DOCX). Useful for ID proof, resume, portfolio, etc. |
| Drag & Drop Sorting | Fields can be rearranged simply by dragging. The same order will appear in the registration form. |
| Full Custom Control | Admin can completely design the registration form as per event requirements — unlimited fields, unlimited options. |
Key Functional Points
- The Additional Details tab is a full custom registration form builder.
- You can add unlimited fields like text, dropdown, file upload, checkbox, radio button, etc.
- Each field can be edited, duplicated, removed, activated, reordered.
- Whatever is configured here appears in the event’s public registration form.
- Form builder gives 100% flexibility to collect any type of information from attendees.
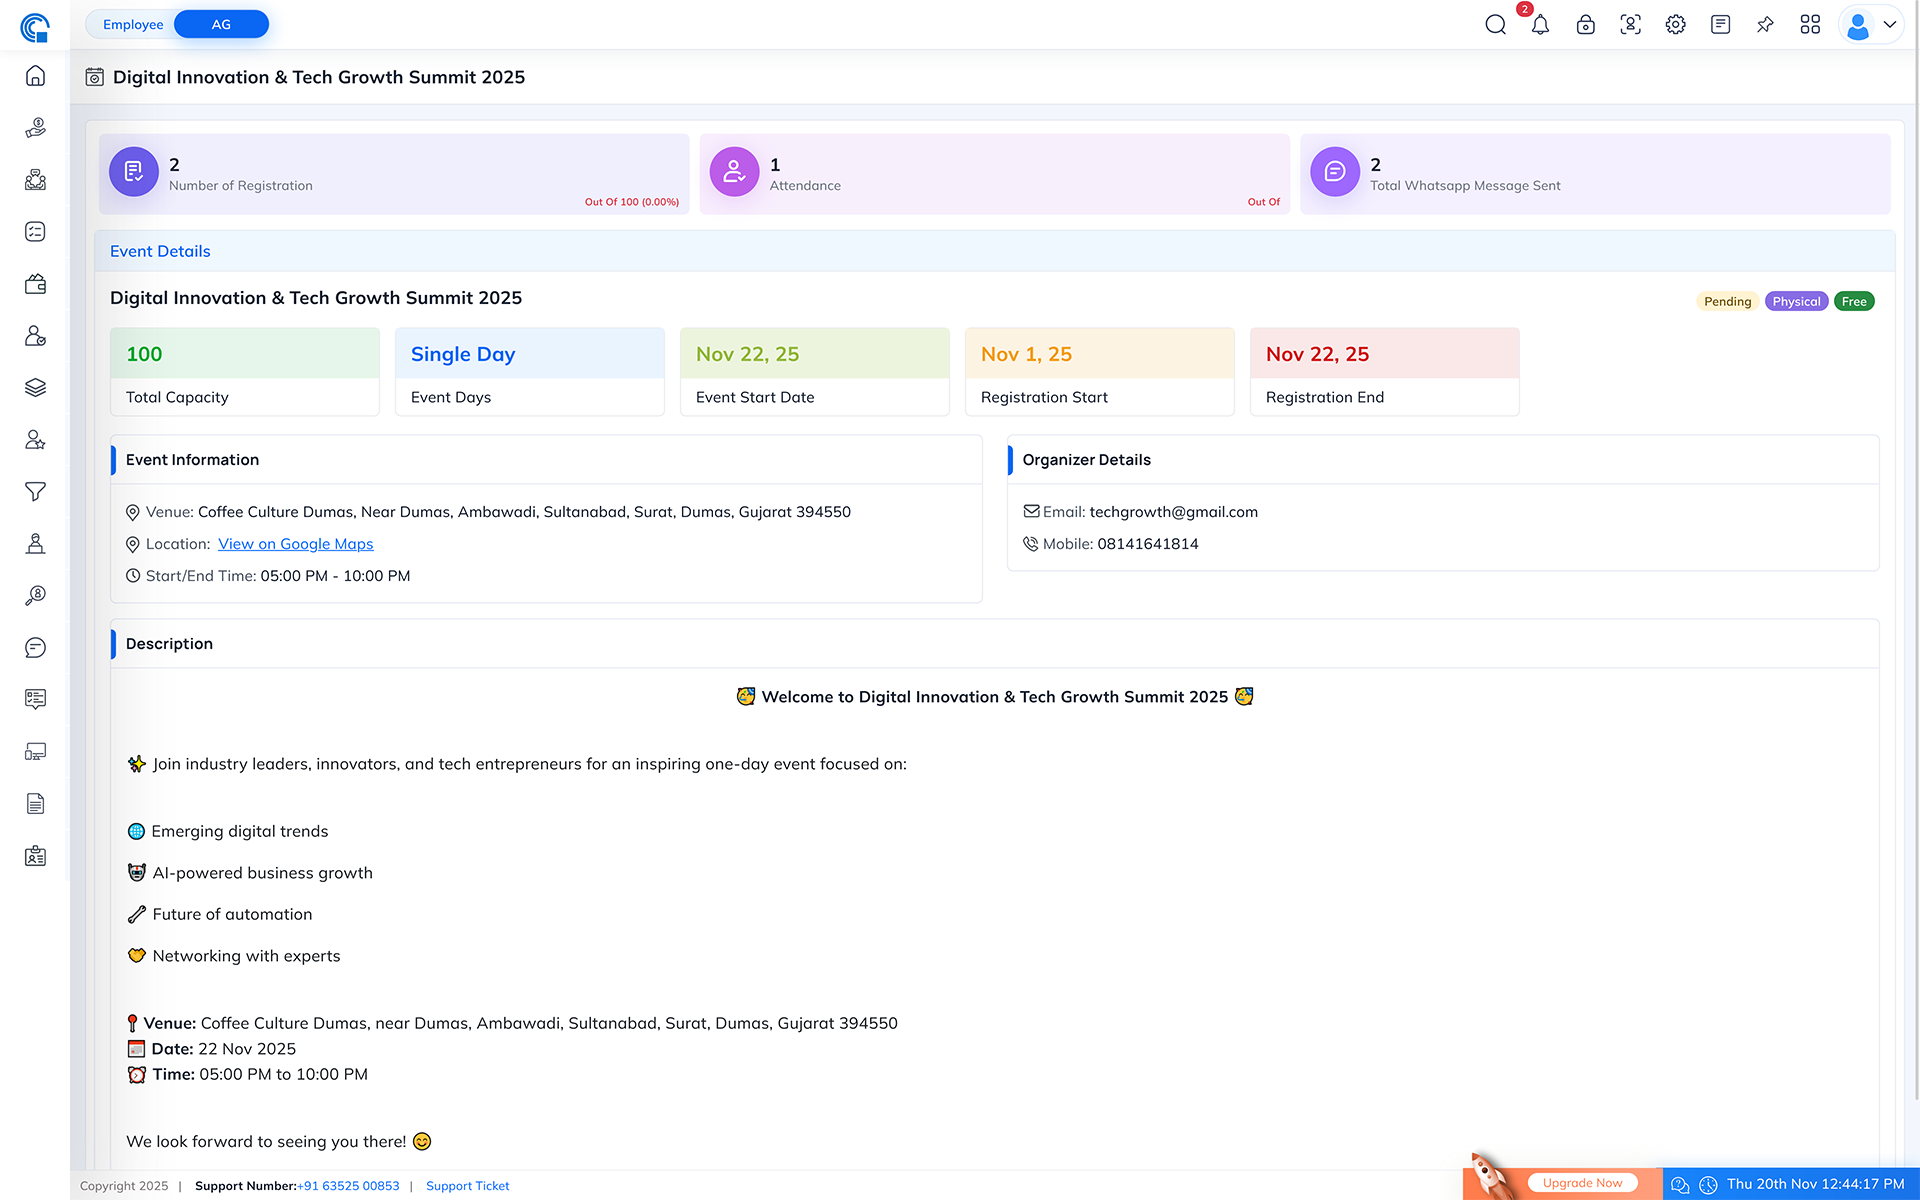
Event Dashboard in Event Listing Layout
Overview
The Event Dashboard provides a complete, real-time summary of your event. It helps you instantly track registrations, attendance, payments, and schedule details — all in one place. This dashboard opens when you click the Event Dashboard icon.
It dynamically displays information based on your event settings such as single/multi-day, paid/free, registration type, platform commission, and more.
Key Features
- Event Summary Cards (Top Insights): These cards show the most important event statistics at a glance:
- Number of Registrations – Total registrations received.
- Attendance – Total attendees who checked in.
- Amount Collected – Total money collected for paid events.
- Tax Collected – Tax amount based on configuration.
- Platform Fees Collected – Commission calculated if enabled.
- Total WhatsApp Messages Sent – Messages sent to registrants.
(Paid event = Payment & tax cards appear. Free event = These cards remain hidden.) - Event Details Section: This block shows the primary configuration of the event:
- Total Capacity – Maximum attendees allowed.
- Event Days – Single Day or Multi-Day event.
- Registration Type – Single Day / Full Event (for multi-day).
- Event Start Date
- Registration Start & End Dates
- Event Status – Pending / Completed
- Event Type – Physical / Virtual
- Event Payment Type – Free / Paid
(Only the fields relevant to your event settings will appear.) - Event Information:
- Venue Information
- Venue Name & Full Address
- Google Maps Link
- Organizer Details
- Organizer Email
- Organizer Mobile Number
(For virtual events ? URL will be shown instead of location.) - Venue Information
- Event Schedule (for Multi-Day Events): For multi-day events, a schedule table is displayed with:
- Date
- Start Time
- End Time
- Fee (if the event or specific date is paid)
- Event Description:
- This section displays the complete event description you entered, including: Bullet points, Emojis, Headings, Icons, Rich formatting, etc…
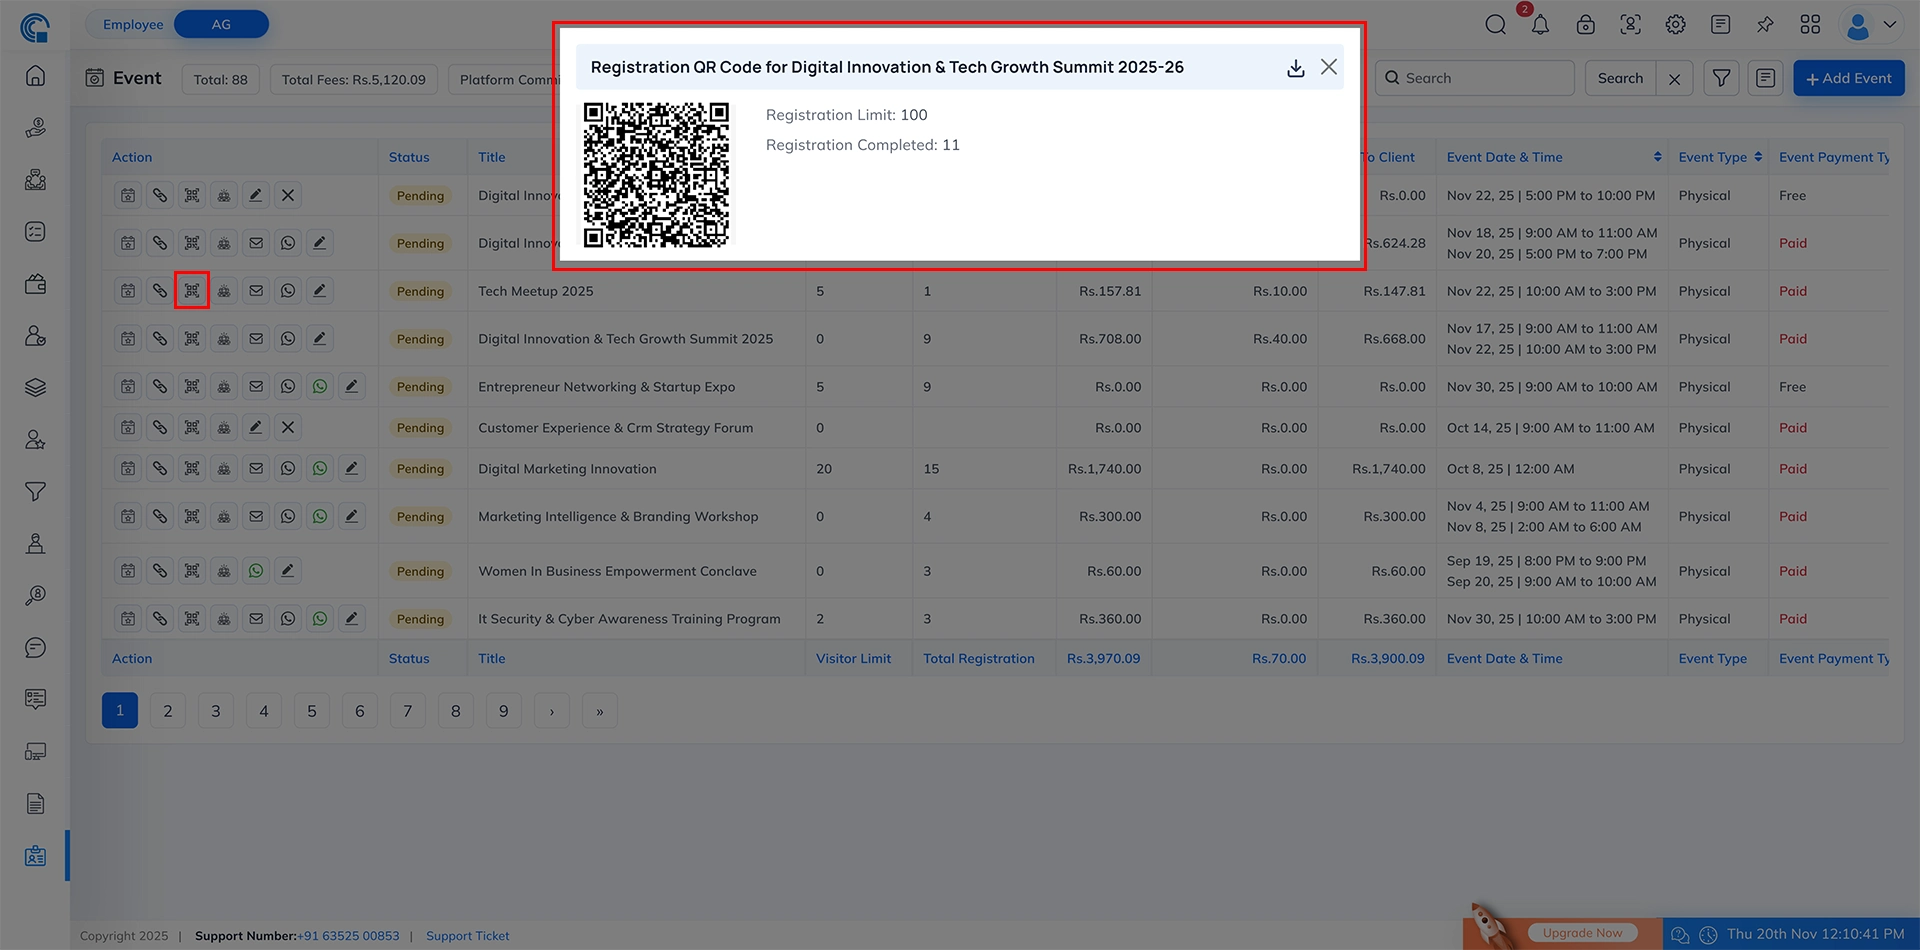
Registration QR Code in Event Listing Layout:
Overview
- The Registration QR Code provides a quick and seamless way for users to access the event registration form. When you click on the QR code icon in the event listing, a popup appears displaying the event-specific QR code along with event capacity details.
- Users can simply scan the QR code using any mobile device to instantly open the registration form, making the registration process fast, contactless and highly convenient.
- You can also download and share the QR code with participants through WhatsApp, email, social media or print materials.
Key Features
- Instant Registration Access:
- Scanning the QR code directly opens the event’s registration form.
- No need to share long URLs manually.
- QR Code Download Option:
- The download icon allows you to save the QR code image.
- Easily share it with participants or use it for marketing posters, banners, etc.
- Shows Registration Details:
- Inside the popup, two important event details are shown:
- Registration Limit: Total allowed participants
- Registration Completed: How many users have already registered
- Inside the popup, two important event details are shown:
- Easy Sharing for Promotions:
- Shareable QR code can be used in: Social media posts, WhatsApp messages, Email campaigns, Printed brochures, standees, or event invitations.
- Contactless & User Friendly:
- Participants simply scan and register—no typing, no searching, no manual steps.
- Enhances user experience and reduces registration drop-offs.
- Works for All Types of Events:
- Useful for physical events at the venue.
- Also works for virtual events—opens online registration instantly.
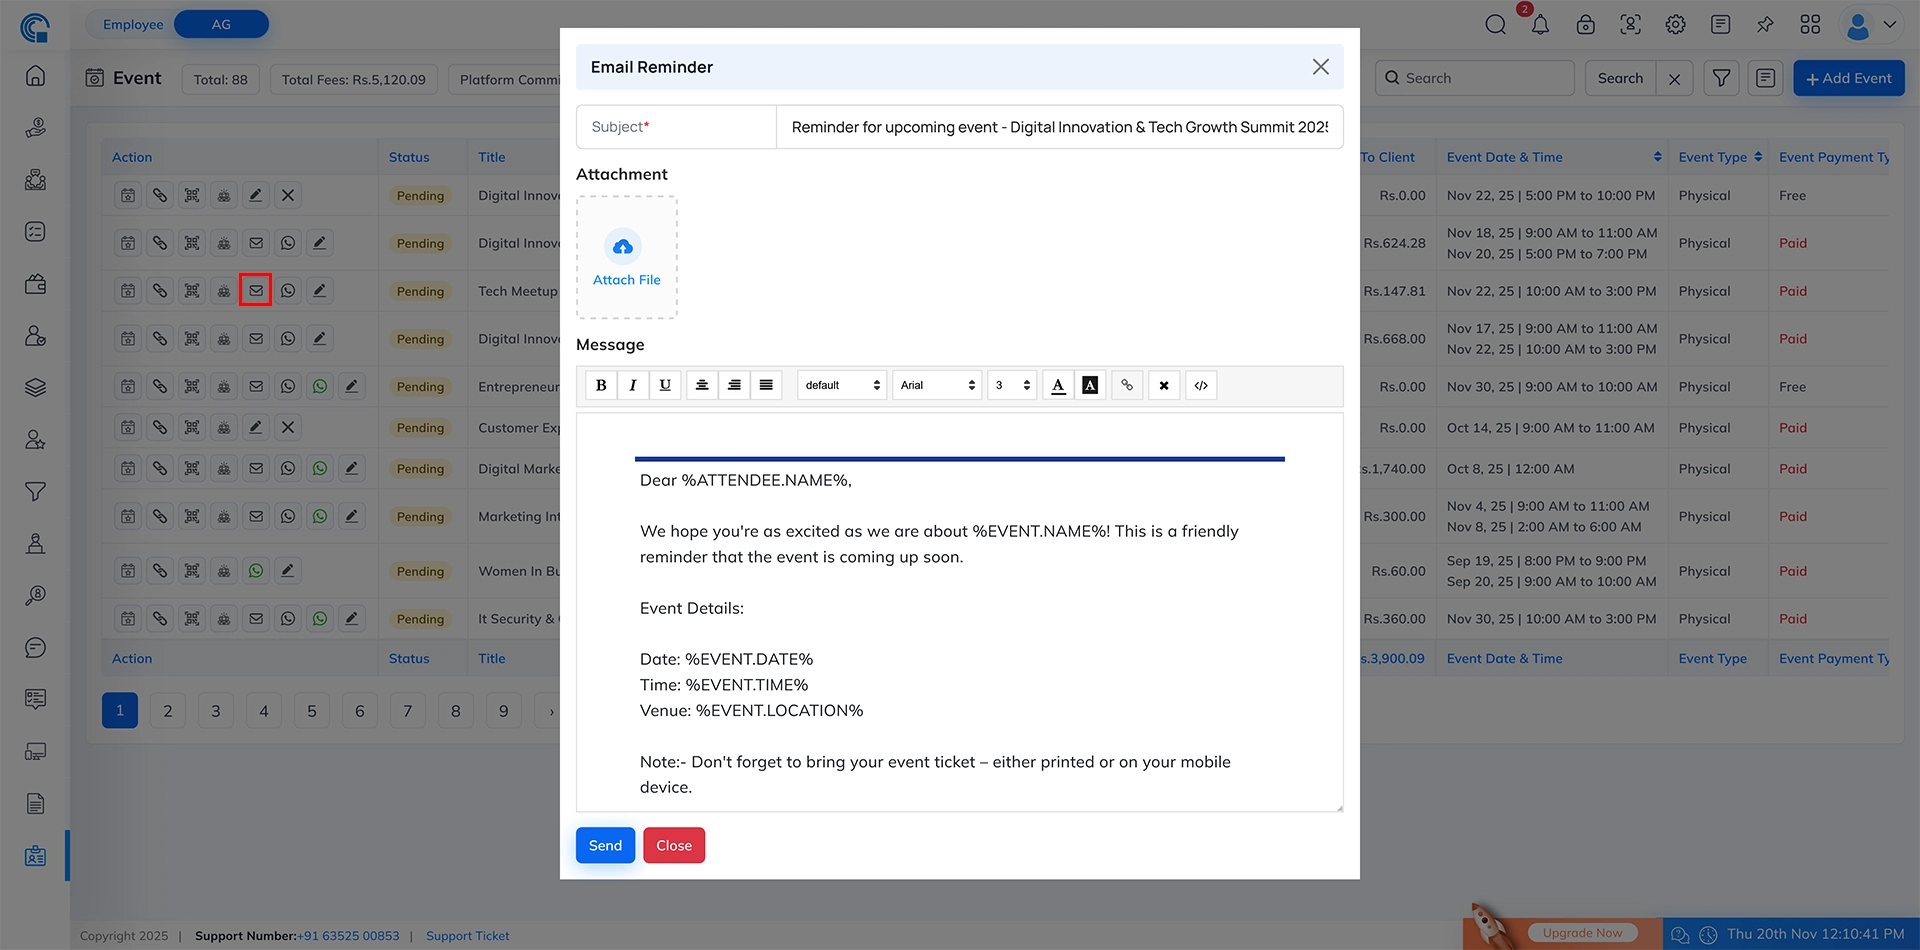
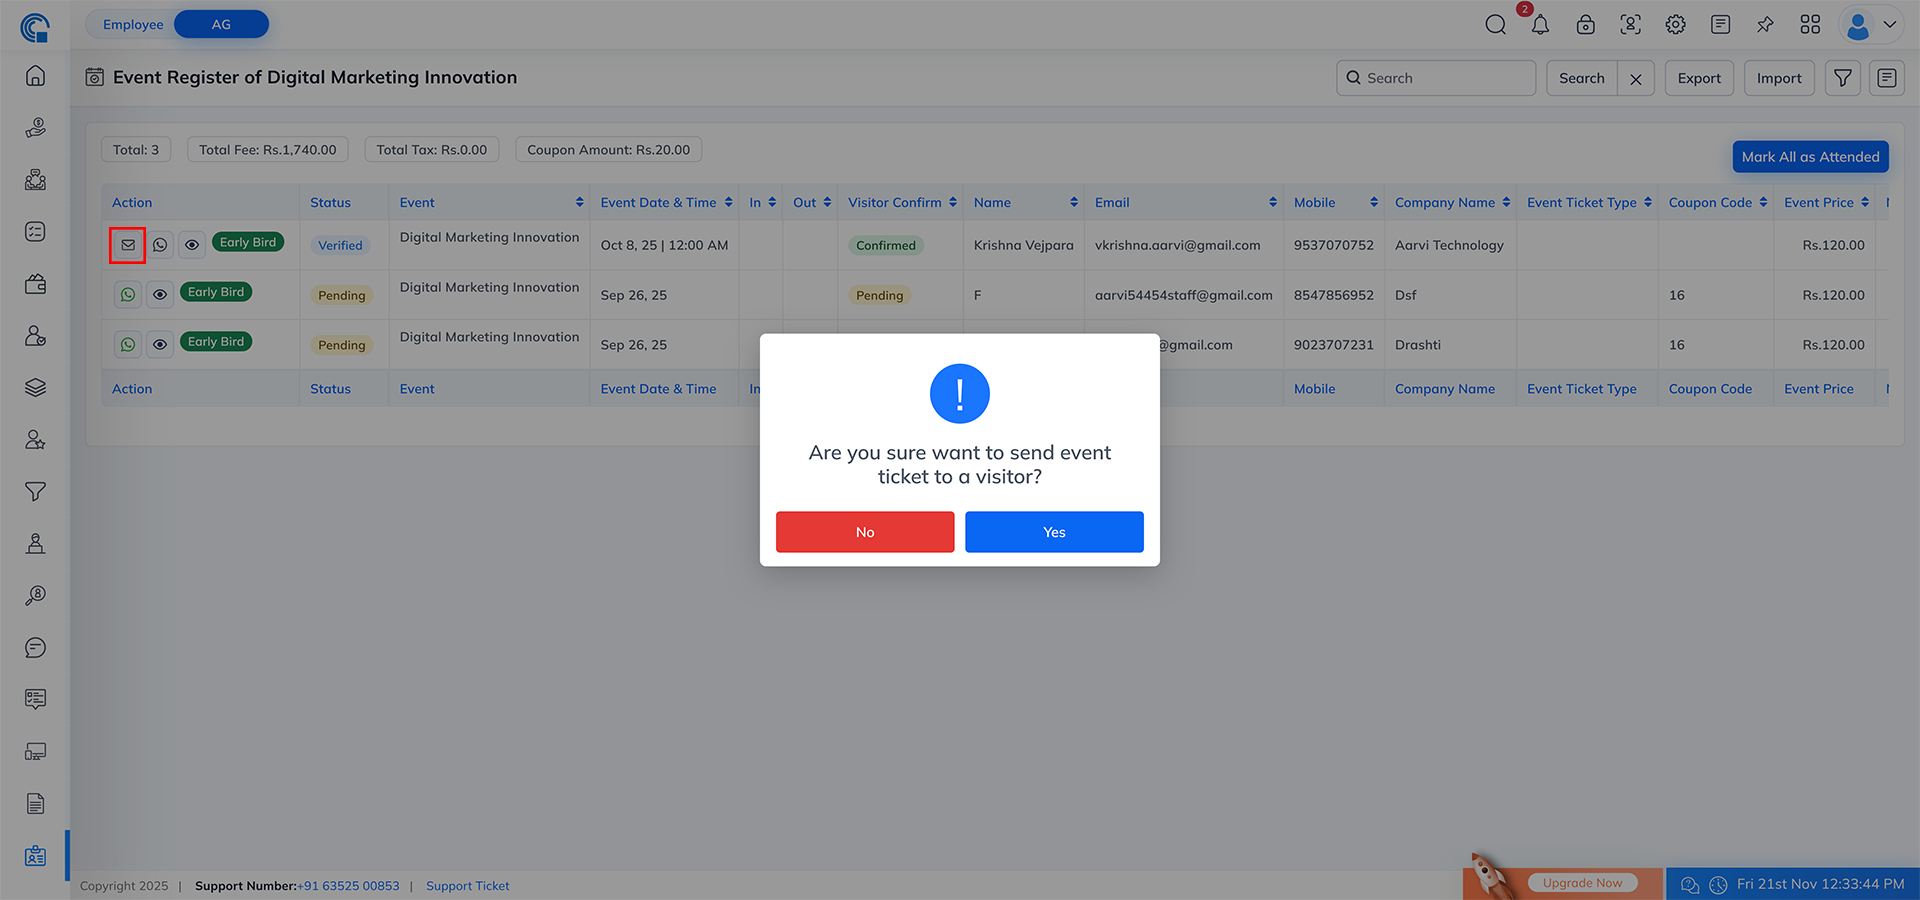
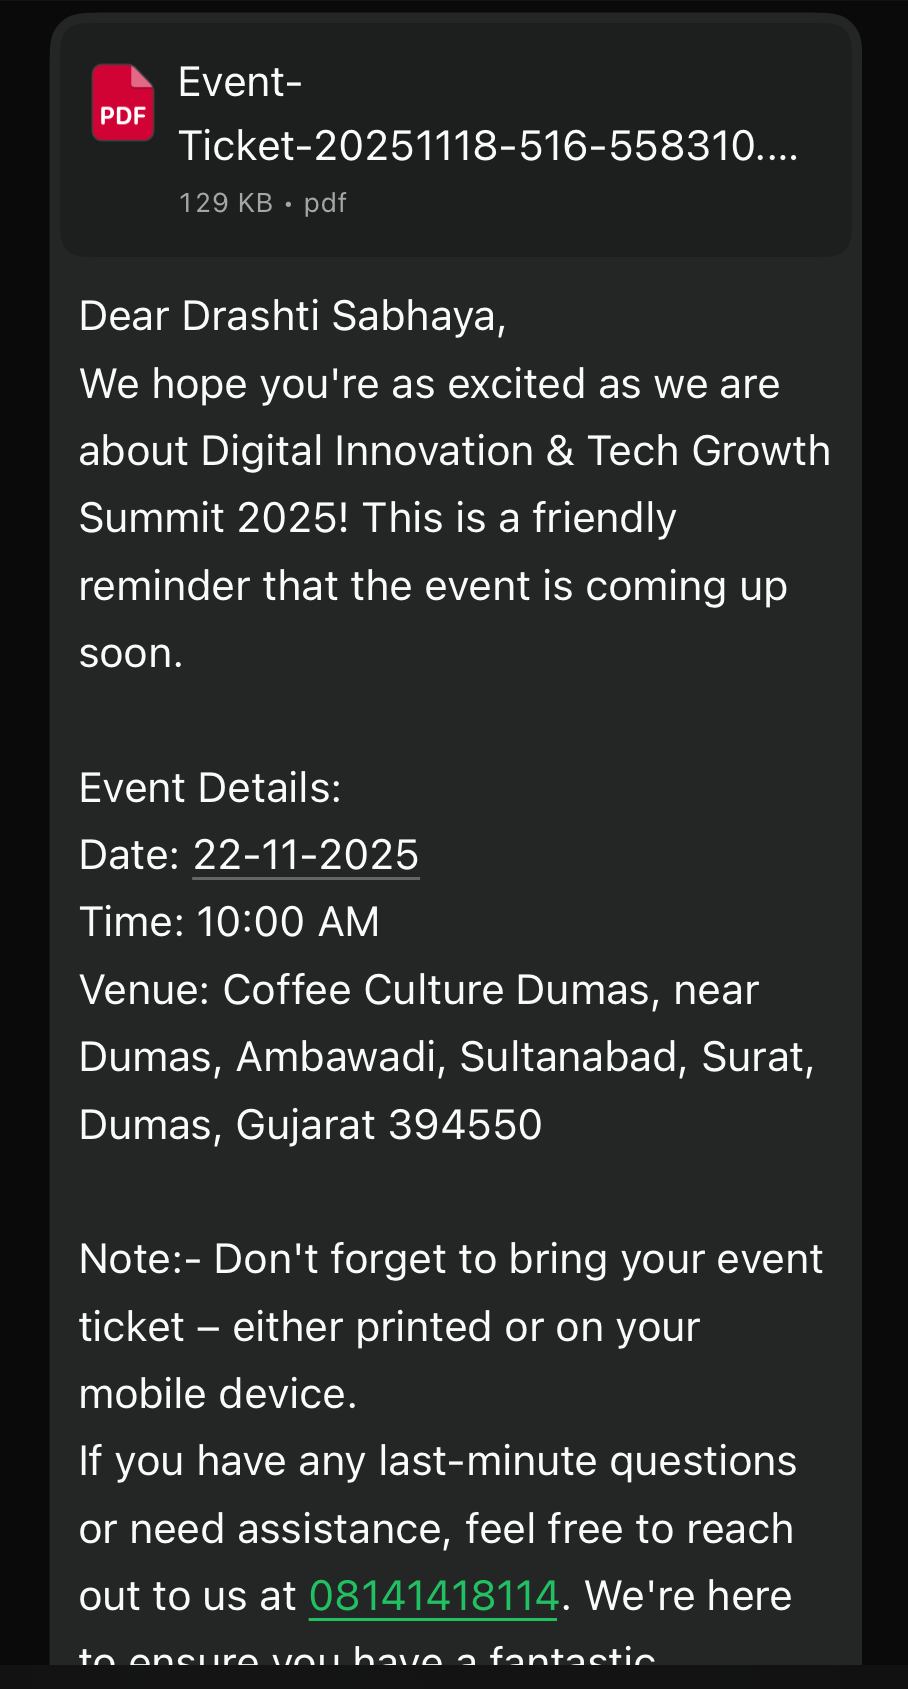
Send Reminder In Email in Event Listing Layout:
Overview
- The Email Reminder feature sends an email reminder to all registered visitors for a specific event. Email Reminder feature allows event organizers to quickly send reminder emails to all users who have registered for a specific event. This ensures that attendees stay informed about the event details, timing, venue and any important instructions.
- When you click the Email Reminder icon, a popup appears where you can customize the email subject, edit the message, attach files and send personalized reminders using dynamic placeholders.
- Emails are sent only when at least one attendee has registered. If no attendee is registered, the reminder icon stays hidden.
- The reminder icon is visible only when at least one visitor has their attendance status marked as Confirmed.
- (If all registered visitors are still in Pending, the email reminder icon will not be displayed.)
- This feature helps improve attendance rate, reduces confusion and allows organizers to send last-minute updates or instructions easily.
Key Features
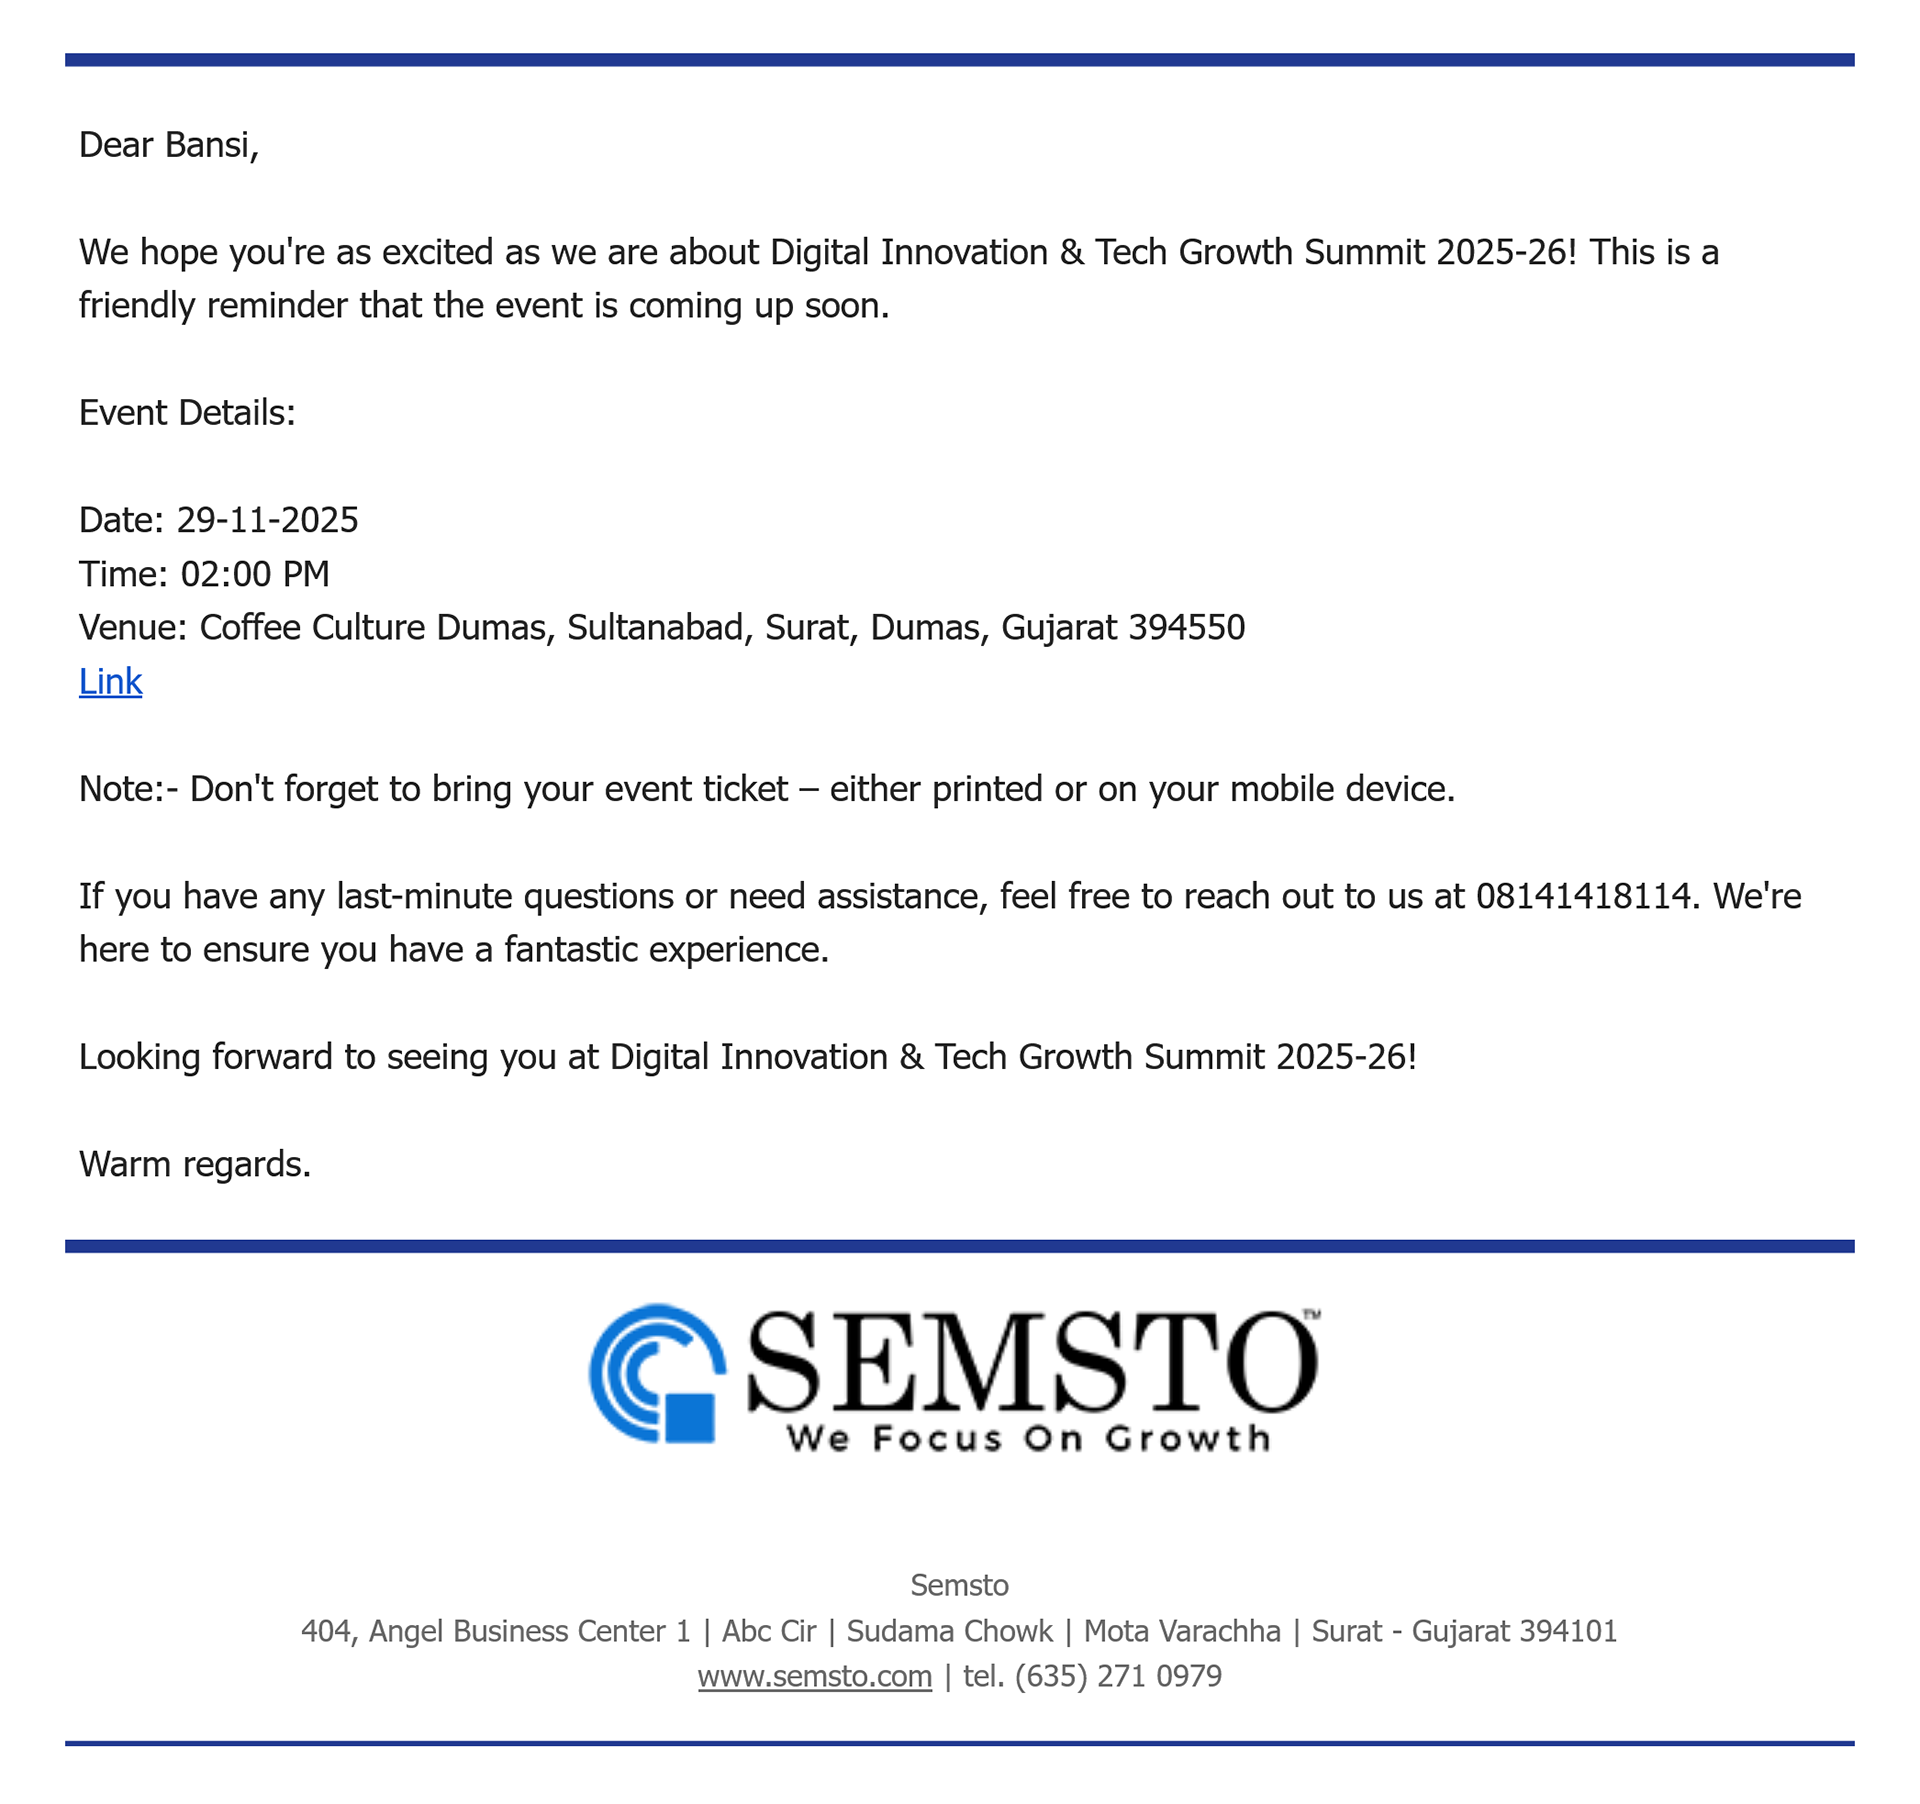
- Auto-Personalized Email Content:
- %ATTENDEE.NAME%, %EVENT.NAME%, %EVENT.DATE%, %EVENT.TIME%, %EVENT.LOCATION% automatically replace with real attendee and event data when the email is sent.
- Custom Subject & Message:
- Organizers can fully edit the subject line and email body.
- You can add your own instructions, custom notes or formatted text.
- Attachment Support:
- Option to upload a photo, PDF, or any file to send along with the email.
- Useful for sharing event tickets, maps, brochures, guidelines or agenda.
- Send Reminder to All Registered Attendees:
- Email goes to every attendee who registered for that event.
- Ensures nobody misses the information.
- Smart Icon Visibility:
Reminder icon appears only when registrations exist. If no attendees registered, the icon remains hidden. - Secure & Controlled Sending:
- Send button ? Send the email.
- Close button ? Close the popup without sending.
- Rich Text Message Editor:
- Bold, underline, alignment, font style, color, and HTML editing.
- Helps create professional-looking reminder emails.
Field Description
| Field Name | Description |
|---|---|
| Subject* | Custom subject line for the reminder email. You can modify it as needed. |
| Attachment | Add files (image, PDF, document) to send additional materials like event pass, instructions or brochure. |
| Message Body | Editable email content with placeholders. Supports formatting, HTML, and styling. |
| Dynamic Placeholders | Auto-replace keywords in the email. Example: %ATTENDEE.NAME% ? attendee’s real name in the email. |
| Send Button | Sends reminder email to all registered attendees. |
| Close Button | Closes popup without sending the email. |
| Email Reminder Icon (in listing) | Visible only when the event has at least one registered attendee and at least one visitor’s attendance status is marked as Confirmed. Hidden when no registrations exist or when all registered visitors are still in Pending status. |

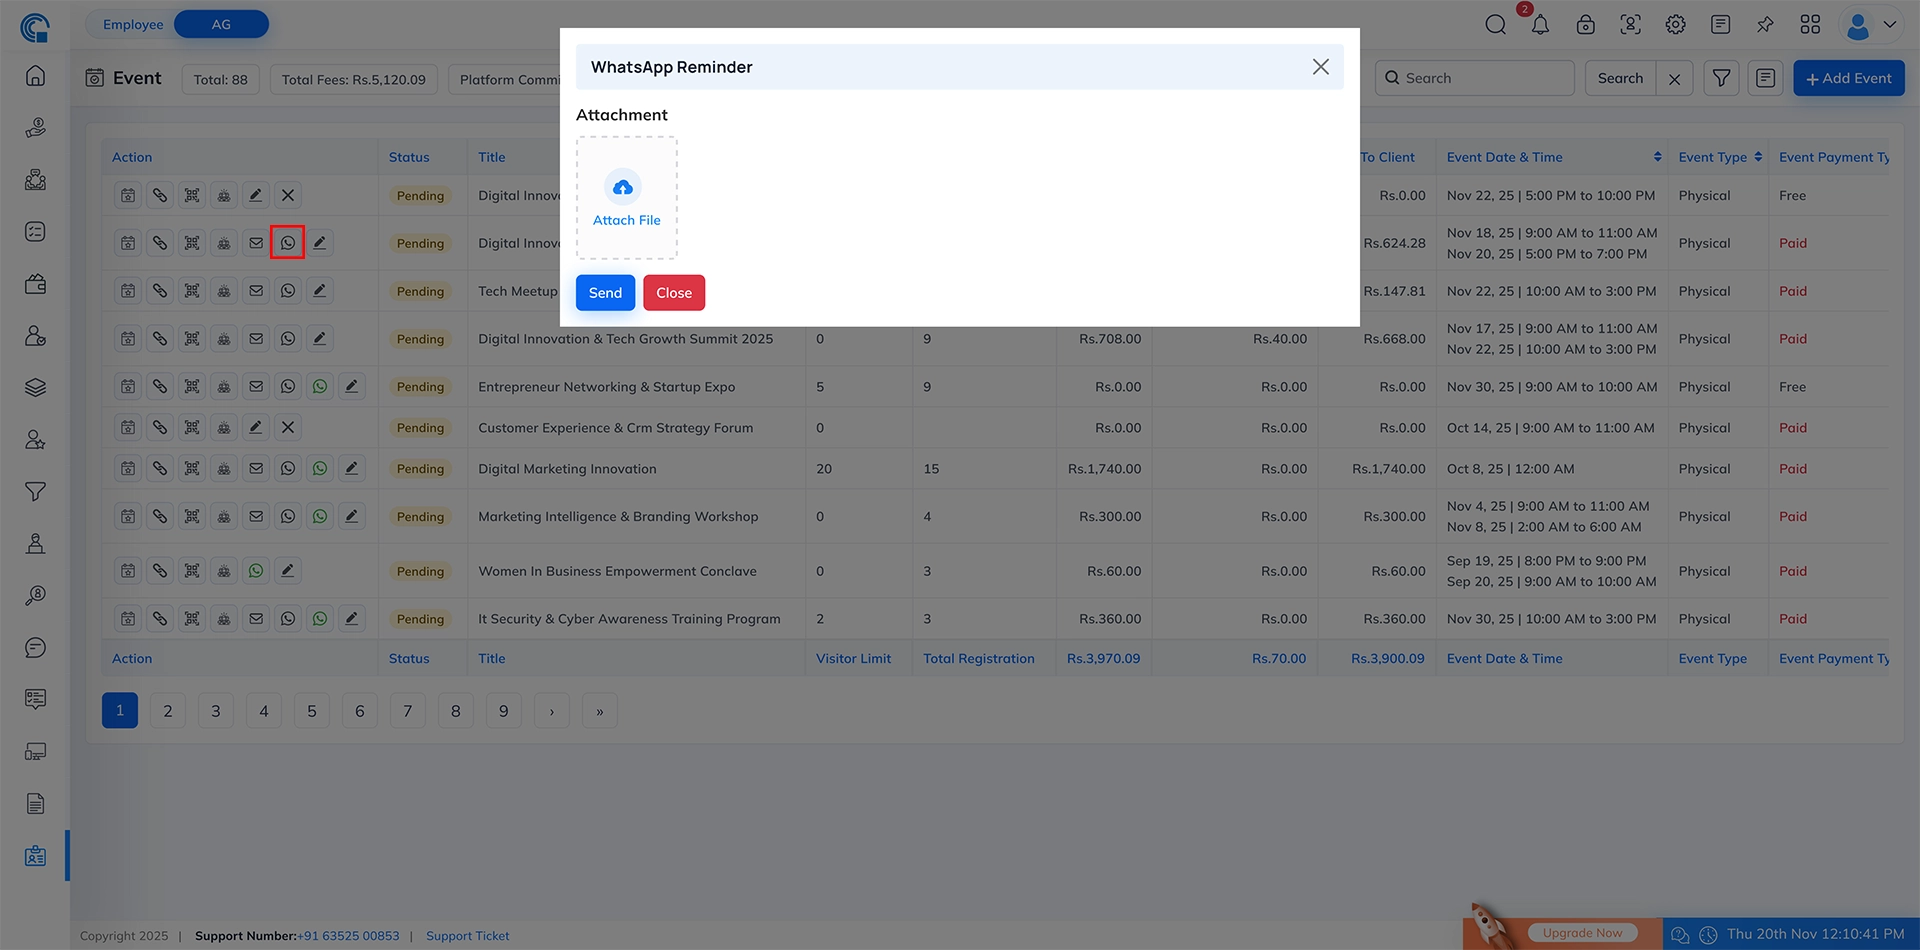
Send Reminder In WhatsApp in Event Listing Layout:
Overview
- The WhatsApp Reminder feature allows event organizers to instantly send reminder messages to all attendees who have registered and whose attendance is confirmed.
- The icon only appears when:
- Registration Count > 0
- At least one attendee has Attendance Status = Confirmed
- (If all attendees are still in Pending status, the WhatsApp icon remains hidden.)
- This ensures reminders are only sent to valid, confirmed participants.
- The popup allows you to upload attachments (optional) and send a WhatsApp reminder along with the event ticket. The reminder helps participants remember the event schedule, venue, and important instructions.
Key Features
- Visible Only for Confirmed Attendees:
- WhatsApp icon shows only when
- At least one attendee is registered
- AND their attendance status is Confirmed
- WhatsApp icon shows only when
- Optional Attachment Support:
- PDF, Image, and Document attachments will be delivered via WhatsApp to all confirmed attendees.
- Send Reminder with One Click:
- Fast, automated reminder delivery to all confirmed attendees.
- Useful for Last-Minute Notices:
- Perfect for sending timing updates, venue instructions, parking information, entry rules, dress code, or any important event notice.
Field Description
| Field Name | Description |
|---|---|
| WhatsApp Icon (Event Listing) | Appears only when registration count > 0 and at least one attendee has Confirmed status. Hidden when all attendees are Pending or if no registrations exist. |
| Attachment Upload Area | Section to upload an optional file (image, PDF, doc). This attachment will be sent to all confirmed attendees. |
| Send Button | Sends WhatsApp reminder including event ticket + attachment to all attendees with Confirmed status. |
| Close Button | Closes the popup without sending the reminder. |

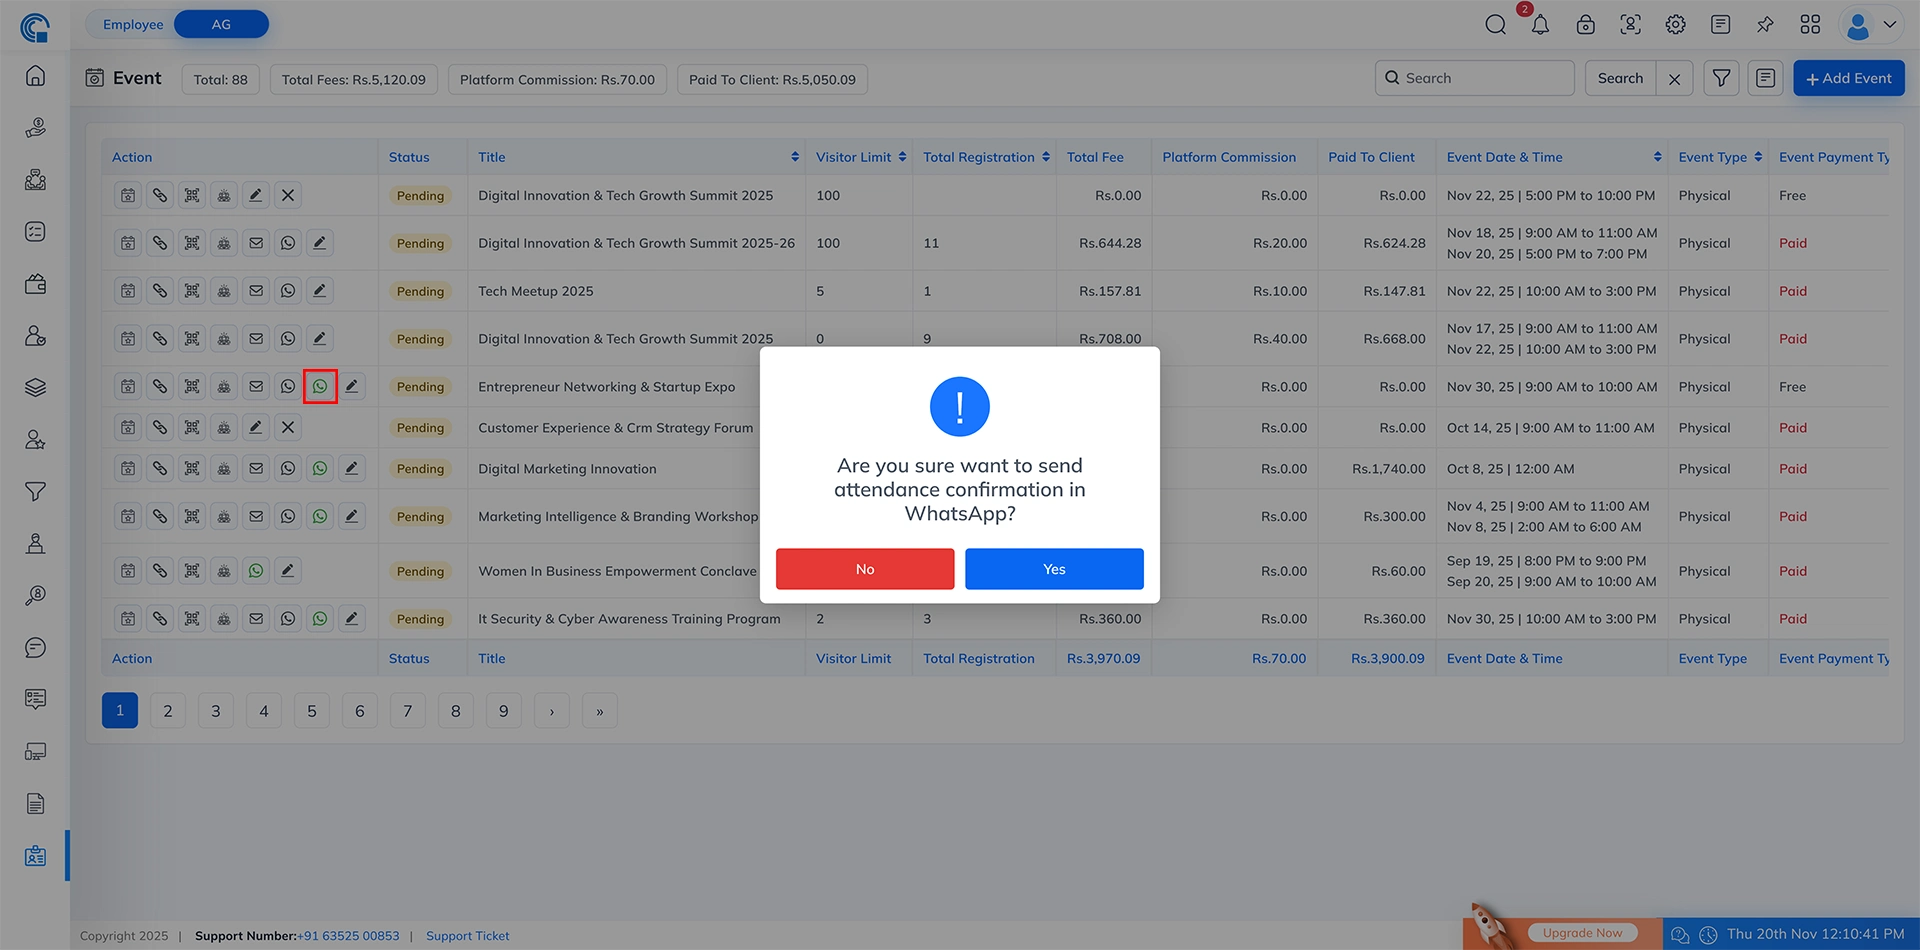
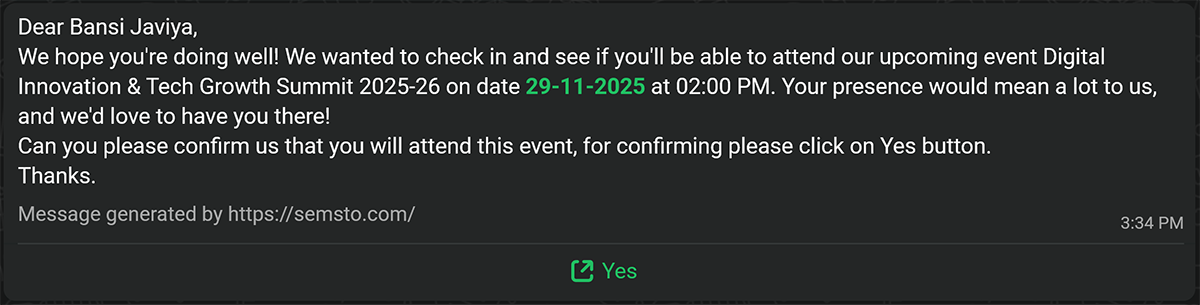
Send Confirmation In WhatsApp in Event Listing Layout:
This section helps to again ask for confirmation from registered attendee.
Overview
- The WhatsApp Attendance Confirmation feature allows event organizers to send a quick confirmation link to all attendees whose attendance status is still marked as Pending. This helps automate the process of verifying attendance before the event and reduces manual follow-ups.
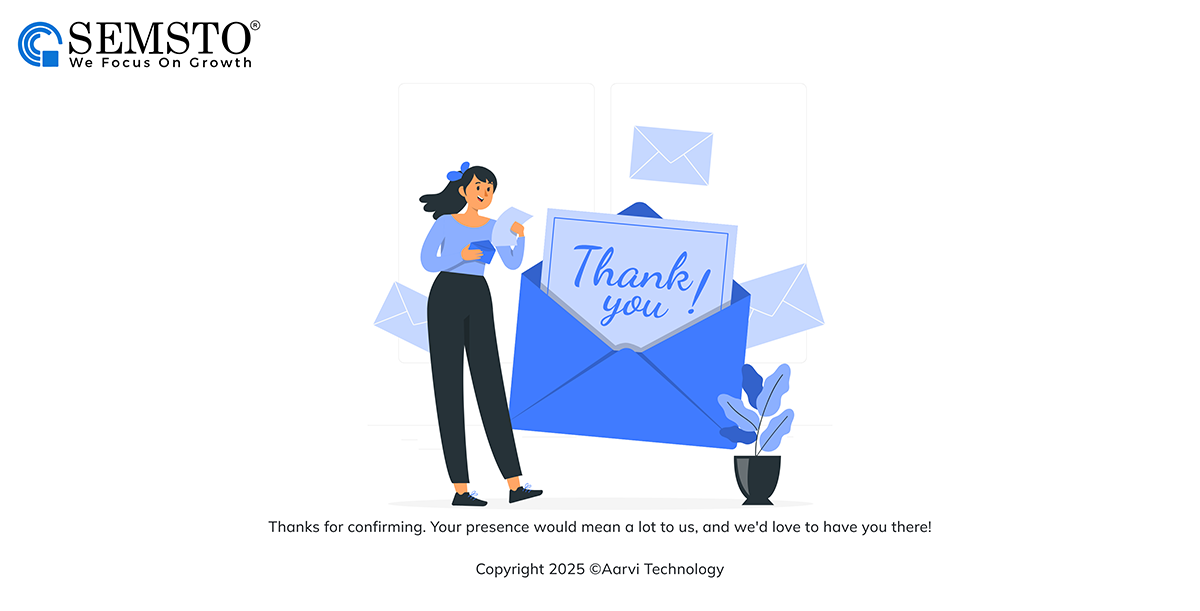
- When the organizer clicks the WhatsApp Confirmation Icon, a confirmation popup appears. Once confirmed, a WhatsApp message is sent to all pending attendees with a unique confirmation link. When attendees click the link, their attendance status is automatically updated to Confirmed in the system.
- This feature ensures faster confirmation collection and helps maintain accurate attendee records.
Key Features
- Sends a confirmation message to all visitors whose attendance status is Pending.
- Visitors simply click the link they receive in WhatsApp. As soon as they click:
- Their attendance status changes from Pending ? Confirmed
- The updated status immediately reflects in the event registration list
- Icon Visibility Based on Data:
- The WhatsApp confirmation icon appears only when it is actually needed.
- If no visitors are registered, the icon does not appear.
- If visitors are registered but all visitors already have Confirm status, the icon does not appear.
- If visitors are registered and at least one visitor’s attendance status is Pending, the icon will appear in the listing.
- Confirmation Popup
- Before sending messages, a confirmation popup appears:
- YES ? Sends the WhatsApp attendance confirmation to all pending visitors.
- NO ? Popup closes, no message is sent
- Bulk Attendance Confirmation
- With one click, the system sends the confirmation link to all pending attendees—saving manual effort.
Use Details
- Click the WhatsApp Confirmation Icon (located in the event listing under the “Action” column).
- Popup Appears: “Are you sure want to send attendance confirmation in WhatsApp?”
- Visitors Receive WhatsApp Message: Message includes event details and confirmation link.
- Visitor Clicks the Link: System automatically marks their attendance as Confirmed.
- Status Updates in Register Listing: Pending ? Confirmed in real-time.


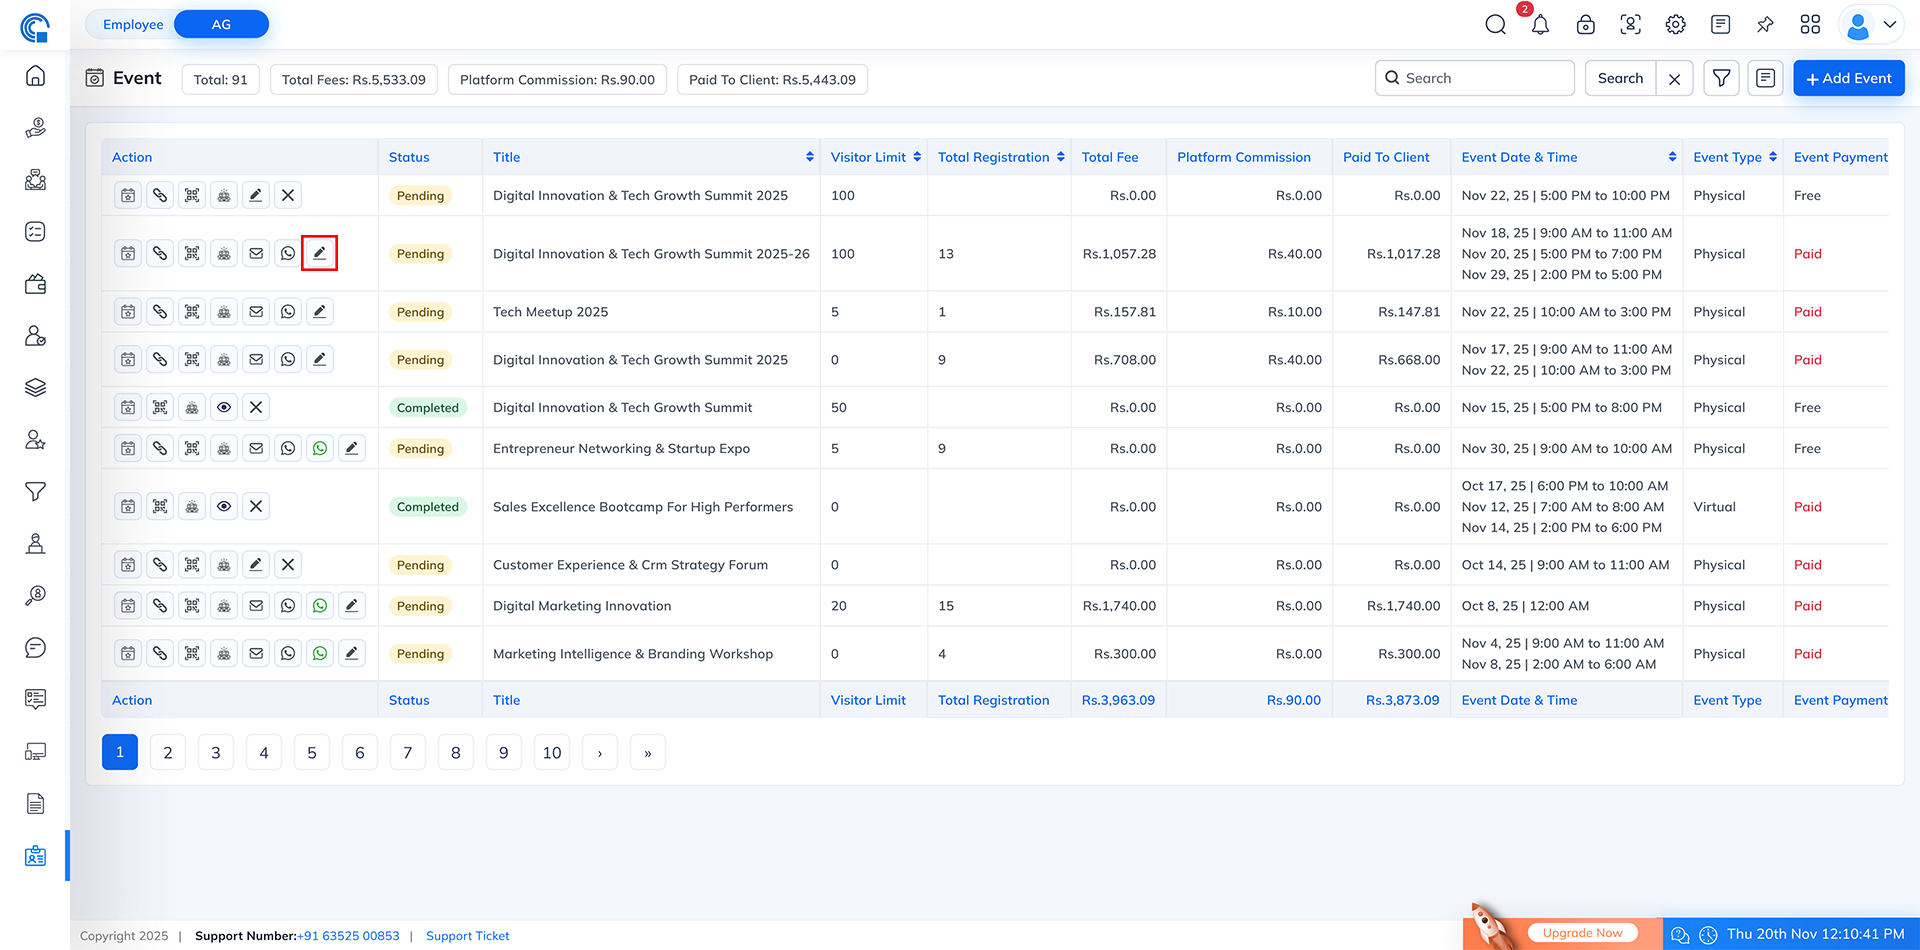
Edit in Event Listing Layout:
Overview
- The Edit Event icon allows you to update or modify any event details after creation.
- By clicking this icon, the full Edit Event form opens, where you can change event information such as title, date, venue, registration settings, ticket options, and more.
- This feature helps maintain accuracy when event plans change.
Key Features
- Full Event Editing: Modify any event detail including schedule, capacity, fees, registration fields, and description.
- Quick Access: Directly opens the existing event data for editing.
- Status-Based Visibility:
- The edit icon is visible only when the event status is Pending.
- The icon is hidden when an event is marked as Completed to prevent accidental changes.
- Real-Time Updates: All changes are immediately reflected in the event listing and dashboard.
Use Case
- Use this icon when you want to:
- Update event timing or venue
- Change registration limits or fees
- Add or remove ticket types
- Edit event description or organizer details
- Enable or disable registration fields
- Ideal for correcting mistakes or making changes due to schedule updates.

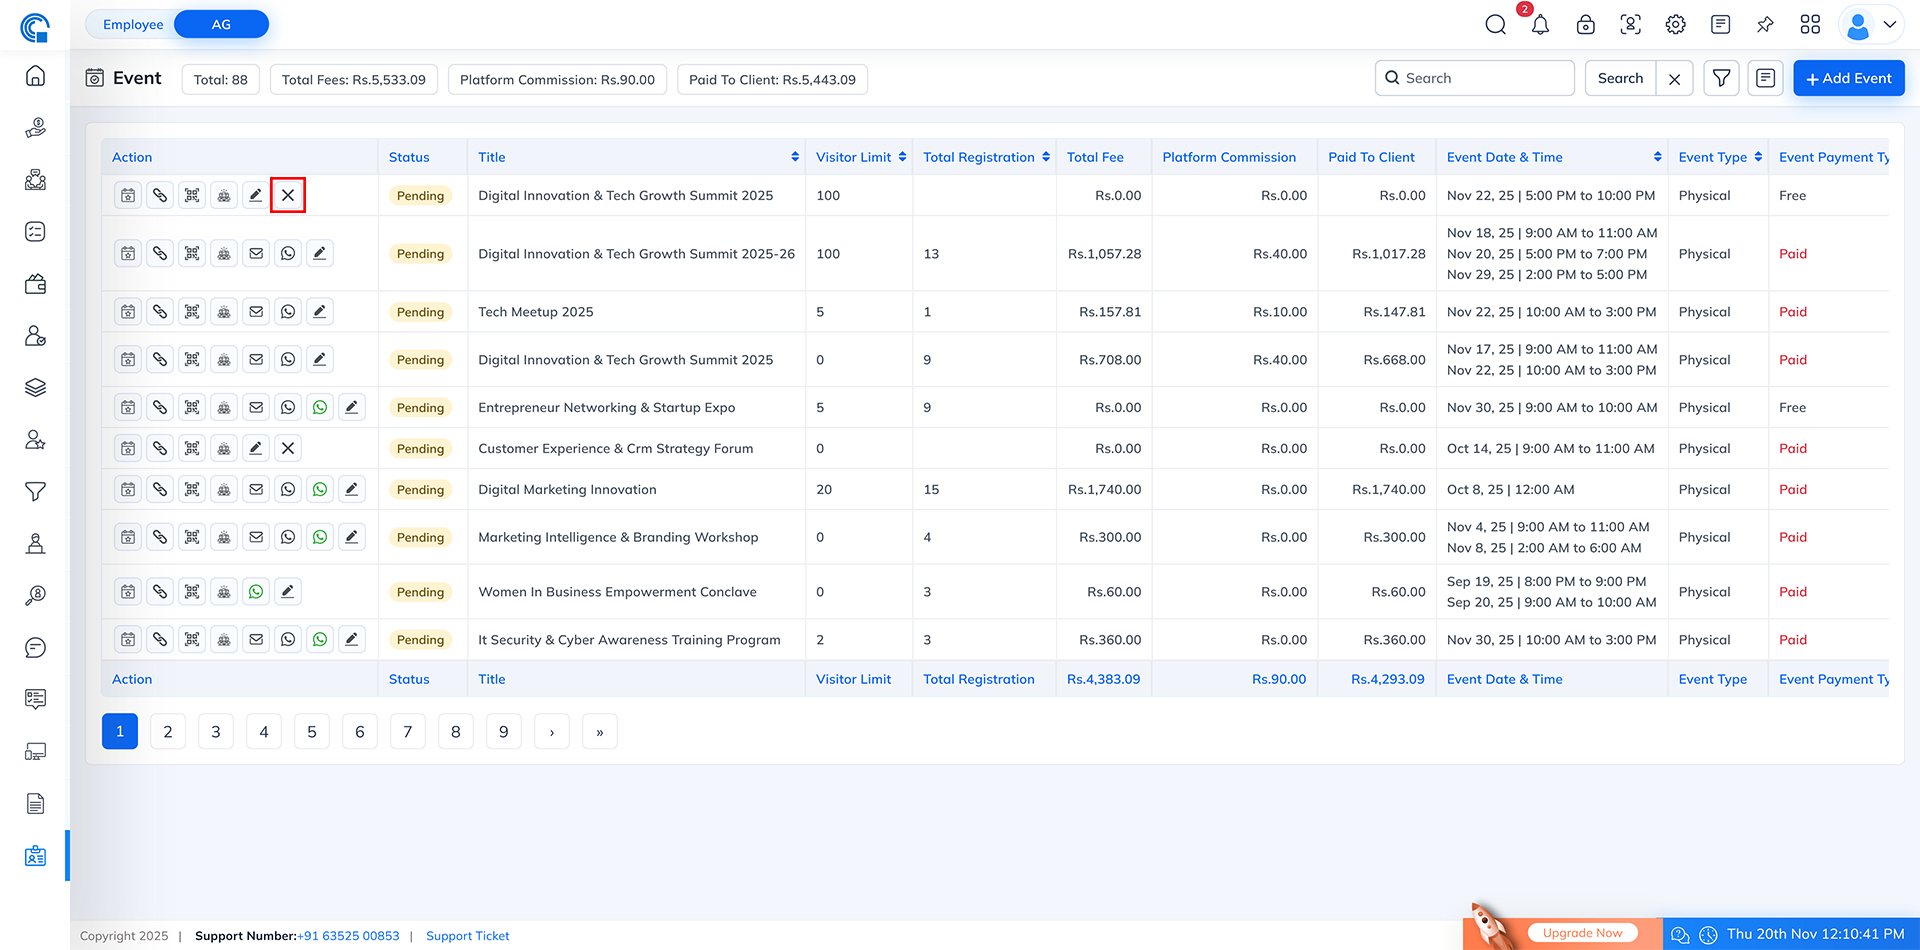
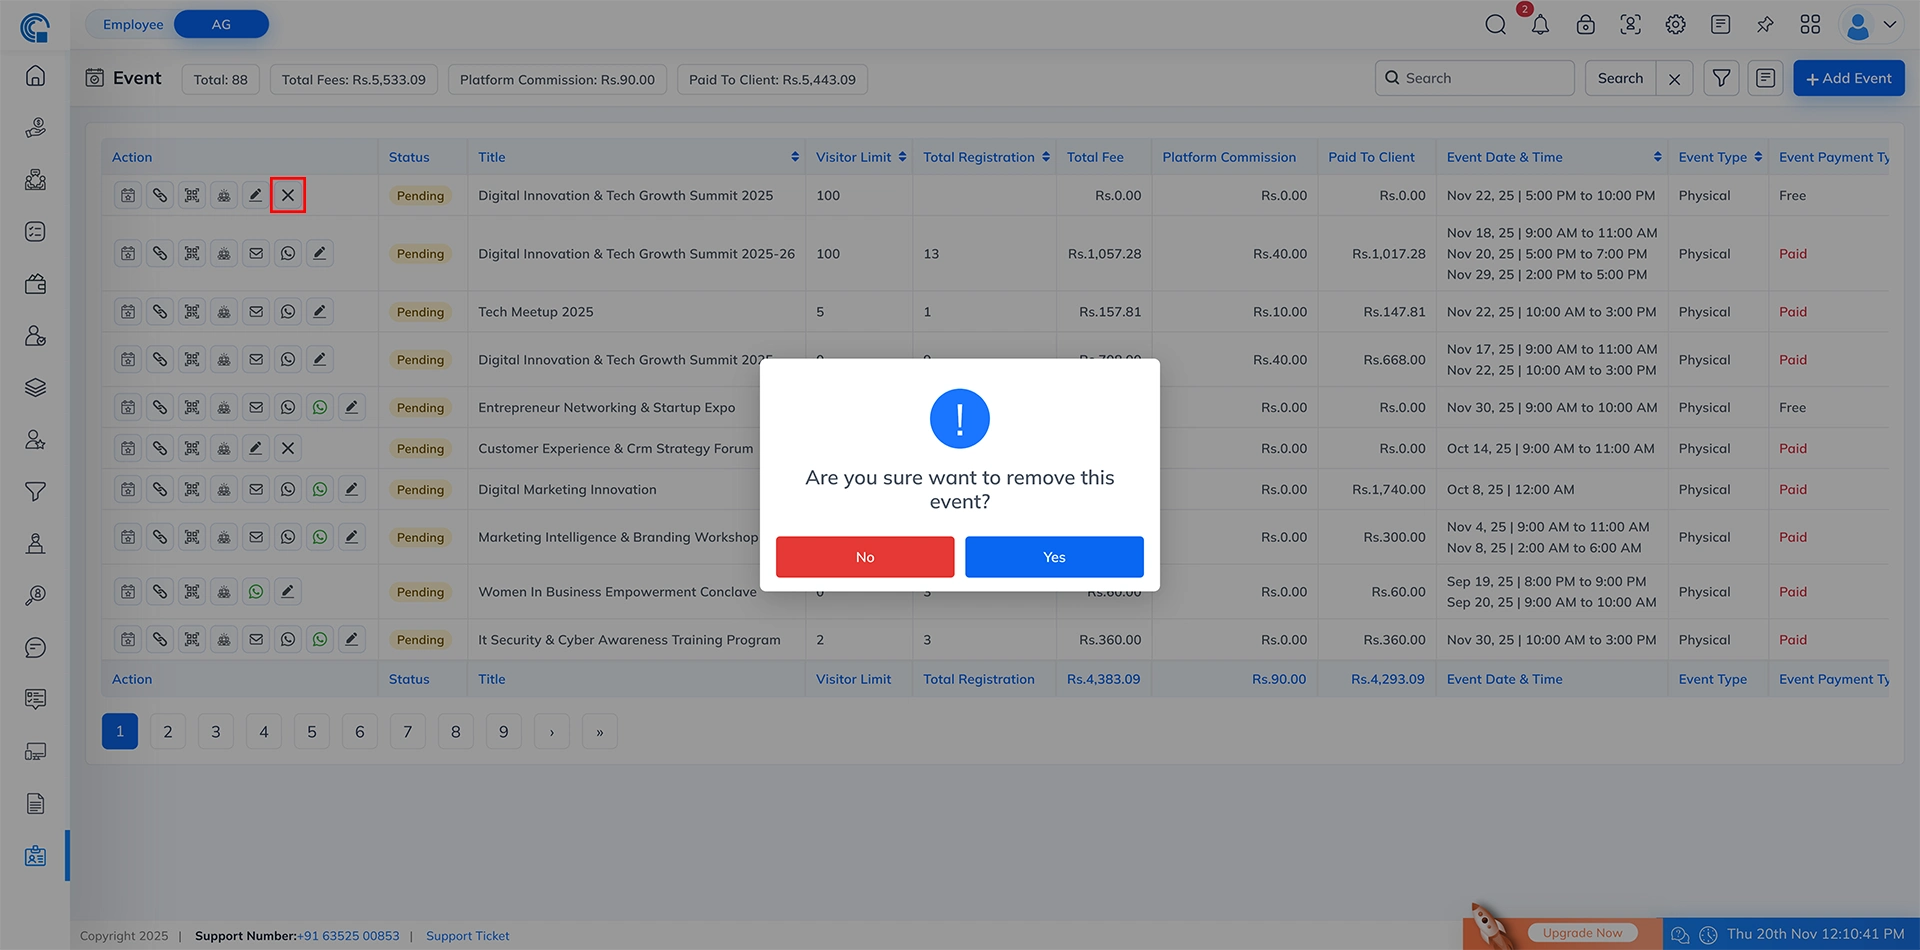
Remove in Event Listing Layout:
Overview
- The Remove Event icon allows you to permanently delete an event from the system.
- It is used when an event is no longer needed or was created by mistake.
- Clicking this icon opens a confirmation popup to avoid accidental deletion.
Key Features:
- When you click the Remove (X) icon, a confirmation popup appears with Yes and No buttons:
- Yes ? The event is permanently deleted from the system.
- No ? The popup closes and the event remains unchanged.
- Visibility Control:
- The remove icon is visible only when NO visitor has registered for that event.
- If even one visitor is registered, the remove icon is hidden to protect event data and prevent deleting events with attendee records.
Use Case:
- The event was created by mistake
- The organizer wants to cancel the event before any registrations
- You need to keep your event listing clean and remove unused drafts

Other Functionality In Event Listing Layout:
Overview (Other Functionality for Completed Events):
- Once an event is marked as Completed, certain action icons become hidden because they are no longer applicable after the event has ended.
- To avoid confusion and prevent unnecessary actions, the system automatically disables the following options for all Completed events:
-
- Registration Link Icon – Registration can no longer be shared because the event is over.
- Email Reminder Icon – Reminders are irrelevant for completed events.
- WhatsApp Reminder Icon – Reminder messages cannot be sent after completion.
- WhatsApp Attendance Confirmation Icon – Attendance confirmation is no longer required once the event is closed.
- Edit Icon – Event details cannot be edited after completion to maintain record accuracy.
(This ensures that completed events remain locked, organized, and protected from accidental updates or unnecessary communication actions.)
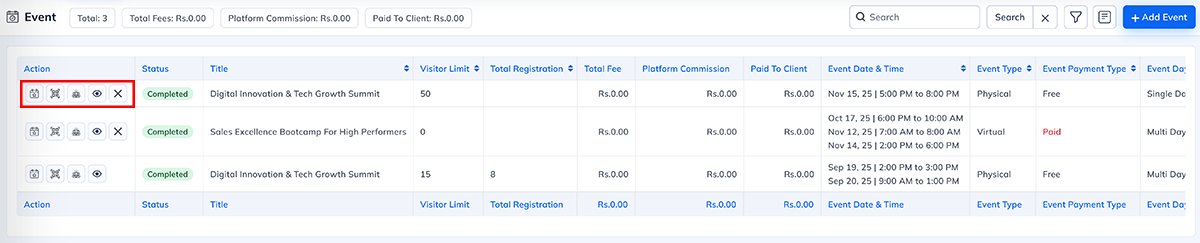
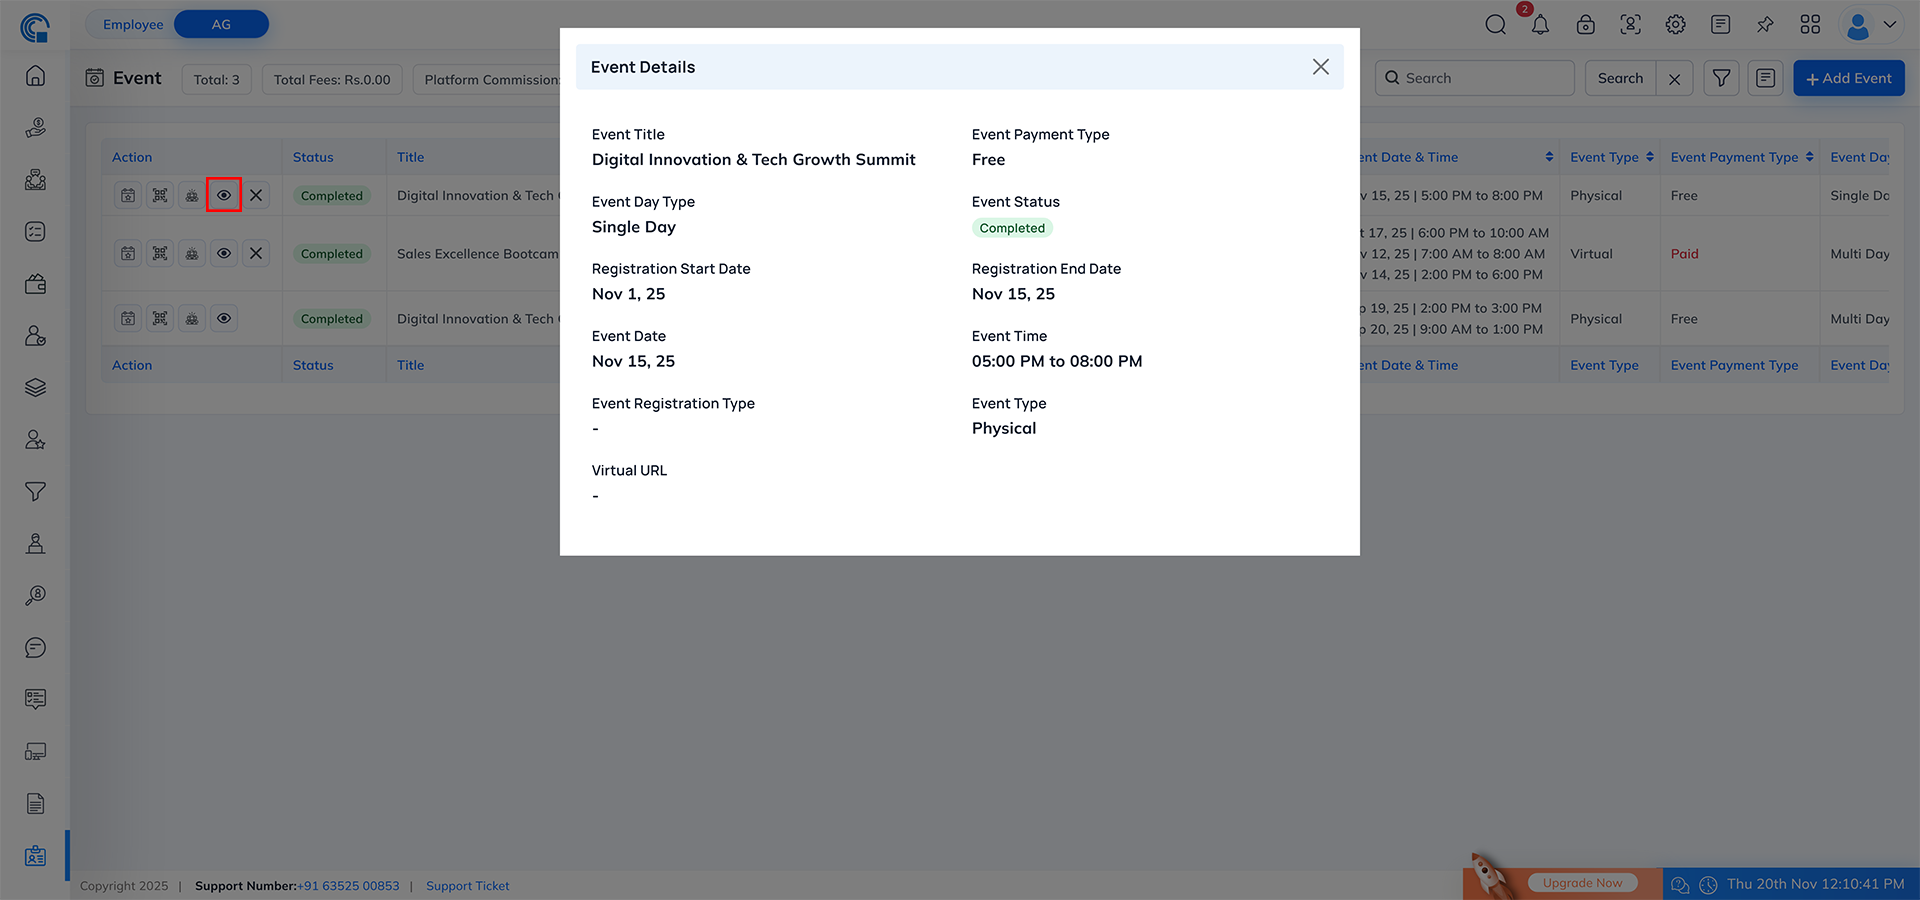
View Event Details in Event Listing Layout: [For Completed Event]
Overview
- The View Event Details icon is designed to provide a quick snapshot of an event’s core information without opening the full edit form.This icon is visible only for Completed Events, ensuring that users can review finalized event details while preventing further modifications.
- Clicking the icon opens a read-only popup showing important event information such as title, dates, timings, registration type, event type, payment type, and status.This helps users quickly refer to event details directly from the listing page.
Key Features
- Visible Only for Completed Events: The icon appears only when the event status is Completed, keeping the listing clean and avoiding unnecessary actions for ongoing or pending events.
- Read-Only Information Popup: The popup displays complete event details in a clean, structured format without allowing edits.
- Quick Access to Important Data: Users can instantly view event title, event day type, payment type, dates, times, status, event type and registration type.
- No Navigation Required: Eliminates the need to open the full event form — saves time and simplifies event review.
- Secure and Non-Editable: Ensures historical event data remains unchanged and tamper-proof.
Generate Link For Visitors in Event Listing Layout:
Overview
- Clicking the Generate Link icon opens the visitor registration form in a new tab.
- This link allows the admin to manually register a visitor on behalf of the event or share the form link externally for self-registration.
- The registration form layout is completely dynamic and fully depends on the event setup.
Registration Link Behavior
- Valid Registration Date:
- If today’s date is between Registration Start Date and Registration End Date, the registration form opens normally.
- Visitors can fill the form and register.
- Registration Date Expired:
- If today’s date is after Registration End Date, the form does not open.
- Instead, a Link Expired page is shown with a thank you message.
- Registration Not Started Yet:
- If today’s date is before Registration Start Date, the form will also not open.
- The user cannot register before the event’s allowed registration start date.
- Event Spots Full:
- If total allowed registration count is reached and the event is full:
- Registration form will not open
- Instead, “Registration Full / Link Expired” page is shown
- Only Active Events Allow Registration:
- If the event is inactive or disabled:
- The form link will automatically show “Link Expired” page
- Registration is not allowed for inactive events
Form Structure & Behavior
- Event Cover Photo:
- If a cover photo is uploaded during event creation, it is displayed on top.
- If no image is uploaded, a default event banner is shown.
- Logo Display:
- Event logo is shown next (if uploaded).
- If not provided, default Semsto event logo appears.
- Event Details Section: This section shows:
- Event Title
- Event Description
- Event Date & Time
- (supports single-day and multi-day formats)
- Event Venue (displayed only if added)
- Registration Date Range (Start to End)
- Google Map (displayed only when a location map URL is added)
Everything in this section is displayed based on event configuration. - Event Price Section (Paid Events Only):
- The Price section is displayed only for Paid Events and appears just below the map area.
- If the event does not use Ticket Types, the system shows a single fixed Event Price here.This price is automatically determined based on the event setup:
- Single-day event: The fixed price for that day is shown.
- Multi-day event: The price shown depends on the selected event date within the registration period.
This helps visitors clearly understand the payable amount before filling in their details.For Free Events, this Price section is not displayed. - Early Bird Indicator (Paid Events Only):
- Visible only if Early Bird is enabled for the event.
- Shows an Early Bird Registration is Open banner with validity date.
- Once Early Bird validity is over or visitor already registered under Early Bird, indicator is auto-removed.
- Visitor Personal Information Section: This section contains all visitor detail fields such as
- Name, Phone, Email, Company Name, Additional optional fields etc. All fields are fully customized per event setup:
- Admin can hide or show fields
- Mark fields as required or optional
- Enable or disable based on event needs
- No. of Attendees:
- If the visitor selects more than 1 attendee, a dynamic panel opens to add additional attendee details.
- Additional attendee fields (Name, Phone, etc.) also follow event-level visibility and required rules.
- Available Spots:
- The Available Spots label shows the number of remaining seats for the event.
- This helps the visitor immediately understand how many seats are still open and how many have already been registered.
- This ensures visitors cannot select more attendees than the remaining availability.
- If available spots become zero, the registration form automatically blocks new submissions.
- Name, Phone, Email, Company Name, Additional optional fields etc. All fields are fully customized per event setup:
For Example
If the visitor selects more than 1 attendee, an additional panel opens automatically to collect details for each attendee.
- Register Now Button (Free Event Only):
- For Free Events, visitors can complete their registration directly by clicking the Register Now button.
- Once all required details are filled in, the system immediately creates the visitor’s registration without any payment step.
- The Register Now button appears only for Free Events.
- In Paid Events, this button is replaced by the payment checkout process.
- If the Verification Required for Attendee switch is ON, then after registration the visitor will not receive any email or WhatsApp message. (Tickets and event details will be sent only after the admin verifies the attendee.)
- If the switch is OFF, then after registration the visitor will immediately receive the event details and ticket on Email and WhatsApp.
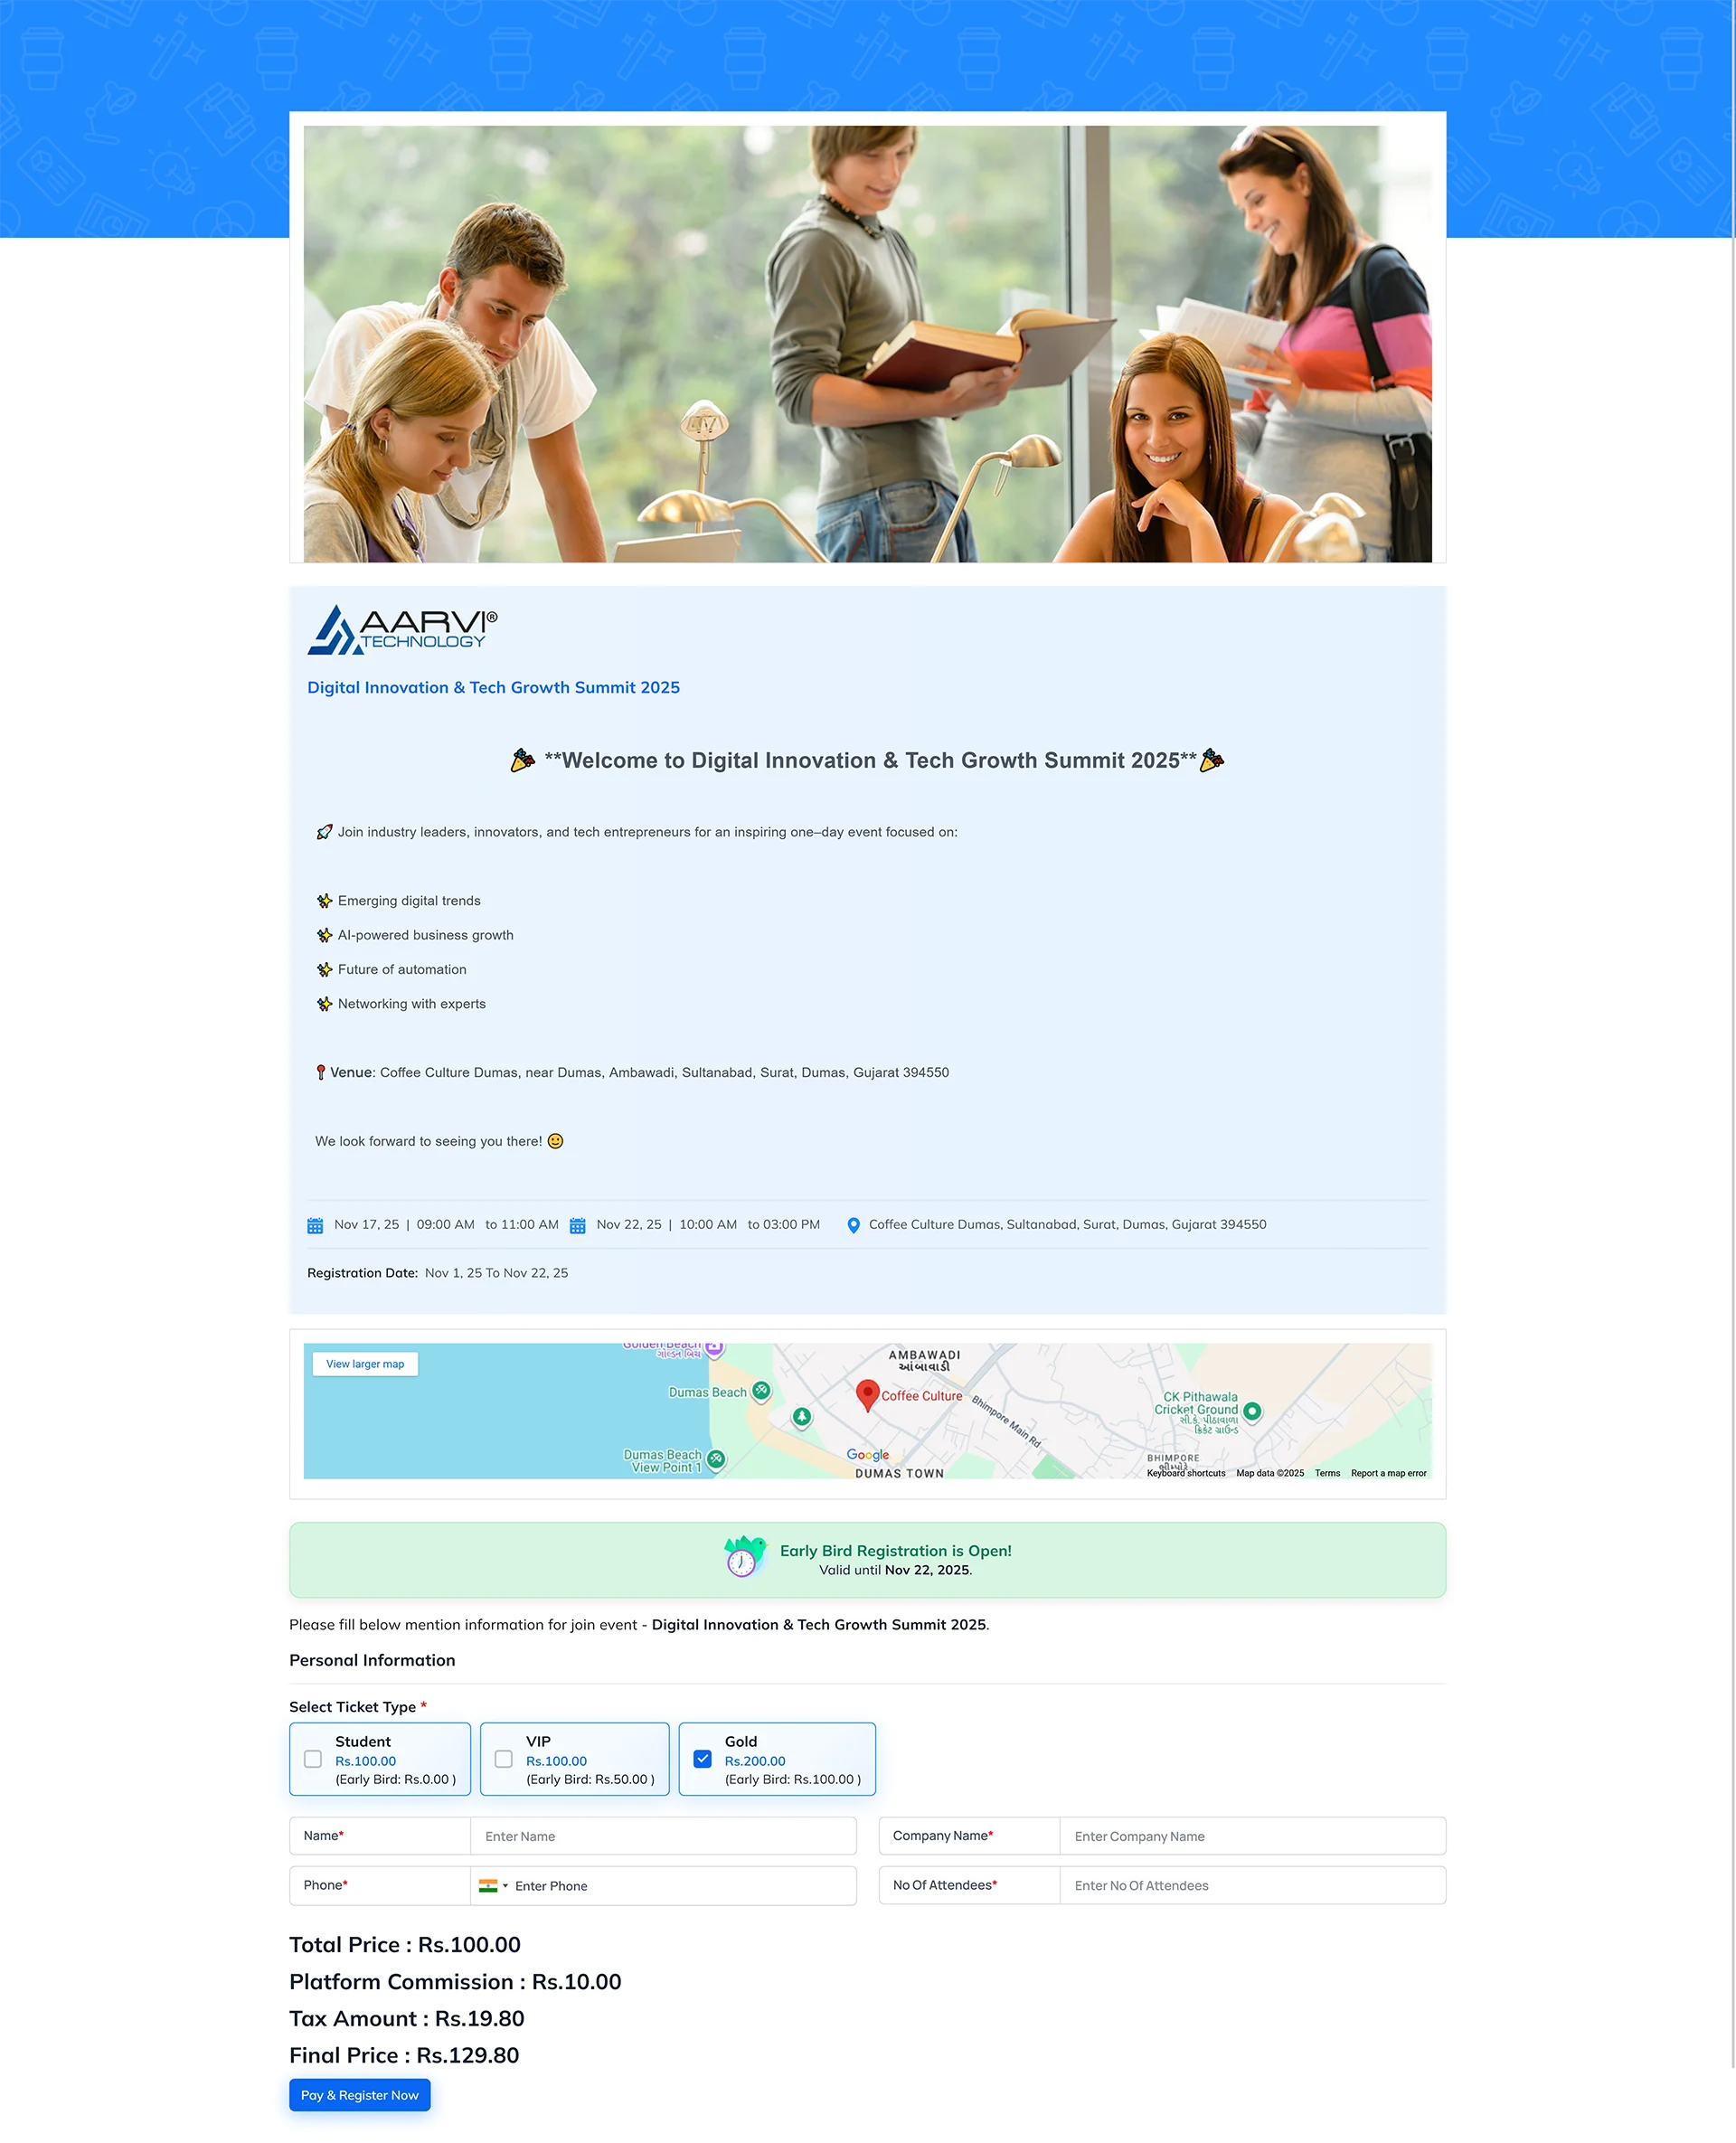
Other Functionality – Ticket Type Selection in Registration Form
- Ticket Type Selection (Paid Events Only):
- Ticket type dropdown appears only when ticket categories are added in event settings.
- If no ticket type is configured, this field will not appear.
- Common ticket types: Student, VIP, Early Bird, Corporate, etc.

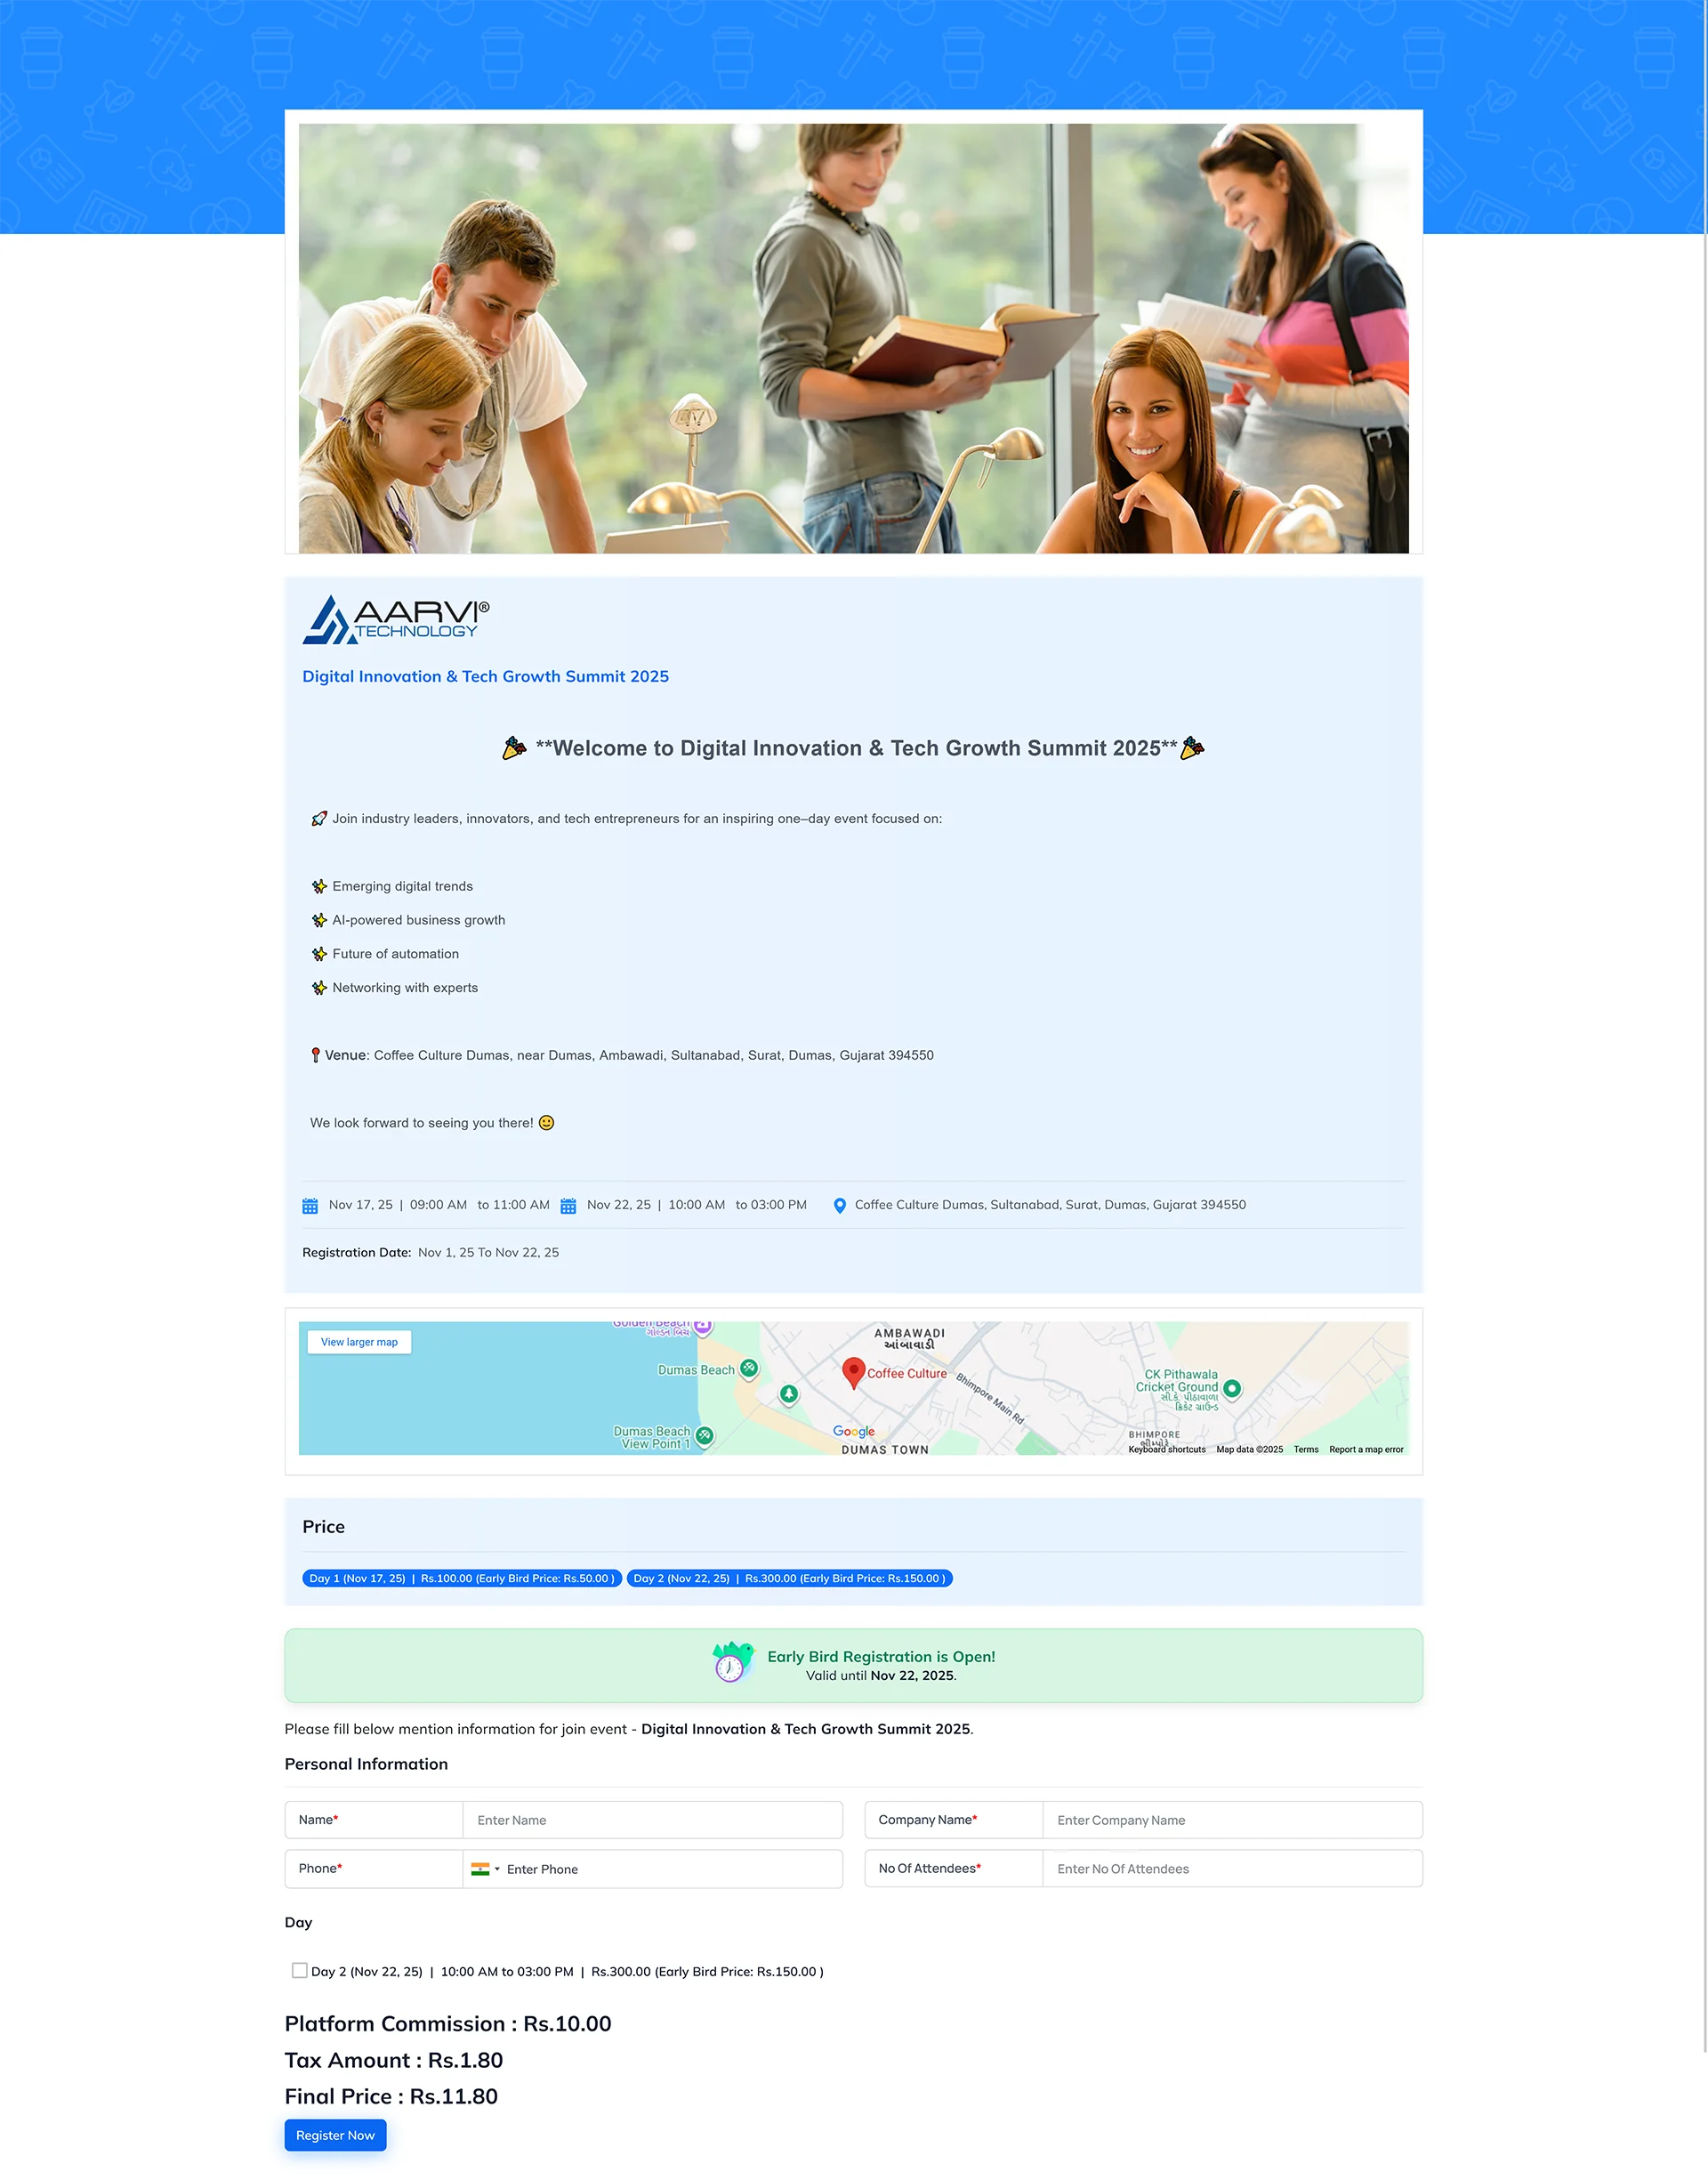
Paid Event – Registration & Payment Flow
- When the visitor is registering for a Paid Event, the form automatically shows additional pricing, coupon, taxation and commission-related options.
- These sections appear only when the event type is Paid.
- Pay & Register Button
- After the visitor fills all mandatory details, the Pay & Register Now button becomes available.
- This button appears only in Paid Events, because payment is required before confirming the registration.
- Coupon Code OptionIf the event has coupons configured, the visitor will see: Do you have a coupon code? Yes / No
- If “No” is selected: Coupon field will not appear.
- If “Yes” is selected: Coupon input box and Apply Coupon button are displayed.
- Applying Coupon Code
- When the visitor enters a coupon and clicks Apply Coupon, the system checks multiple validations:
- Valid Coupon
- Coupon is active
- Coupon is within valid date range
- Coupon has remaining usage limit
- Coupon is allowed for the selected number of attendees
- Coupon matches configuration (Flat or Percentage)
- If valid ? coupon is applied successfully and discount is calculated.
- Invalid Coupon
- If the coupon fails any validation, the system shows proper error messages:
- Invalid code
- Expired code
- Limit exceeded
- Coupon not allowed for selected attendees
- In this case ? discount is not applied.

- How Coupon Discount is Calculated? Based on coupon master settings:
- Flat Discount ? fixed amount is reduced
- Percentage Discount ? discount is applied on price
- Early Bird + Coupon Together:
- If Early Bird switch is ON ? coupon applies on Early Bird price
- If Early Bird switch is OFF ? coupon applies on regular event price
- Only active coupons are allowed
- Coupon applies only up to the configured attendee limit
- Price Details : Price details appear only in paid events, which include:
- Total Price: Calculated based on Event Price × Number of Attendees
- Platform Commission: Shown only when platform commission switch is ON.
- Commission is calculated based on configuration:
- Percentage commission
- Minimum fixed commission per ticket

- Tax Amount: Displayed only when tax switch is enabled in event setup.
- Tax is calculated using: Event Taxation Percentage

- Tax is calculated using: Event Taxation Percentage
- Final Price: Final payable amount after all adjustments:
- Final Price = (Total Price + Commission + Tax) – Coupon Discount [This is the amount sent to the payment gateway.]
- You can set up the coupon from the Settings menu, under the Visitor section, by opening the Event Coupon Master.
- Based on your paid event, the coupon amount will be displayed here. You can verify whether the displayed amount is correct or not directly from the Event Coupon Master using this link. Click here to setup coupon

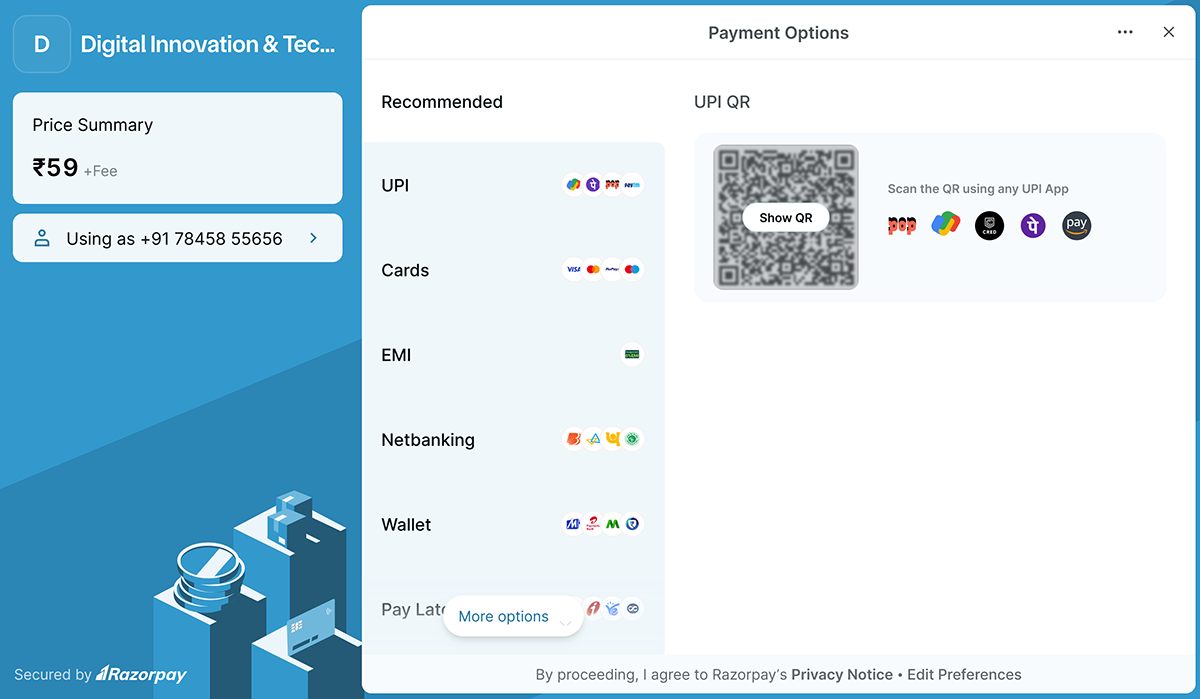
- Payment Gateway Popup: When the visitor clicks Pay & Register Now, the payment window opens.
- Visitor can choose any method such as: UPI QR UPI Apps, Cards, EMI, Net Banking etc…
- The gateway also shows: Convenience fee (if applicable), GST on convenience fee, Total payable charges shown by Razorpay

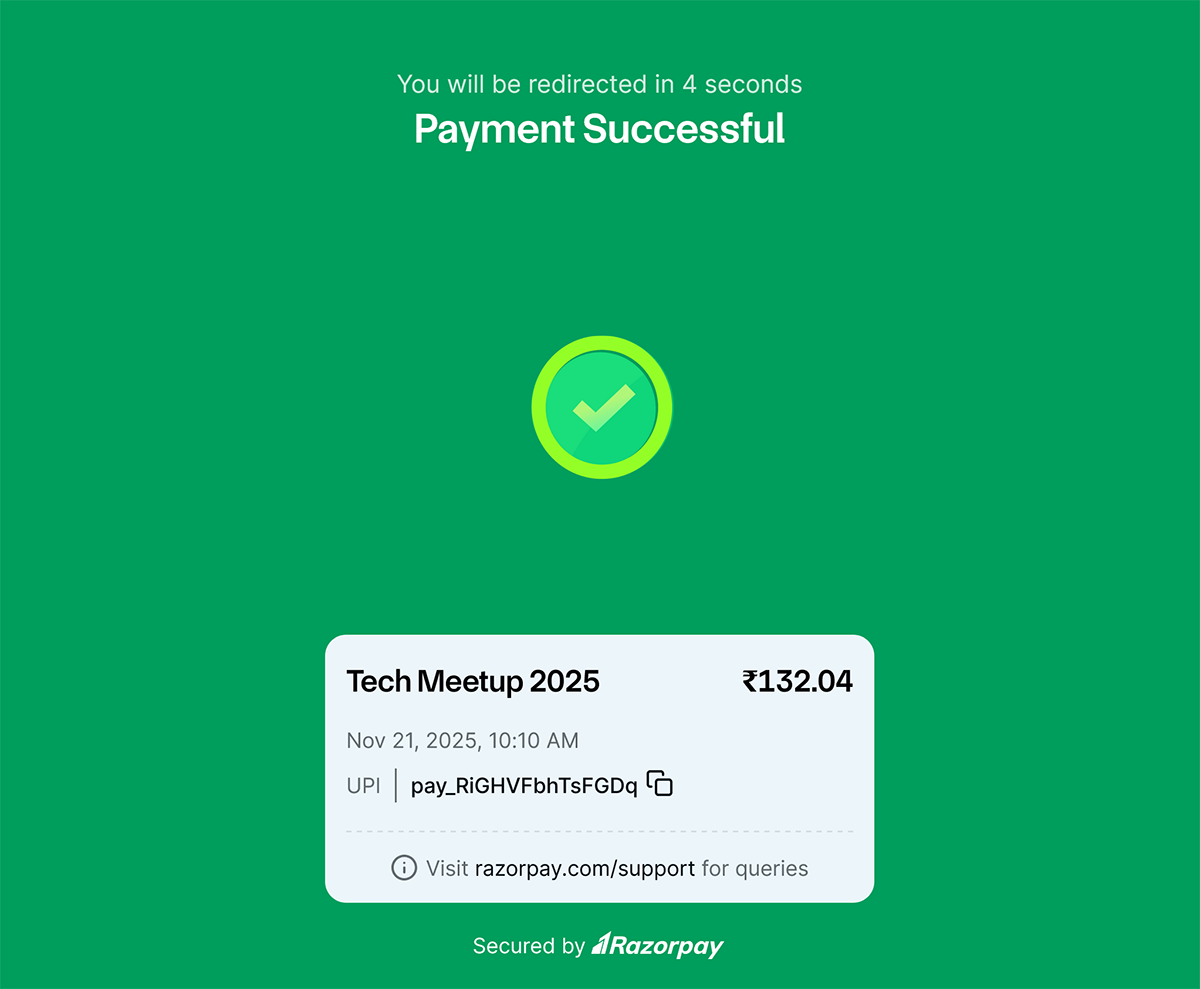
- Successful Payment: After successful payment:
- A success popup is shown
- Registration is created instantly
- Visitor is redirected to the Thank You page
- Thank You Page Shows
- Confirmation message
- A note that the event ticket has been sent
- The support email of the event
- If event has custom email ? that email is shown
- Otherwise the organization’s support email is displayed
- Ticket & Confirmation For all paid events:
- Ticket and event details are always sent instantly to visitor’s Email and WhatsApp
- Because payment confirms the registration
- No verification is required for paid events
Show Registration in Event Listing Layout:
Overview
- The Show Registration icon allows event organizers to view the complete list of visitors who have registered for a specific event. It opens a detailed registration panel where all attendee information appears dynamically based on the event's configuration such as payment mode, swag distribution, additional fields and form builder fields.
- This feature helps organizers quickly monitor registrations, verify attendee details, manage swag distribution, check attendance status and perform event-day operations seamlessly.
Key Features
- Event-Wise Registration Listing:
- Displays only those visitors who have registered for the selected event.
- Dynamic Columns Based on Event Settings:
- Paid Event:
- Shows fee details, Payment status, Commission, Tax, Transaction details
- Free Event:
- Hides all payment-related columns
- Only visitor information appears
- Swag Distribution Switch Enabled:
- Displays Swag Distribution / Kit Status column
- Top bar shows Pending Swag: X/Y
- If switch is OFF ? column and counter are hidden
- Additional Fields Enabled:
- If additional visitor fields are active for the event, those columns appear automatically in this list
- Custom Form Builder Fields:
- If custom fields were added in the event form builder, they also appear as columns (text, dropdown, file etc.)
- Paid Event:
- Clear Page Title:
- The page header displays the event name dynamically, for example: “Event Register of Tech Meetup 2025”
What Happens When You Click the Icon?
When you click the Show Registration icon:
- You are taken to the Event Register List page for that specific event.
- The system loads all visitor registrations based on the event ID.
- Columns are shown/hidden dynamically based on event settings.
- Swag counter and additional fields appear if applicable.
- Search becomes active for the entire event registration dataset.

Description of Register Listing Layout: [For Particular Event]
The Event Register screen displays all visitors who have registered for a specific event. This module helps event coordinators manage registrations, track attendance, distribute kits (swag), send reminders and validate visitor entries — all from one central interface.
Summary:
The Event Register page provides a complete view of all visitors registered for a selected event.
- View the list of all registered visitors
- Track their attendance (In/Out)
- Check and update Distribution Kit / Swag status
- Verify attendance confirmation
- Import and export visitor details
- Send Email / WhatsApp reminders
- Perform bulk attendance and bulk distribution kit updates
- Access individual visitor details including QR code and ticket
- Manage visitor deletion, status changes and manual updates
(This page is specifically designed to streamline event execution, check-ins and visitor handling so the entire process becomes fast, transparent and accurate.)
Page Header Functions:
At the top of the Event Register page, you will see multiple quick-access options:
- Total Count: Shows the total number of visitors registered for the event.
Example: Total: 25 - Pending Swag: Visible only when Swag / Distribution Kit is enabled for the event. It shows the number of visitors whose kit is still pending.
Format: Pending Swag: x/y
x = Pending kits
y = Total registered visitors
(If Swag Distribution is OFF for the event, this section does not appear.) - Search Bar: Performs a full-text search across all columns: Name, Email, Mobile, Company Name, No. of Attendees, etc.
Useful for quickly locating a specific visitor or company. - Export: Exports the entire registration list into a downloadable file. Useful for reporting, manual check-in sheets, or sharing with other teams.
- Import: Opens the Visitor Import module for bulk visitor registration upload. Supports Excel (.xls, .xlsx) and JSON formats
Search Event Date (Paid Event Only):
- The Search Event Date dropdown allows the admin to filter the event register based on the event dates.This filter is available only for Paid Events, because paid events may have multiple event batches or multiple event dates.
- This helps you quickly view registrations for a specific date without scrolling through the full list.

Filter: Opens a detailed filter panel with the following filters:
- Visitor Status (Verified, Pending, Waiting, In, Out, Confirmed etc.)
- Past Event (visitor attended previous event dates)
- Upcoming Event (visitor registered for future event dates)
- Buttons:
- Apply ? Apply selected filters
- Reset ? Clear all filters

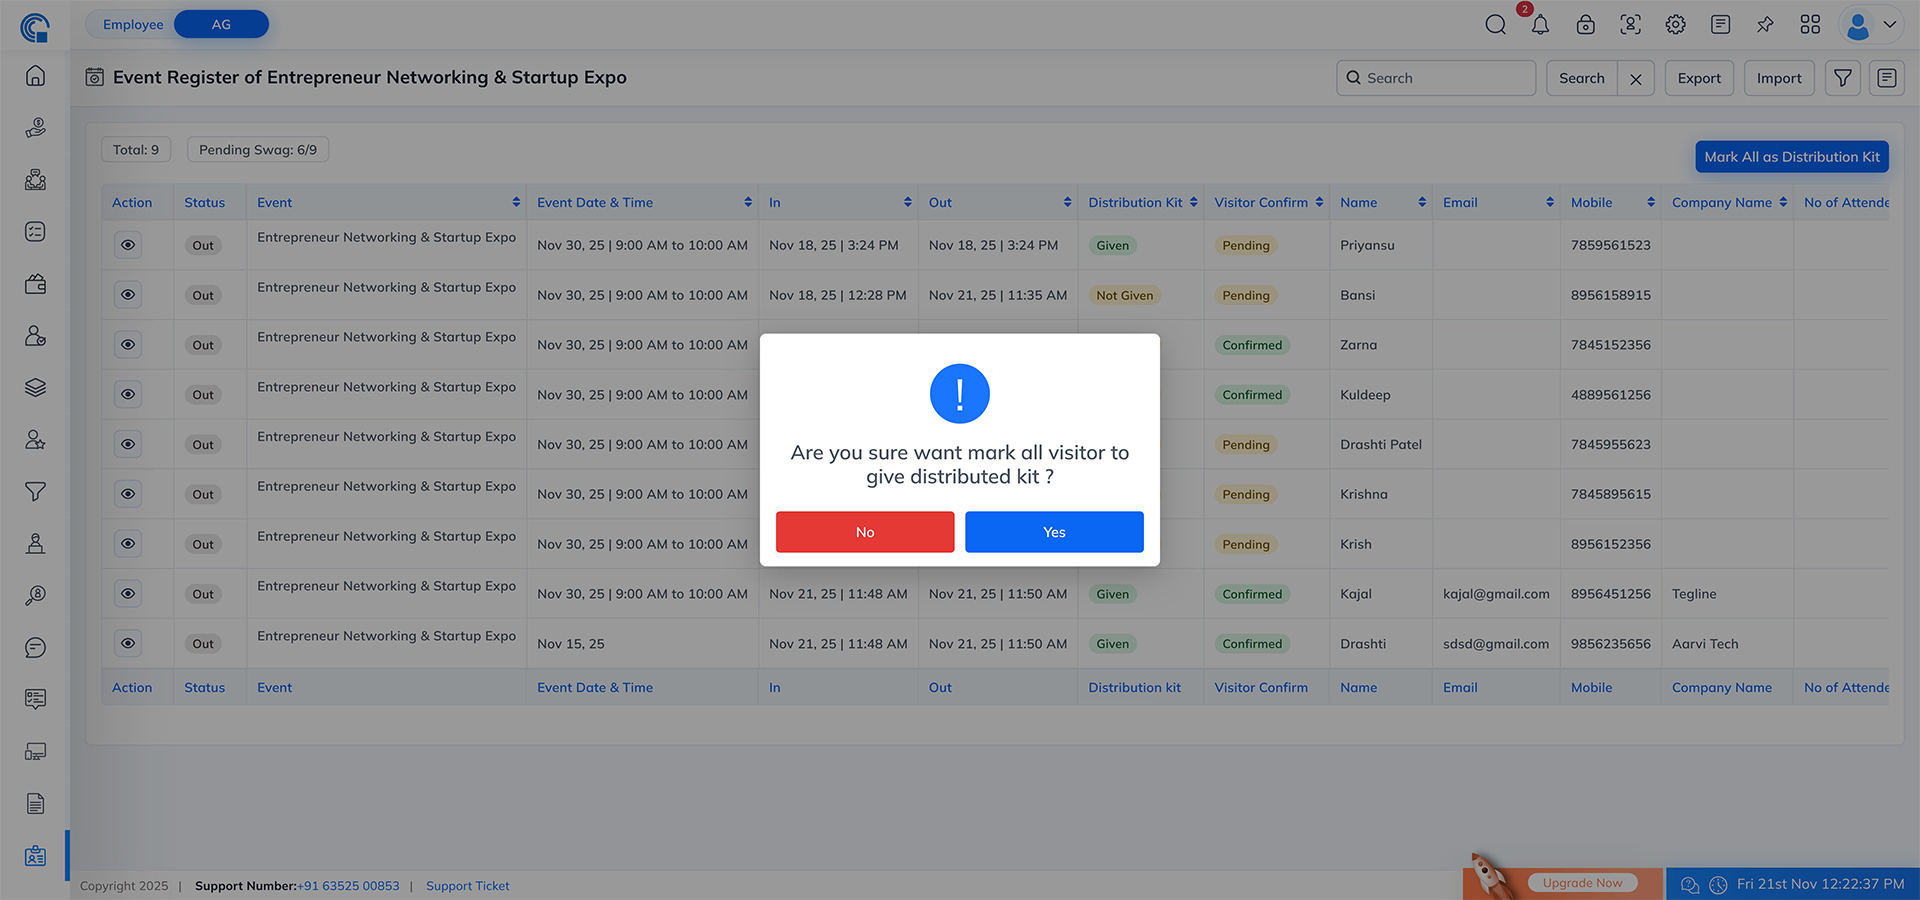
Mark All as Distribution Kit
- Visible only when:
- Swag Distribution is ON for the event
- At least one visitor still has status Not Given
- Clicking this button:
- Marks all pending kits as Given
- Updates the "Pending Swag" count to 0
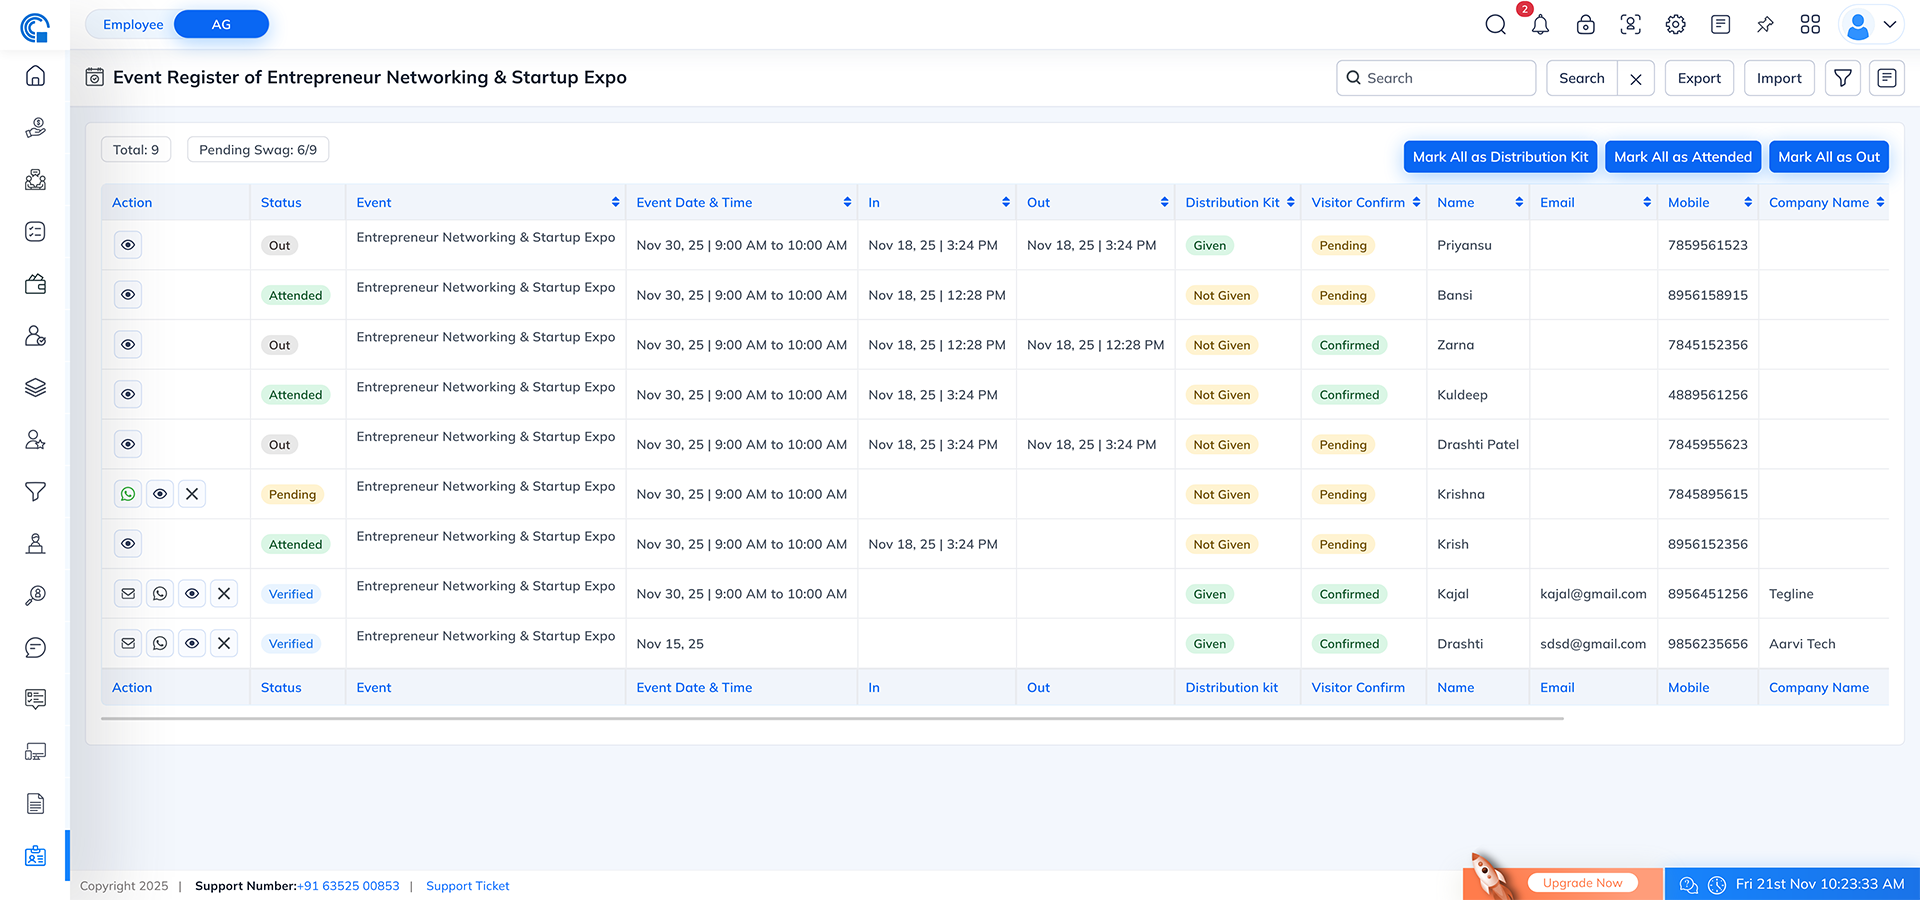
Mark All as Attended
- Visible only when:
- At least one visitor still has In status empty
- Clicking this button:
- Marks all visitors as In
- Useful for events where bulk attendance is required (exhibitions, seminars etc.)
Mark All as Out
- Visible only when:
- At least one visitor already has In status (meaning at least one visitor has checked in)
- Clicking this button:
- Marks all “In” visitors as Out
- Useful for events that finish at a common time where everyone exits together (seminars, conferences, workshops, exhibitions etc.)
- Additional behaviour:
- Visitors who are already Out remain unchanged
- Visitors who are Pending / Verified / Waiting (not In yet) are not affected
- A confirmation popup ensures no accidental updates

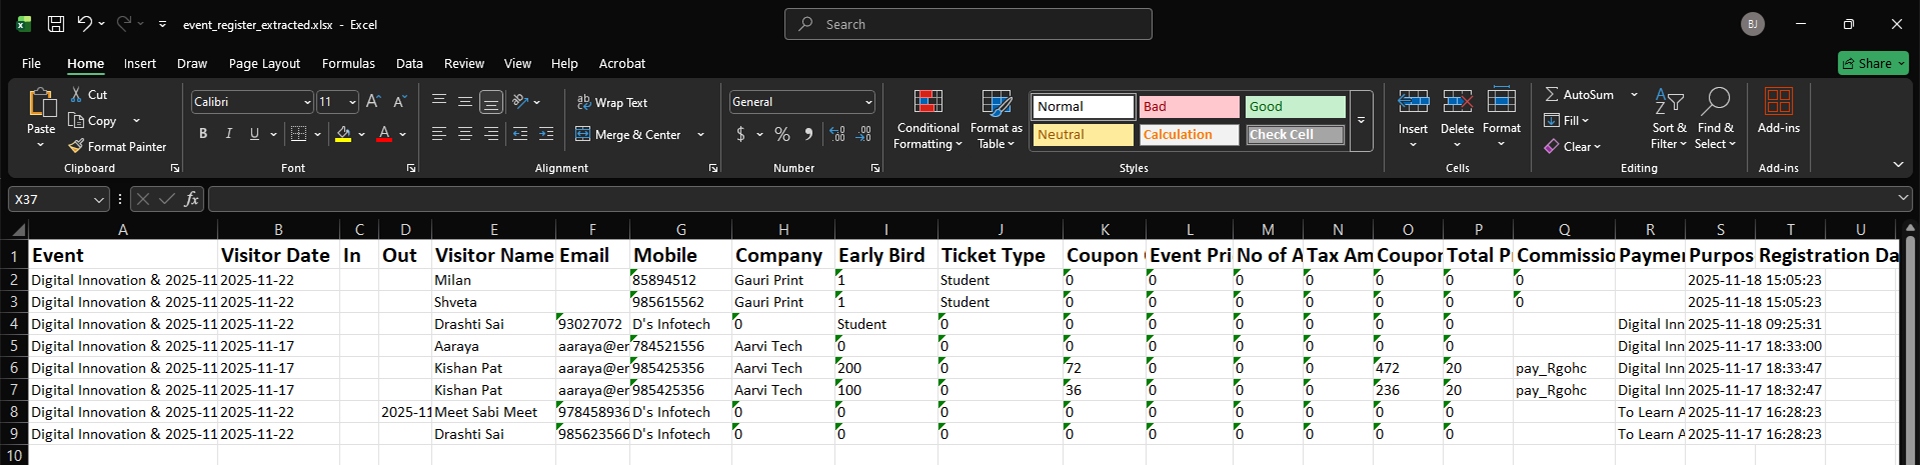
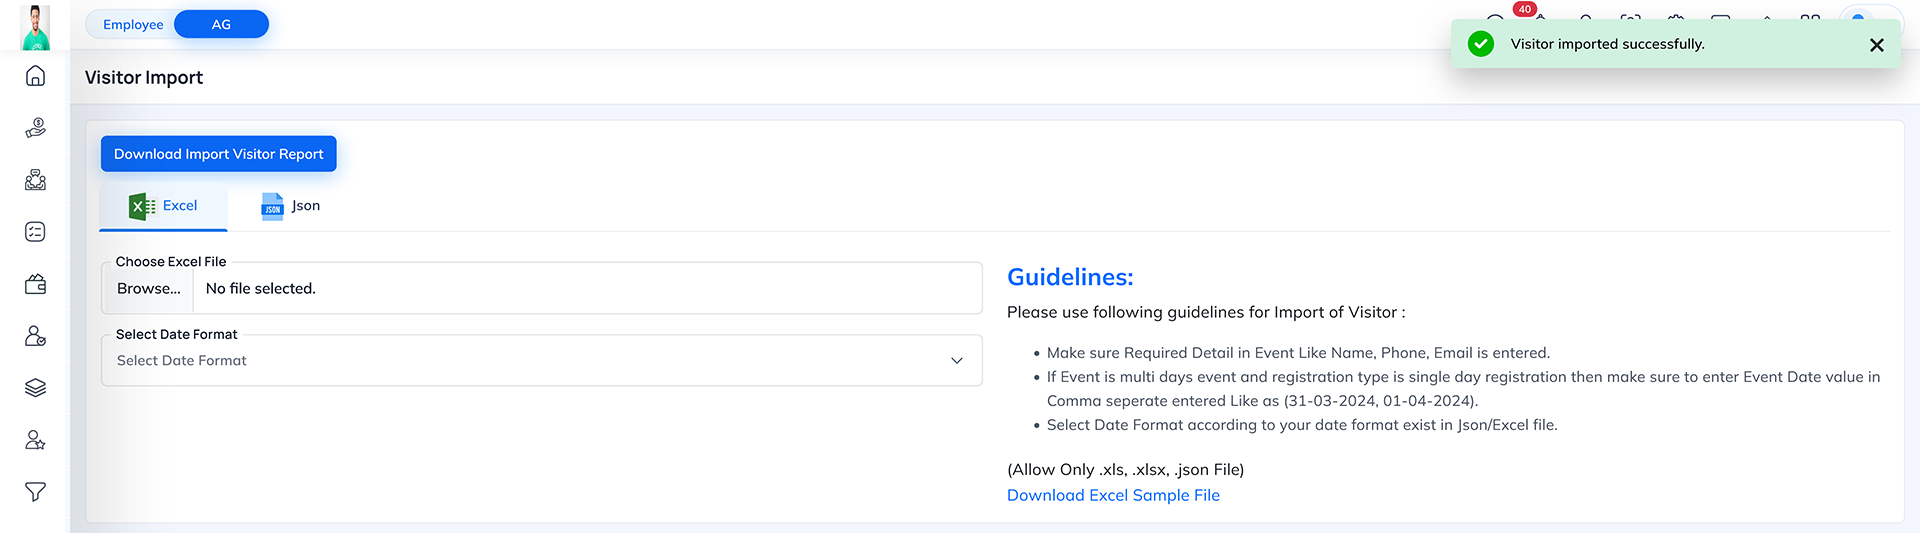
Visitor Import Process
Importing visitors is a multi-step interactive process.
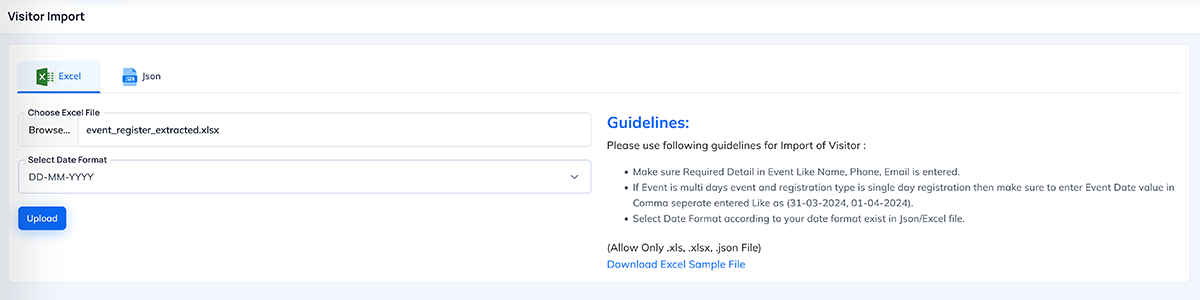
- Step 1: Upload File
- When you click Import:
- Choose file type: Excel or JSON
- Download the Sample File
- This file is dynamic
- It automatically includes:
- Event Type
- Registration Type
- Single Day / Multi Day structure
- Default Fields
- Custom Form Fields (if created in event form builder)
- Fill visitor data into the sample format
- Select the Date Format that matches your file
- Click Upload

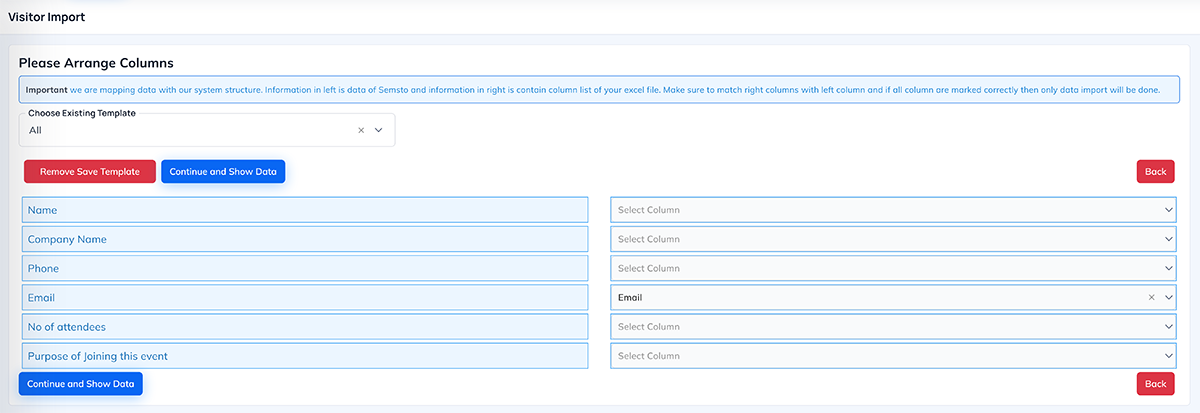
- Step 2: Mapping Columns
- After uploading, the Arrange Columns screen appears.
- Left side ? Semsto system fields
- Right side ? Columns from your uploaded file
- You must match each Semsto column with your Excel/JSON column.
- Features:
- Mandatory fields must be mapped to proceed
- Custom fields appear dynamically
- For multi-day events, additional date columns appear
- Mapping Templates:
- Click Save Template
- Enter Template Name
- The saved template is available in Choose Existing Template
- Selecting it automatically fills all mappings
- You can remove saved templates if not required

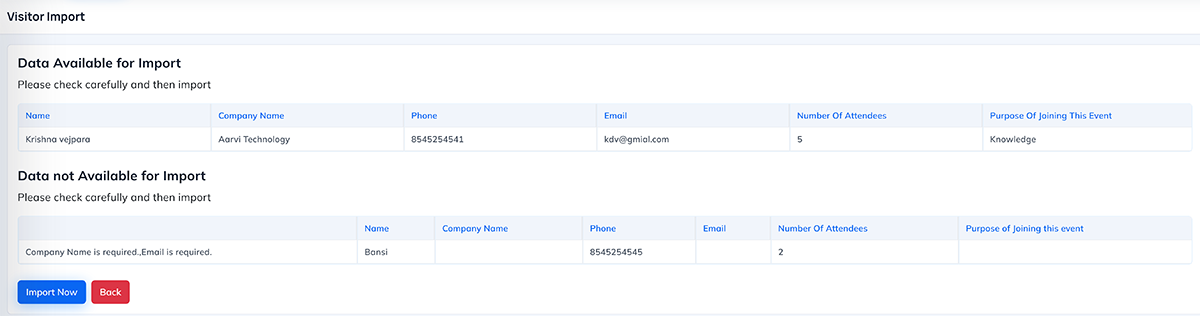
- Step 3: Data Validation
- After column mapping, click Continue and Show Data.
- System shows two tables:
- Valid Data: Rows that are ready for import.
- Invalid Data: Rows that cannot be imported, with clear error messages such as:
- Missing required fields
- Wrong date format
- Incorrect mapping
- Duplicate email or mobile

- Step 4: Import NowOnce everything is correct:
- Click Import Now
- Only valid records are added as Visitor Registrations
- Data instantly appears in the Event Register list
Visitor Status Workflow:
- Pending: New registration, not yet verified or confirmed.
- Waiting: Special status where organizer manually verifies later.
- Verified: Visitor is checked and approved.
- In: Visitor has attended the event (either manually or by QR scan).
- Out: Visitor has left the event.
- Rules:
- Clicking a status may open a popup:
- Waiting ? Pending
- Pending ? In
- Verified ? In
- In ? Out
- Out ? No more changes allowed
- Sub visitors follow parent visitor rules
- Parent visitor cannot be deleted until all sub visitors are deleted

Distribution Kit / Swag Management:
- Distribution Kit Column: Shows status as Not Given / Given.
- Rules:
- Clicking Not Given opens a popup to confirm kit distribution.
- Clicking Given does nothing (cannot revert).
- If swag switch is OFF for the event, the column is hidden.
- "Pending Swag" counter updates automatically.
- Bulk Option:Mark All as Distribution Kit:
- Marks every pending kit as Given.
- Visible only if at least one pending record exists.

Visitor Confirmation Workflow:
- Visitor Confirm Column: Shows status as Pending / Confirmed.
- Rules:
- Pending status can be changed to Confirmed via popup.
- Once Confirmed ? Cannot revert.
- Confirmation is also auto-updated when visitor confirms through WhatsApp attendance link.
Action Icons (Per Visitor):
- The Action column contains multiple icons. Each appears based on visitor status and event rules.
- WhatsApp Attendance Confirmation Icon:
- Used to send attendance confirmation link.
- Visibility Conditions:
- At least one visitor must be registered
- Visitor must have Visitor Confirm = Pending
- Function:
- Opens popup: “Are you sure want to send attendance confirmation in WhatsApp?”
- Yes ? Sends confirmation link
- No ? Cancels
- When visitor confirms:
- Status becomes Confirmed
- Icon disappears
Email Reminder Icon
- Sent individually to the selected visitor.
- Visibility:
- Shown only if Visitor Confirm = Confirmed
- Hidden for Pending visitors
- Features:
- Custom subject
- Editable message
- Dynamic placeholders replaced automatically
- Option to attach file
- Ticket is included automatically

WhatsApp Reminder Icon
- Sends WhatsApp reminder + ticket.
- Visibility: Shown only if Visitor Confirm = Confirmed
- Features:
- Optional attachment
- Sends only to selected visitor

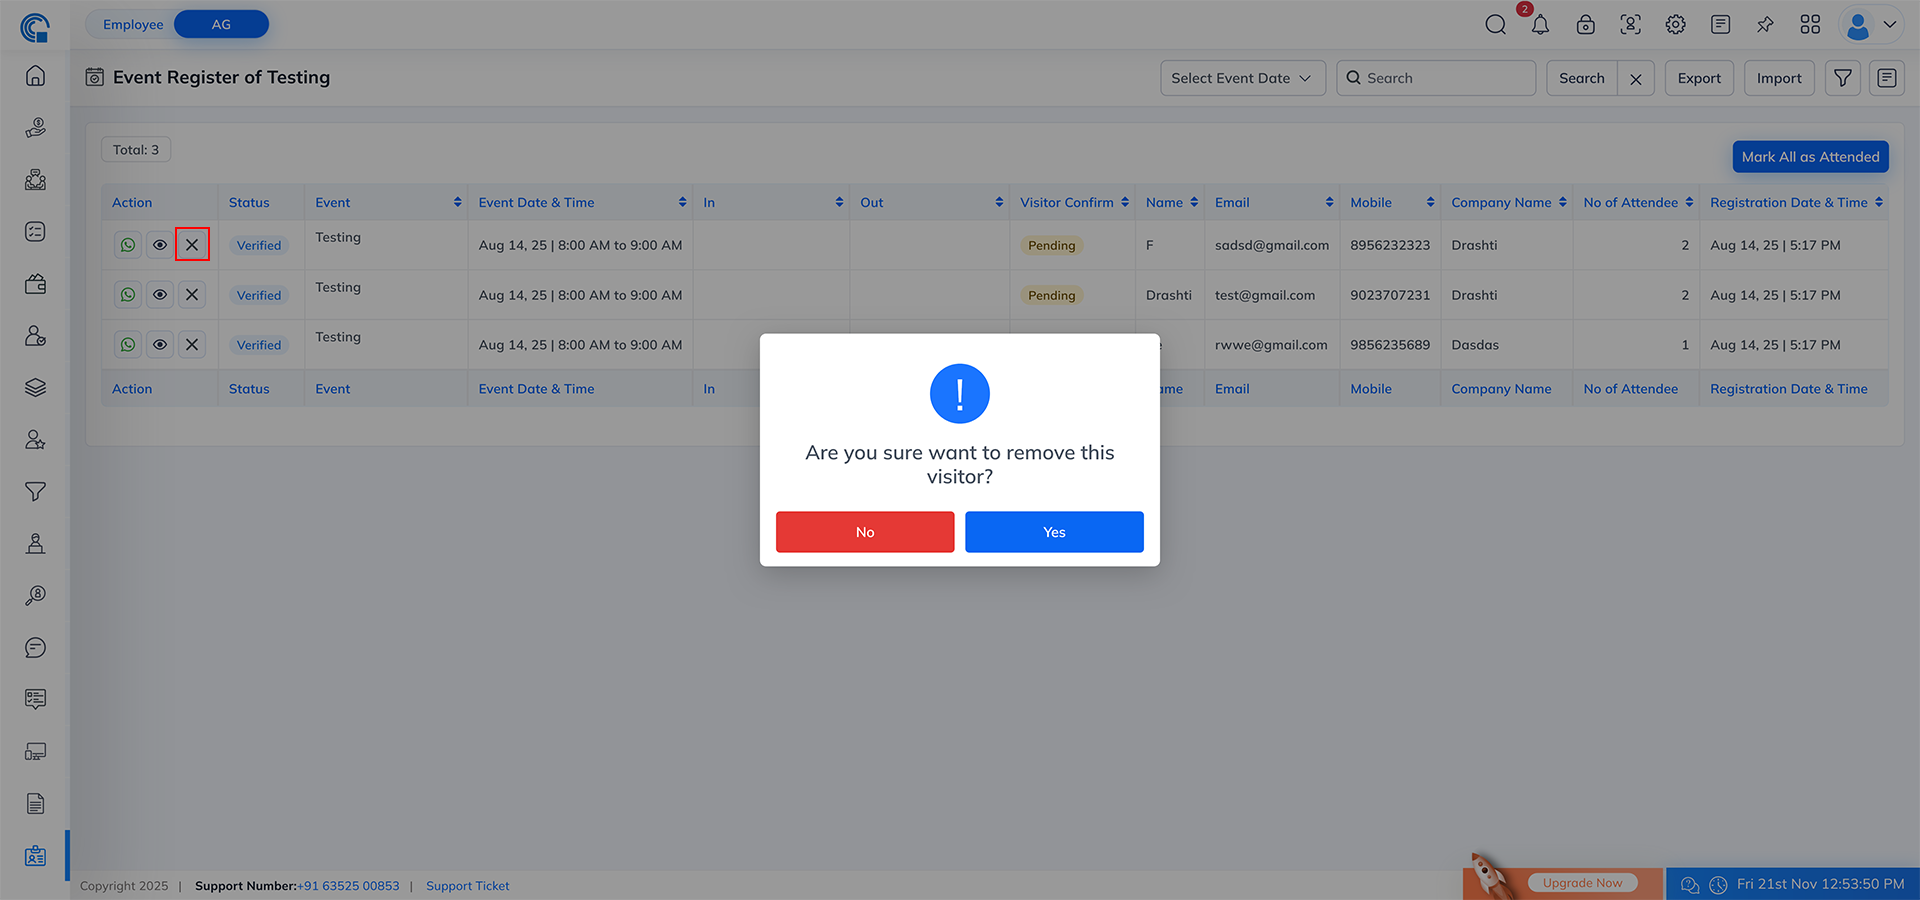
Remove Icon
- Removes visitor registration.
- Rules:
- If parent visitor has sub-visitors ? Delete icon is hidden
- Delete sub-visitors first
- Confirmation popup protects accidental deletion
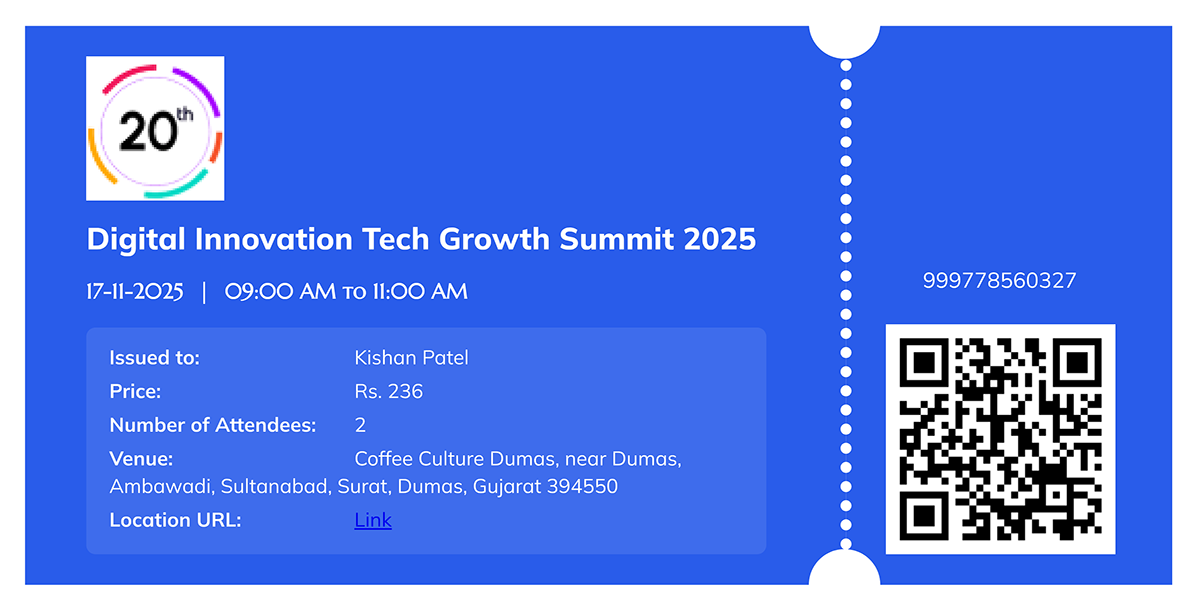
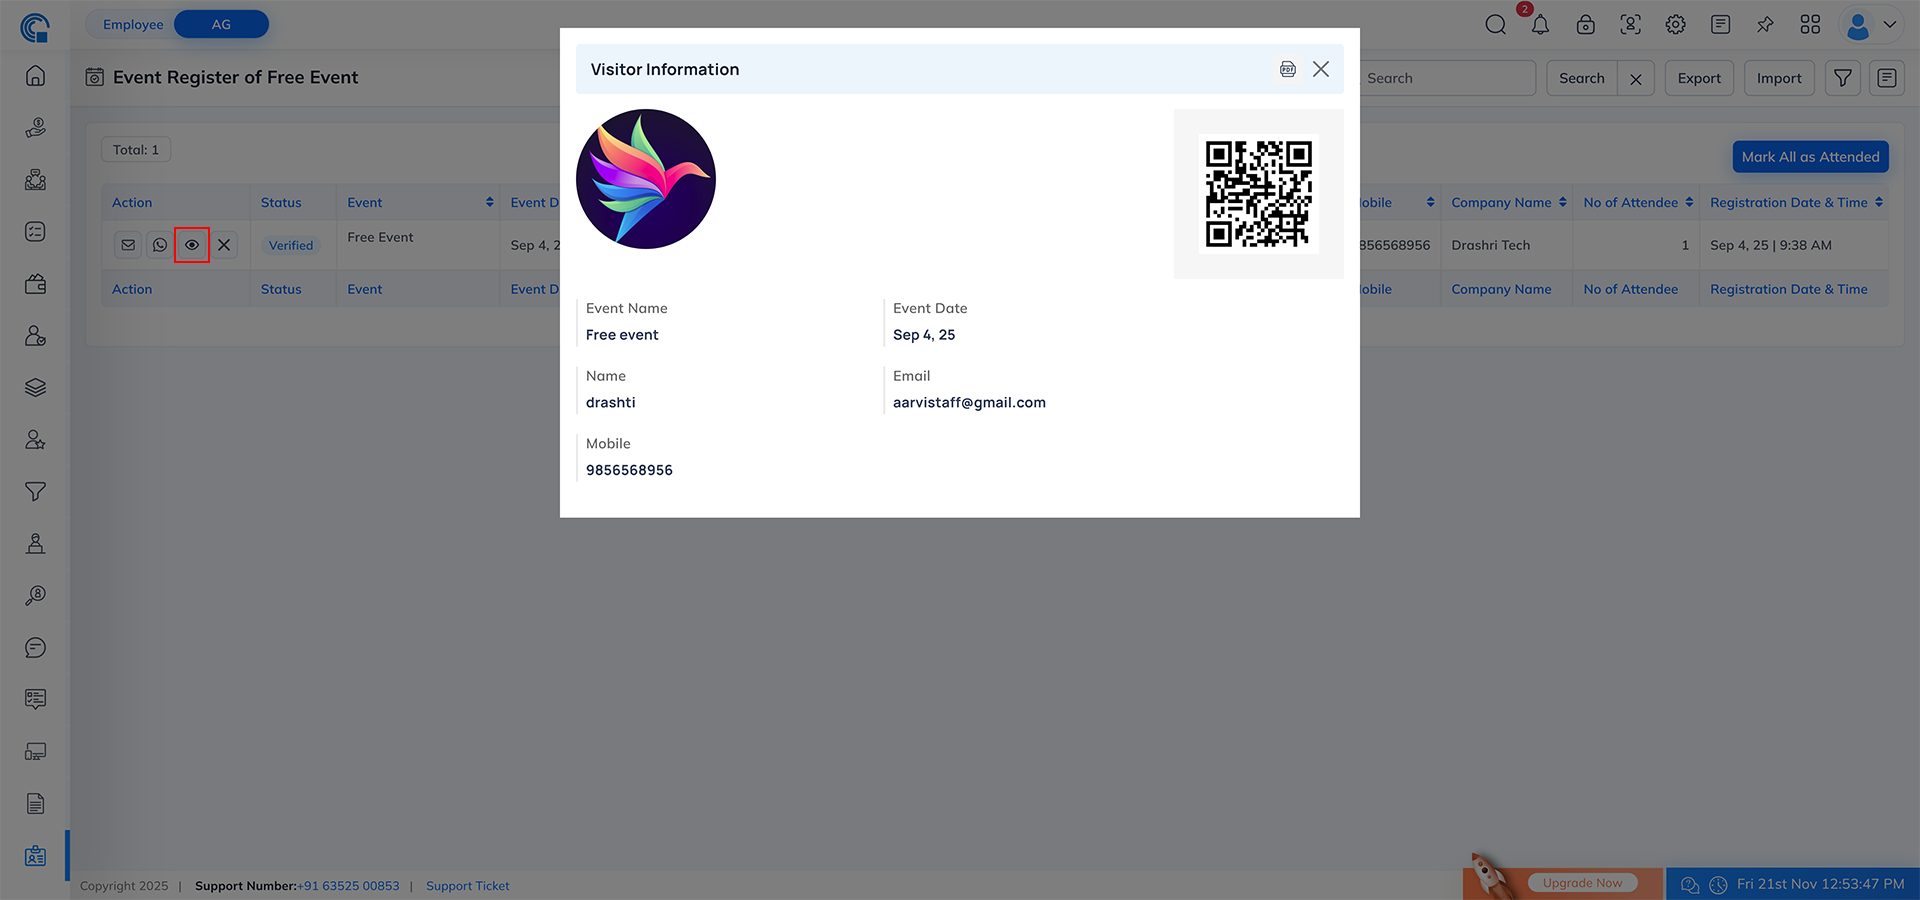
View Visitor Information Icon
- Opens a detailed popup showing:
- Visitor photo, Visitor QR Code, Event details, Visitor personal and company details, Print ticket options
- QR Code Rules:
- Can be scanned only from the Semsto Mobile App
- Web scanning is not supported
- QR Scan Behavior:
- 1st Scan ? IN
- 2nd Scan ? OUT
- Also used for:
- Kit distribution
- Attendance automation
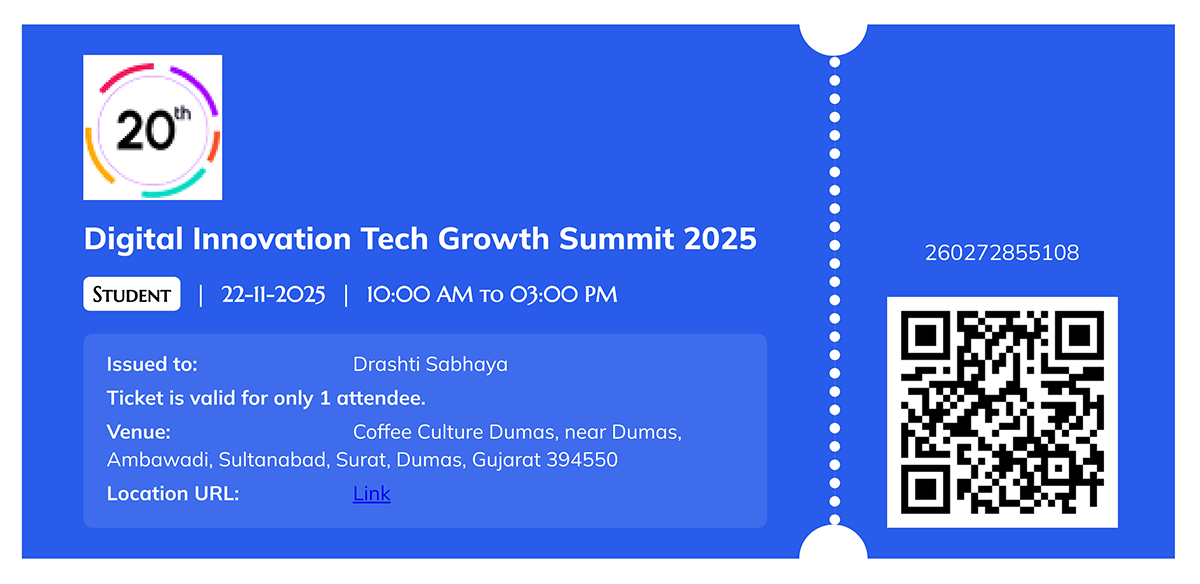
- Download Icon:
- Clicking the download button displays the visitor’s full event details in a clean ticket-style format
- The downloaded ticket includes visitor information, QR code, event name, date, and registration details
- This is useful for sharing tickets with visitors or for offline verification
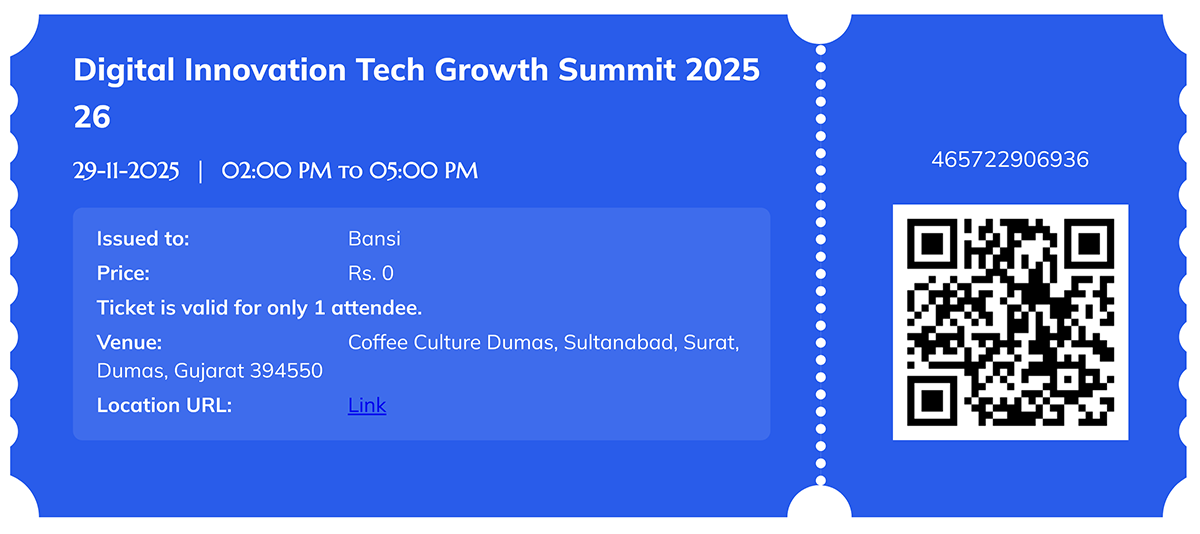
QR Code Usage & Ticket Integration
- Each visitor registration includes a unique QR code.
- QR Code Appears In:
- Visitor Information popup
- Visitor Ticket (PDF or digital ticket)
- Email / WhatsApp reminders
- Purpose:
- Fast check-in/out
- Distribution kit scanning
- Attendance validation
- Restrictions:
- Can only be scanned via Semsto Mobile App
- Not supported on web due to security and hardware limitations
Bulk Features
- Mark All as Distribution Kit:
- One-click kit distribution
- Reduces manual work
- Updates all "Not Given" visitors to "Given"
- Mark All as Attended:
- Marks all visitors as "In"
- Used when manual check-in is not required
- Mark All as Out:
- Marks all “In” visitors as “Out” in one click
- Helps close event attendance quickly at the end of the event
- Visible only when at least one visitor has In status
- Ensures proper event closing and accurate visitor exit records
Paid Event Summary Details
- When an event is marked as a Paid Event, the system automatically enables additional fields, columns and summary values that are required to manage financial transactions. These fields appear only for Paid Events and are not shown for Free Events.
- Top Summary Bar (Visible only for Paid Event):
When the event type is Paid, the system shows a summary section at the top of the page:- Total Fee – Total event fee collected
- Total Tax – Total tax collected
- Coupon Amount – Total discount applied from coupons
- Platform Commission
- Visible only if the Platform Commission switch is ON in Event Settings
- If the switch is OFF ? this box will not appear
Paid Event Specific Columns
When the event is Paid, the following extra columns appear in the list:
- Visitor Confirmation: Always shows Confirmed for every registration. Paid events do not require manual confirmation since payment is already verified.
- Coupon Code:
- This column appears only for Paid Event.
- If the user has applied a coupon:
- Coupon Code will be visible
- Coupon discount amount will reflect in financial totals
- Event Price: The base price of the paid event before tax and discounts.
- Tax Amount: Shows the tax amount applied on the event price.
- Coupon Amount: Shows the discount amount deducted through coupons.
- Total Price: Shows the final payable amount: (Event Price + Tax Amount) – Coupon Amount
- Payment ID: Displays the payment reference ID when payment is successful. If payment failed or not received ? this field will remain blank.
- Platform Commission Column (Conditional):
- If the Platform Commission switch is ON ? A column named Commission will appear, showing the deducted commission amount.
- If the switch is OFF ? The Commission column will not appear.

Other Functionality
- Event Ticket Type Column (Paid Event Only):
- The Event Ticket Type column appears only for Paid Events.
- This column helps identify which ticket category the visitor has selected during registration.
- This is useful when your event has multiple ticket types, such as
- Student, VIP, General, Early Bird, Corporate, Premium If ticket-based pricing or access rules are enabled for the event, each visitor’s ticket selection will be shown here.
- How It Works?
- Admin first creates different Ticket Types inside the Event setup.
- When a visitor registers, they select one of the available ticket types.
- That selected type is displayed in the Event Ticket Type column for every attendee.
- Early Bird Indicator (Paid Event Only):
- The Early Bird label appears only in Paid Events and is used to identify visitors who registered under the Early Bird ticket offer.
- When Early Bird pricing or ticket type is enabled during event creation, any visitor who selects that option will be marked with a green “Early Bird” badge in the Event Register listing.
- How It Works?
- Early Bird Setup in Event Creation: When creating the event, if the admin enables Early Bird pricing or adds Early Bird as a ticket type, the system activates Early Bird tracking.
- Early Bird can include:
- Special discounted price,
- Limited time offer,
- Limited seat category.
- Visitor Registration: If a visitor selects Early Bird during registration, the system identifies them as an Early Bird participant.
- Display in Event Register: In the listing page, a green “Early Bird” badge appears under the Status column for such visitors.
End-to-End Visitor Journey Summary:
- Visitor registers for the event
- Organizer views registration in Event Register
- Organizer sends confirmation link (optional)
- Visitor confirms attendance
- On event day:
- QR code scanned ? IN
- Second scan ? OUT
- Kit scanning updates distribution
- Organizer sends reminders via Email / WhatsApp
- Organizer exports or filters data for reporting
Event Register (Common Listing Layout)::
Overview
- The Event Register menu is available under the Visitor section in the left navigation. When you click this menu, the system opens a common listing layout that displays the details of all visitors who have registered for any event — including both Free Events and Paid Events.
- This view helps the admin monitor event activities, visitor status, financial details, and confirmation status in one single screen.
Top Summary Bar
- Total: Total number of visitor registrations across all events
- Total Fee: Total event fee collected (Paid events only)
- Total Tax: Total tax collected (Paid events only)
- Coupon Amount: Total discount applied through coupons
- Platform Commission: Visible only when commission is enabled for paid events
Search, Filter & Export:
- Search Bar – Search by name, email, mobile, company, or event
- Filters – Advanced filters for event-based and status-based searching
- Export – Export the full filtered list into Excel
Event Register Columns:
- This listing shows all important visitor details in one place so you can easily track event participation.
- It includes visitor information like name, email, mobile, company name, and confirmation status.
- For paid events, extra columns appear such as ticket type, coupon code, event price, tax amount, total price, commission and payment ID.
- In and Out date–time columns help track visitor attendance.
- Overall, these columns provide a complete overview of every visitor registered across all events.
Export Button Example: